
UPI, or Unified Payments Interface, is a real-time digital payment system that allows users to send money, pay bills, and manage accounts through one app. This article explains what UPI is, how it works, and its key features, helping you understand its role in simplifying digital payments.
Table of Contents
What are Instant Payments?
Instant payments allow financial transactions to be processed and settled within seconds using modern payment systems like Real-Time Gross Settlement (RTGS) and Immediate Payment Systems (IPS). Many of these systems operate 24/7, ensuring real-time fund transfers.
As a fast and secure alternative to traditional payment methods, instant payments play a key role in improving customer experience and boosting efficiency in digital finance.
What is Unified Payments Interface (UPI) in Banking?
The full form of UPI is Unified Payments Interface, a real-time payment system developed by the National Payments Corporation of India (NPCI) that facilitates instant money transfers between bank accounts via smartphones. UPI enables users to send and receive money, pay bills, and make online purchases seamlessly through a single mobile app.
UPI eliminates the need to enter detailed bank information for each transaction, simplifying payments through QR codes, virtual payment addresses (VPAs), or UPI-registered mobile numbers.
UPI works by leveraging existing systems, such as Immediate Payment Service (IMPS) and Aadhaar Enabled Payment System (AEPS), to ensure seamless payment settlement between bank accounts.
Related Read: What is UPI Lite? How Does it Work, and its Benefits
Features of Unified Payments Interface (UPI)
- UPI is a fast, real-time system that is available 24*7, 365 days of the year, enabling money transfer and payments within seconds.
- UPI is one of the only payment system that allows you or online merchants to request money by sending a message, requesting payment via the bank, a facility that is not available in old systems like NEFT and IMPS.
- NPCI does not levy any extra charge for making payments or requesting money via UPI. Thus, UPI payments by individuals for peer-to-peer transactions are completely free.
- With no lower limit on the amount of money that can be transferred, UPI has made it easier for brick and mortar stores to accept small payments.
- UPI AutoPay function by NPCI for recurring payments provides you the ease of duly paying your utility bills.
How Unified Payments Interface (UPI) Payment Works in India?
UPI operates on a simple yet effective framework that streamlines digital transactions. Here’s how it works:
Step 1. User Registration
To use UPI, users first download a UPI-enabled app, such as PhonePe, Google Pay, or Paytm. After installation, they register by linking their bank account and creating a unique virtual payment address (VPA), such as user@bankname, which serves as their UPI ID.
Step 2. Initiating a Transaction
When a user wants to make a payment, they can do so by selecting the payee’s VPA (e.g., merchant@bankname), scanning a QR code, or entering their UPI ID. For instance, if a customer wants to pay a local merchant, they can simply scan the merchant’s QR code or enter the merchant’s VPA.
Step 3. Authentication
To authorize the transaction, users must enter their UPI PIN—a secure six-digit code created during registration. This step ensures that only the account holder can approve transactions.
Step 4. Transaction Processing:
Once the UPI PIN is entered, the app sends the payment request to the UPI server. The server verifies the request and processes it by communicating with the user’s bank (the issuer) and the recipient’s bank (the acquirer).
Step 5. Confirmation
After the banks confirm the transaction, the user receives an instant notification regarding the success or failure of the payment. For example, the app might display a message like “Payment of ₹500 to merchant@bankname successful.”
Step 6. Settlement
The UPI system ensures the funds are settled between banks within a short time frame, usually within a few hours, although users see the transaction reflected in their accounts immediately.
This seamless process, facilitated by apps like PhonePe, Google Pay, and Paytm, makes UPI an efficient, secure, and convenient method for digital transactions, contributing to its widespread adoption in India.
Related Read: Bima ASBA by IRDAI: A Game-Changer for UPI Insurance Payments
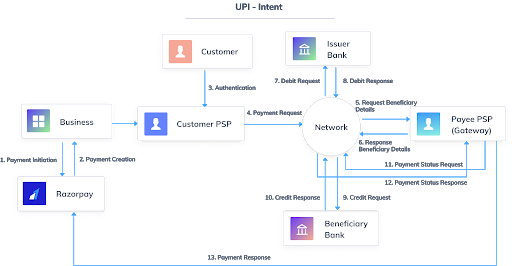
UPI Transaction Flow
The UPI transaction flow outlines the steps involved in processing payments, whether initiated by the sender (push) or requested by the recipient (pull). Understanding this flow helps clarify how seamless and secure transactions occur within the UPI ecosystem.
PUSH: Streamlined Payment Initiation and Authorisation
Push transactions in UPI allow users to initiate payments directly from their accounts to transfer funds to a recipient. This method is commonly used for purchases, bill payments, or sending money to friends and family.
Phase 1: Transaction Initiation and Authorisation
- Initiating the Transaction: Customers use their UPI-enabled apps to enter recipient details, the transaction amount, and any optional notes.
- Routing the Request: The customer’s app forwards the transaction request to their chosen Payment Service Provider (PSP), which acts as an intermediary.
- Verification by NPCI: The PSP routes the request to the National Payments Corporation of India (NPCI), overseeing UPI transactions.
- Bank Verification: The issuing bank (the sender’s bank) verifies the transaction’s authenticity, checks account balance, and confirms customer credentials.
- Authorisation: Upon verification, the issuing bank authorizes the transaction and generates a digital signature for security.
Phase 2: Verification and Fund Transfer
- Detail Sharing: The PSP shares the sender’s bank details with the UPI system for verification and routing.
- Funds Deduction: The NPCI checks account details and fund availability. If sufficient funds are available, the NPCI triggers the deduction from the sender’s account.
- Credit to Recipient: The acquiring bank (receiver’s bank) receives the transaction amount and credits it to the payee’s account.
- Transaction Confirmation: The UPI server sends a response to the customer’s app, confirming the successful transaction and providing a reference ID.
PULL: Controlled Payment Requests and Execution
Pull transactions occur when the recipient initiates a request for funds from the sender. This method is often used for bill payments or collecting payments from customers, ensuring secure fund retrieval.
Phase 1: Transaction Initiation and Payment Message Flow
- Recipient Initiation: The recipient generates a payment request through their UPI-enabled app.
- Payment Request Flow: The request is sent to the NPCI, indicating the intention to pull funds from the payer.
Phase 2: Transaction Flow between Banks
- Routing the Request: The payment request reaches the creditor’s bank, which forwards it to the debtor’s bank via the NPCI.
- Verification by Debtor’s Bank: The debtor’s bank verifies the request, checks the customer’s account details, and available balance.
- Transaction Approval: If funds are sufficient, the debtor’s bank approves the transaction and confirms it with the NPCI.
- Completing the Transaction: The debtor’s bank transfers the requested amount to the creditor’s bank, completing the transaction.

Participants in UPI
To understand how UPI transactions work, it’s essential to recognize the key participants involved:
1. Payer App/Payment Service Provider (PSP)
The journey begins with the payer app, such as Google Pay, PhonePe, or Paytm. Users initiate transactions by entering the recipient’s details and transaction amount.
List of major UPI apps and their respective sponsor banks:
| UPI App/PSPs | Sponsor Banks | Handles |
| Google Pay | Axis | @okaxis |
| ICICI | @okicici | |
| HDFC | @okhdfcbank | |
| SBI | @oksbi | |
| Phonepe | Yes | @ybl |
| ICICI | @ibl | |
| Axis | @axl | |
| Amazon Pay | Axis | @apl |
| WhatsApp Payments | ICICI Bank | @okicici |
| Airtel Payments Bank | Kotak Mahindra Bank | @Kotak |
| Paytm | ICICI Bank | @okicici |
| BHIM (Bharat Interface for Money) | National Payments Corporation of India (NPCI) | @upi |
Related Read: How to Change UPI ID in Google Pay?
2. National Payments Corporation of India (NPCI)
The NPCI governs UPI, ensuring uniformity and security across transactions. It validates the transaction details and routes requests between banks and PSPs.
3. Issuing Bank
The sender’s bank verifies the transaction request, checking the sender’s credentials and account balance. It authorizes the transaction before proceeding.
4. Acquiring Bank
The receiver’s bank processes the transaction and credits the payee’s account with the funds once the transaction is confirmed.
5. Payee PSP
The payee’s app receives confirmation of the funds and notifies the payee, ensuring transparency and swift reconciliation.
UPI Security and Data Protection Measures
Interbank Transfers
When a user initiates an online payment or fund transfer through a UPI-enabled application, the transaction is processed in real-time, ensuring that the funds are instantly debited from the sender’s account and credited to the recipient’s account.
Two-factor authentication (2FA)
UPI incorporates a robust Two-Factor Authentication (2FA) mechanism to ensure the security of transactions. Users are required to enter their unique Mobile Personal Identification Number (MPIN) to validate the transaction. Additionally, UPI leverages biometric authentication, utilising features like fingerprint or iris recognition, further enhancing the security of the payment process by reducing the risk of unauthorised access and fraudulent activities.
Exemplary Data Protection Measures
Since its inception in 2016, UPI has employed advanced encryption protocols to safeguard sensitive information, ensuring that data remains confidential and uncompromised during transmission.
Leveraging Existing Payment Systems
UPI relies on the existing National Electronic Funds Transfer (NEFT), Real-Time Gross Settlement (RTGS), and Immediate Payment Service (IMPS) systems for settlements. These established digital payment systems serve as the backbone for UPI, facilitating the seamless transfer of funds between banks and ensuring secure and timely transactions.
Related Read: NEFT vs UPI: What’s the Difference?
Versatility with Over-the-Counter and Barcode Payments
UPI’s versatility extends beyond peer-to-peer transfers. It can be used for over-the-counter (OTC) payments, allowing users to make quick transactions at physical stores by scanning QR codes or entering Virtual Payment Address (VPA). Additionally, UPI simplifies day-to-day bill payments such as utilities and mobile recharges, offering a one-stop solution for a wide range of financial transactions.
UPI Transaction Limit and Charges in India
UPI Transaction Limits (more detailed)
Standard limits (most users)
• Per transaction: Commonly up to ₹1 lakh per transfer (your bank/app may set a lower cap).
• Per day: Many banks/apps allow up to ₹1 lakh per day for regular transfers, and some also cap usage at around 20 transactions per day.
• Why limits differ: Your exact limit can change based on your bank, account type, UPI app, risk checks, and whether you’re a new user (newly linked accounts sometimes have tighter caps initially).
Higher limits for specific payments
• Certain categories like healthcare and education can allow higher per-transaction limits (up to ₹5 lakh) where supported by the merchant category and your bank/app.
Special UPI modes (separate caps)
• UPI 123PAY (feature phone UPI): Usually has a lower per-transaction limit compared to standard UPI.
• UPI AutoPay (recurring payments): Limits depend on the mandate type and your bank/app settings. Many recurring use cases are designed for small-to-mid value payments, but some mandates can go higher depending on rules and approvals.
Charges (what users and merchants actually pay)
For users
• UPI is generally free for customers for bank-to-bank transfers and most merchant payments.
• In most cases, you won’t see any extra “UPI fee” added while paying.
For merchants and certain wallet flows
• Some wallet-based UPI merchant payments can involve interchange charges in the backend (these are typically not charged directly to customers).
• Banks or providers may apply small service fees for specific cases like certain business services, value-added features, or special payment products, depending on their policies.
Problems UPI solves and eliminates
UPI effectively addresses several issues that were prevalent in the pre-digital payment era, such as:
- It eliminates the need for carrying physical cash, reducing the risk of theft or loss.
- It minimises the hassles associated with writing and depositing cheques.
- It does away with the time-consuming process of visiting banks or ATMs for transactions.
Related Read: UPI ATM Cash Withdrawal: How to Withdraw Money Using UPI ATM?
How to Start Using Unified Payments Interface (UPI) Payments in India?
To ensure seamless digital transactions using UPI, a few fundamental prerequisites need to be in place:
- Ensure you have a smartphone with a reliable operating system that can support UPI-enabled applications.
- You must have an active bank account with a bank that offers UPI services.
- Make sure your mobile number is linked to your bank account for verification purposes.
- A stable internet connection is essential to use UPI services effectively.
Step 1: Choose a UPI-Enabled App
Select a UPI-enabled application from your smartphone’s app store. Popular choices include apps provided by your bank or third-party payment platforms.
Step 2: Registration and Verification
- Download and install the chosen UPI app.
- Open the app and select the option to register.
- Enter your mobile number linked to your bank account. The app will send an OTP for verification.
- After verifying the OTP, you’ll need to set a 4-6 digit UPI PIN. This PIN will be required for every transaction to ensure security.
Step 3: Create a Virtual Payment Address (VPA)
- Within the app, navigate to the UPI settings or profile section.
- Look for the option to create a new Virtual Payment Address (VPA). You can typically customise your VPA with a username that’s easy to remember (e.g., yourname@bankname).
- Link the desired bank account to this VPA. You can link multiple bank accounts if needed.
Step 4: Initiate UPI Transactions
- To send money, select the option to send funds and enter the recipient’s VPA or mobile number. Verify the recipient’s details.
- Enter the amount you wish to send and add an optional note if required.
- Confirm the transaction using your UPI PIN.
Step 5: Receiving UPI Payments
- To receive money, simply provide your VPA to the sender.
- Once the sender initiates the transaction, you’ll receive a notification.
- The funds will be instantly credited to your linked bank account.
Step 6: Additional UPI Services
Apart from basic transfers, UPI offers various services like bill payments, recharges, and more. Explore the app to make the most of these functionalities.
Benefits of UPI for Merchants
-
Faster Settlements
One of the standout benefits of UPI for merchants is the speed at which settlements occur. Unlike traditional payment methods that might involve waiting, UPI ensures swift transfers, often within seconds. This rapid settlement mechanism aids in maintaining healthy cash flow, enabling merchants to have access to funds promptly.
-
Enhanced Security
In the digital age, security is paramount, and UPI rises to the occasion. With its multi-layered security protocols, including 2FA and biometric verification, UPI ensures that every transaction is safeguarded against unauthorised access.
-
Improved Customer Satisfaction
UPI not only benefits merchants directly but also enhances the overall customer experience. Customers appreciate the convenience and speed that UPI offers, leading to increased satisfaction and the likelihood of repeat business.
-
Ease of Integration
For developers and tech-savvy merchants, UPI offers a streamlined integration process. Many payment gateways and platforms provide APIs that enable easy integration of UPI services into online stores and applications.
-
Access to Digital Transactions
As digital payments gain prominence, offering UPI as a payment option ensures that merchants stay relevant and accessible to a wider customer base. Embracing UPI opens doors to tap into the tech-savvy consumer segment, capturing opportunities that might be missed with traditional payment methods.
-
Reduced Transaction Costs
UPI transactions typically have lower fees compared to traditional payment methods or card-based payments. This reduction in transaction costs makes it a cost-effective choice for receiving payments, boosting the overall financial health of merchants.
More than 50% of transactions on Razorpay are through the UPI payment method and it has become somewhat of a default payment mode for most of the people in India. The UPI is perhaps the fastest product to hit 2 billion transactions-a-month in 2020 since its inception in August 2016.
Benefits of UPI for Customers
Have a look at the following benefits of UPI that can enable you to provide superior services and experiences to your customers.
-
Ease of Use
One of the standout advantages of UPI for customers is its user-friendly interface. UPI eliminates the need for intricate bank account details during transactions. With a VPA, customers can link their bank accounts and make payments using a simple identifier, often their email-like username.
-
Security Reinforced
Customers prioritise security when engaging in digital transactions, and UPI system design caters to this need effectively. The incorporation of 2FA and biometric verification adds an extra layer of security to transactions.
-
Accessibility Redefined
UPI has redefined financial accessibility by bridging gaps between traditional banking and technology. Customers, irrespective of their geographical location, can access UPI-enabled services with a smartphone and an internet connection.
-
Payment Versatility
The adaptability of UPI to various payment scenarios is a major boon for customers. Whether it’s splitting bills with friends, paying for utilities, shopping online, or making in-store purchases through QR codes, UPI caters to a wide spectrum of payment needs.
-
Simplified Record-Keeping
Customers often find it challenging to keep track of their expenses. UPI addresses this concern by providing users with a transaction history that captures every payment made through the platform.
Are Unified Payments Interface (UPI) Transactions Safe?
UPI transactions are backed by robust safety protocols and stringent regulatory measures established by the RBI, making it a safe choice for business owners, merchants, and customers.
Related Read: Is UPI Safe for Online Payment?
-
Multi-Layered Encryption
UPI transactions are protected by advanced encryption protocols such as TLS (Transport Layer Security), AES (Advanced Encryption Standard), and PKI (Public Key Infrastructure), ensuring that sensitive information including user credentials and transaction data remains confidential during transmission.
-
Virtual Payment Address
The VPA acts as a unique identifier for UPI transactions, eliminating the need to share sensitive bank account details. This reduces the risk of information exposure and unauthorised access to the user’s bank account.
-
Device Binding
UPI-enabled applications are often bound to specific devices. This measure prevents unauthorised access to a user’s UPI account from different devices, adding an extra layer of security.
-
Transaction Limits
UPI transactions often have predefined transaction limits set by the user’s bank. These limits restrict the amount that can be transacted in a single transaction or within a specified timeframe, minimising the impact of potential fraudulent activities.
-
Regulatory Measures by RBI
The RBI mandates strong authentication methods for UPI transactions, such as 2FA and biometric verification. It has also established a dispute resolution framework that empowers customers to raise complaints and seek resolution for unauthorised transactions or discrepancies. Additionally, RBI encourages banks and payment service providers to educate customers about safe UPI practices
How is UPI Different from IMPS?
UPI (Unified Payments Interface) and IMPS (Immediate Payment Service) both facilitate instant money transfers but differ in functionality and user experience:
- UPI: Provides a user-friendly interface, enabling transactions through mobile apps using QR codes and Virtual Payment Addresses (VPAs). It supports higher transaction limits and employs two-factor authentication for enhanced security.
- IMPS: Requires detailed bank information, including the recipient’s bank account number and IFSC code for each transaction. While it also facilitates instant interbank transfers, IMPS typically has lower transaction limits compared to UPI.
Why is Razorpay the Preferred Payment Gateway for UPI Payments?
First Payment Aggregator to Launch UPI Payments in 2016
Razorpay made history by becoming the first payment aggregator to introduce UPI payments through its platform in 2016. We were also the first payment aggregator to launch UPI AutoPay and UPI 2.0 features. Our close partnership with NPCI gives us an extra edge to stay one step ahead of our competitors. Interestingly, Razorpay is also the market leader in P2M (person to merchant) UPI payments in India.
Multi bank model approach
Razorpay closely works with multiple banks and payment technology service providers to solve the exact customer requirement. In the case of UPI payments, we work with 6 different banks and route transactions based on our Smart Routing solution. This helps businesses to keep getting best in class success rate, even if there is downtime on one bank or the other.
Reconciliation and Refunds
Razorpay’s commitment to customer satisfaction is further underscored by its efficient reconciliation and refund processes. Reconciliation, a critical aspect of financial operations, is streamlined through Razorpay’s advanced technology, minimising discrepancies and simplifying accounting processes for businesses.
Razorpay Dashboard provides different types of reports to help you with reconciliations. Thus, even if we are using multiple banking partners to process your online payments, you don’t have to worry much about the reconciliation. The best in class Reconciliation system, along with our ‘Instant Refund’ product makes Razorpay the preferred UPI payment partner in India.
Developer-Friendly APIs
In the rapidly evolving world of UPI transactions, developer-friendly APIs play a pivotal role, and Razorpay excels in this arena. Razorpay’s well-documented and intuitive APIs reduce the complexities associated with UPI integration. This approach encourages innovation, allowing developers to create innovative solutions that enhance the UPI ecosystem.
What is UPI 2.0?
UPI 2.0 represents the latest iteration of this revolutionary payment system, bringing with it a host of enhancements and new features. Understanding UPI 2.0 is crucial as it opens up new possibilities and capabilities within the realm of digital transactions. UPI 2.0 builds upon the foundation laid by its predecessor, UPI 1.0, to further simplify and enrich the digital payment experience.
Features of UPI 2.0
-
Overdraft Facility
UPI 2.0 introduces an overdraft facility, allowing users to link their overdraft accounts to their UPI handles. This empowers users to perform transactions even when their account balance is insufficient, ensuring uninterrupted services.
-
One-Time Mandate
UPI 2.0 enables users to create one-time mandates for pre-authorised transactions. This feature is particularly beneficial for businesses that offer subscription-based services or have recurring payment requirements, providing a hassle-free way to initiate transactions without repetitive authorisation.
-
Sending invoices on the go
Businesses can now send invoices along with payment requests through UPI 2.0. This feature streamlines the payment process for customers, as they receive detailed invoices directly in their UPI apps, simplifying payment validation and reconciliation.
-
Signed Intent and QR
UPI 2.0 enhances security by introducing signed QR codes. These QR codes carry digitally signed information, ensuring the authenticity of the merchant and preventing potential QR code tampering.
-
Linking of Multiple Accounts
UPI 2.0 allows users to link multiple bank accounts to a single UPI handle. This feature offers added flexibility and convenience, enabling users to choose from different accounts when making transactions.
-
Biometric Authentication
UPI 2.0 incorporates biometric authentication, leveraging fingerprint and iris scans for secure transaction authorisation. This advanced authentication method adds an extra layer of security to UPI transactions.
-
Enhanced Transaction Limits
UPI 2.0 raises transaction limits for certain types of payments, such as peer-to-peer and peer-to-merchant transactions. This facilitates larger transactions, catering to businesses and individuals with higher payment requirements.
-
Bill Sharing
UPI 2.0 introduces bill-sharing options, enabling users to split bills and expenses seamlessly. This feature simplifies group payments, making it easier to settle shared expenses among friends, family, or colleagues.
Related Read: Digital Rupee vs UPI: Understanding the Key Differences
Key Takeaways
UPI stands as a transformative force in the world of digital transactions. Its ingenious design, seamless integration, and user-friendly features have reshaped financial transactions. UPI’s real-time capabilities, robust security measures, and interoperability have not only simplified transactions but have also accelerated the adoption of digital payments.
As UPI continues to evolve with enhancements like UPI 2.0, its significance in modernising financial interactions and promoting a cashless economy remains indisputable. It has ushered in a digitally empowered financial world with a strong focus on inclusivity. Significantly, Razorpay has earned a distinct status as the preferred payment gateway for UPI payments.
Related Read: MPIN vs UPI PIN: What’s the Difference?
Related Read: What are Payment Banks? Features & List of Payments Banks
Explore Razorpay’s Payment Solutions
Frequently Asked Questions (FAQs)
1. What is UPI PIN?
A UPI PIN is a unique 4 to 6-digit Personal Identification Number that serves as a secure authentication code for UPI transactions. It ensures that only the authorised user can initiate and confirm transactions through their UPI-enabled app, adding an extra layer of security to the process.
2. How to set my UPI PIN?
Follow these steps to set your UPI PIN:
- Open your UPI-enabled app and go to the UPI PIN section.
- Enter the last six digits of your debit card and its expiry date.
- You will receive an OTP for verification. Enter the OTP.
- Set your desired UPI PIN.
- Confirm the UPI PIN and it will be set for your account.
3. What will happen if I forget my UPI PIN?
If you forget your UPI PIN, you can reset it using the app’s “Forgot UPI PIN” option. This usually involves verifying your identity through methods like answering security questions or receiving an OTP on your registered mobile number. It’s important to follow the app’s instructions for a secure PIN reset process.
4. Is it possible to pay merchants through UPI?
UPI allows seamless payments to merchants. You can make payments by scanning the UPI QR code or entering the VPA. This method simplifies transactions for both customers and merchants, fostering efficient and secure digital payments.
5. How to find your UPI ID?
To find your UPI ID, open your UPI-enabled app and navigate to the profile or settings section. Your UPI ID will typically be displayed along with your linked bank accounts.
6. What is the difference between BHIM and UPI?
BHIM (Bharat Interface for Money) is a mobile application developed by NPCI for UPI transactions. UPI is the underlying framework that facilitates real-time money transfers, while BHIM is one of the platforms through which users can access UPI services.
7. Is KYC required for UPI money transfer?
Yes, KYC (Know Your Customer) is required to use UPI services. Users must complete KYC by providing identity and address proof to their bank to enable UPI transactions.
8. How to generate a UPI PIN?
To generate a UPI PIN, open your UPI-enabled app, select your bank account, and choose the option to set or change your UPI PIN. You will be prompted to enter your debit card details and a new PIN, which must be a 4 to 6-digit number.
9. What countries accept UPI?
UPI (Unified Payments Interface) is primarily used in India but has expanded internationally. Here’s a list of countries that accept UPI payments as per NPCI: Bhutan, France, Mauritius, Nepal, Singapore, Sri Lanka, and UAE.
