

Paying GST is an essential obligation for businesses and professionals in India. To simplify this process, the government provides both online and offline methods for making GST payments, ensuring flexibility for taxpayers.
In this article, we’ll explore the step-by-step process for making GST payments through both methods, discuss the benefits of each option, and highlight key points to ensure compliance.
Table of Contents
What Is GST Payment?
GST payment refers to the tax businesses and individuals are required to pay to the government under the Goods and Services Tax regime. This payment is calculated based on the applicable rates for the goods or services provided, after subtracting Input Tax Credit (ITC). Businesses collect GST from their customers on behalf of the government and then remit it to the tax authorities.
Filing GST returns is mandatory, detailing sales, purchases, and tax payments. To assist with calculations, taxpayers can utilize tools like the GST Calculator and GST number search tools.
GST Payment Processes for Different Taxpayers
Different taxpayer categories must follow specific steps to pay GST, as outlined below:
Regular Taxpayers
Regular taxpayers need to generate a PMT-06 challan to deposit payments into the cash ledger, especially when filing GSTR-3B. The challan can be generated before, after, or during the return filing process.
Quarterly Taxpayers (QRMP Scheme)
For QRMP taxpayers, GST must be paid using the PMT-06 challan for the first two months of the quarter, with the GSTR-3B return filed in the last month. Payments for the first two months must be made by the 25th of the succeeding month (e.g., April and May for the April-June quarter).
Nil GST Return Taxpayers
If a taxpayer has no sales, purchases, or taxes due in a month or quarter, no GST payment or challan generation is required.
Composition Scheme Taxpayers
These taxpayers summarize their quarterly turnover and generate the CMP-08 challan for payment. For example, tax for the April-June quarter must be paid by 18th June.
What Are the Modes of GST Payment?
Making GST payments can be done through various methods, providing taxpayers with flexibility and convenience. Here’s a concise overview of the available options:
1. Online Payment via GST Portal
- Log In: Access the official GST portal with your credentials.
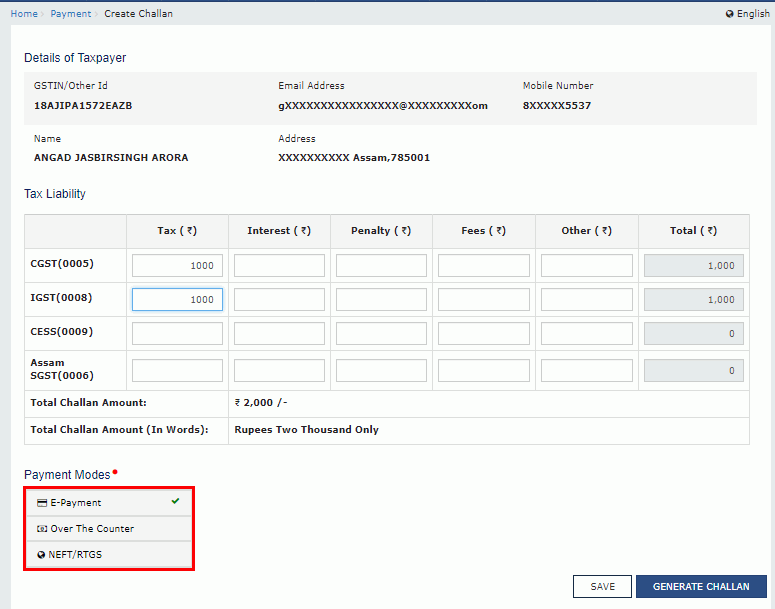
- Create Challan: Navigate to the ‘Services’ section, select ‘Payments,’ and then ‘Create Challan.’
- Select Tax Head: Choose the appropriate tax heads and input the payment amount.
- Choose Payment Mode: Options include Net Banking, Credit/Debit Card, or NEFT/RTGS.
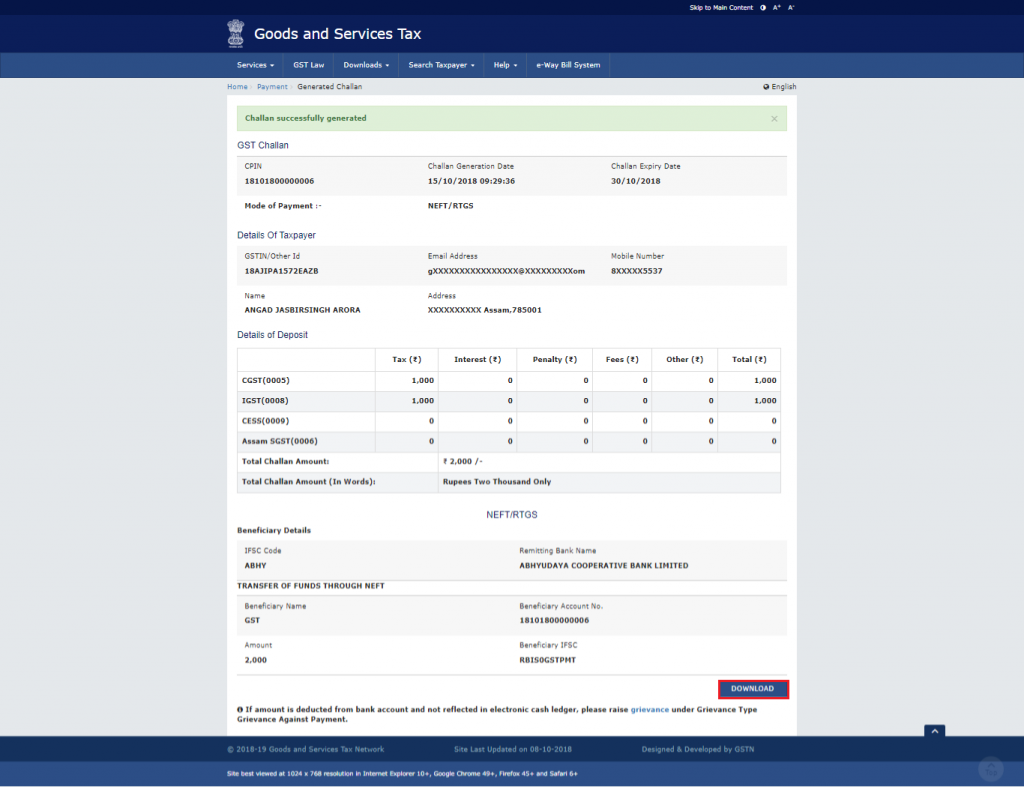
- Complete Payment: Finalize the transaction and save the Challan Reference Number (CRN) for your records.
Notes:
- Online payments update your electronic cash ledger immediately.
- Ensure you complete payment immediately if generating the challan without logging in.
- For NEFT/RTGS transfers, you’ll need to generate a Unique Transaction Reference (UTR) number from your bank, this must be linked to your payment during the submission process to ensure seamless reconciliation.
2. Bank Payment
- Generate Challan: Create your challan on the GST portal.
- Visit a Bank: Go to an authorized bank branch with your challan.
- Payment Methods: Make the payment using cash, cheque, or demand draft.
- Confirmation Receipt: Ensure you receive a confirmation receipt from the bank for your records.
3. Over-the-Counter (OTC) Payment
- Eligibility: This option is available for payments up to ₹10,000.
- Generate Challan: Create the challan online and bring it to the nearest authorized bank branch.
- Make Payment: Pay using cash, cheque, or demand draft, and collect the receipt.
4. Unified Payments Interface (UPI)
- Select UPI: Choose UPI as your payment method on the GST portal.
- Complete Transaction: Use a UPI-enabled app to finalize the payment.
- Record Details: Save transaction details for future reference.
Related Read: GST on UPI Payments
Key Tips for GST Payments
- Check Payment Limits: Be aware of transaction limits, especially with OTC payments.
- Save Receipts: Always save your payment confirmations for accounting and compliance purposes.
- Monitor Deadlines: Keep track of due dates to avoid late fees and penalties.
How to generate a GST challan on the GST portal?
Generating a GST challan on the GST portal is a straightforward process and can be done either before or after logging in to your GSTIN account.
Generating a GST Challan Before Logging In
- Visit the GST Portal: Go to the official GST portal at gst.gov.in.
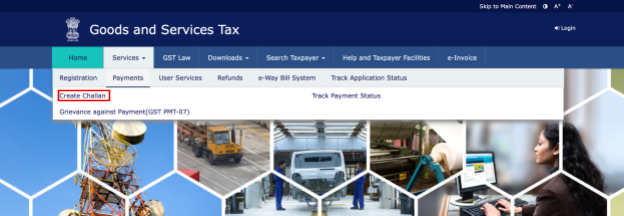
- Navigate to Challan: On the homepage, click on ‘Services’ > ‘Payments’ > ‘Create Challan’.
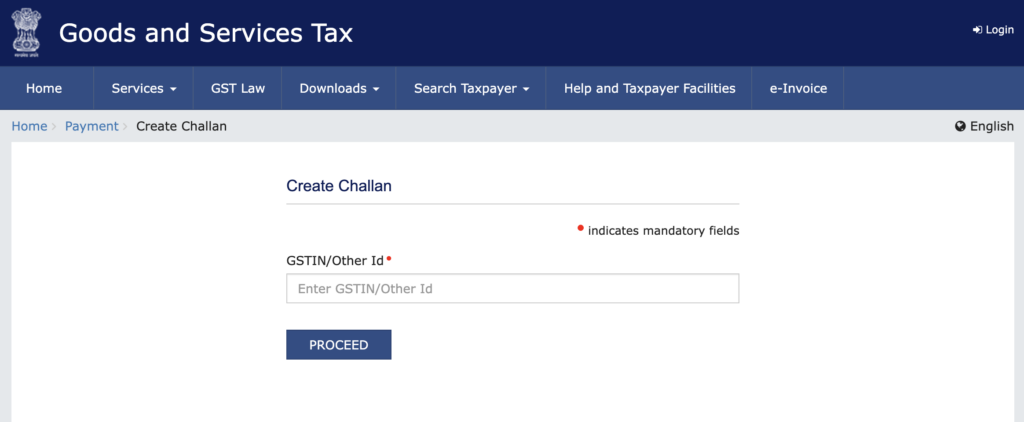
- Enter GSTIN or Other ID: Input your GSTIN, temporary ID, or other identification details.
Generating a GST Challan After Logging In
- Log In to the GST Portal: Use your credentials to log in to your GSTIN account on the GST portal.
- Go to Create Challan: Click on ‘Services’ > ‘Payments’ > ‘Create Challan’.
How to Make GST Payment Online?
1. Visit the official GST portal
Go to the official GST portal at https://www.gst.gov.in/.
2. Navigate to the “Payments” section
Navigate to the ‘Services’ tab and select ‘Payments’ from the drop-down menu.
 3. Click on “Create Challan”
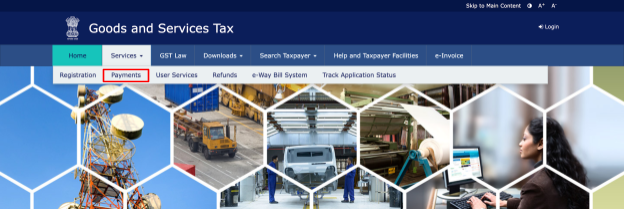 3. Click on “Create Challan”
Under the ‘Payments’ section, click on the ‘Create Challan’ option.
4. Enter GSTIN Number
Once you clicked on create challan, This will prompt you to enter the GSTIN number. Once you have entered the Id, click to proceed.
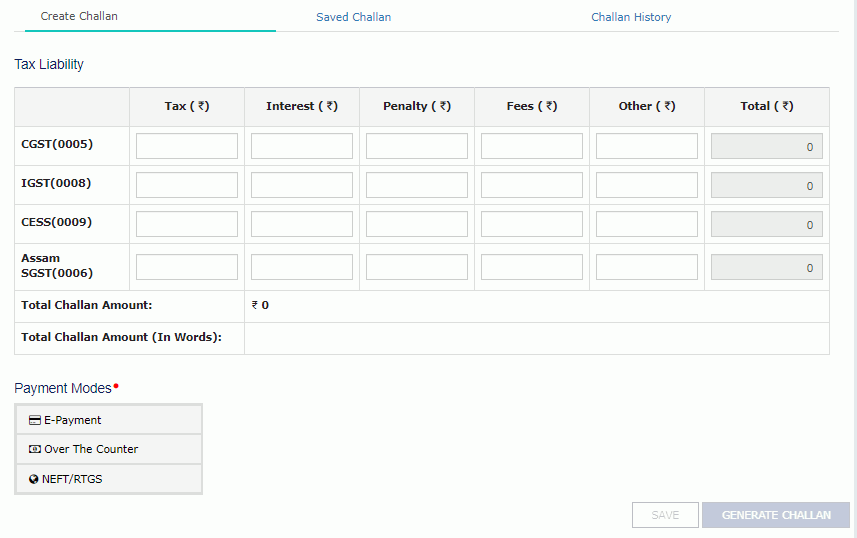
 5. Fill in challan details
 5. Fill in challan details
You will be prompted to fill in details such as the type of tax like CGST, SGST, IGST and other relevant information. Ensure that all fields are filled out accurately.
Related Read: What is the Difference Between CGST, SGST and IGST
6. Choose a payment method
After filling in the challan details, choose a payment method. GST payments online can be made through various modes, such as Net Banking, Debit/Credit Cards, etc., or over-the-counter at authorised banks.
 7. Make the payment
 7. Make the payment
If you pay GST online, you will be redirected to a secure payment gateway. Enter the payment details and follow the instructions to complete the transaction.
8. Generate challan counterfoil
A challan counterfoil will be generated after successful payment. Download and save this counterfoil for your records. It serves as proof of GST payment.
 9. Tracking GST Payment Status
 9. Tracking GST Payment Status
To ensure your payment has been successfully processed, go to the “Track Payment Status” option on the GST portal. Enter the Challan Identification Number (CIN) to check your payment status.
These were some crucial steps about how to pay GST challan online without logging in to the portal.
How to Make GST Payments Offline?
These are the steps on how to pay GST challan offline:
1. Obtain a GST Payment Challan
- Log in to the GST portal using your credentials.
- Go to the “Services” tab, select “Payments,” and click on “Create Challan.”
- Fill in the required details, such as the type of tax, amount, and other relevant information.
- Click on “Generate Challan” to create the payment challan.
2. Download and Print Challan
Download the generated challan and take a printout. Ensure that all details on the challan are accurate.
3. Visit an Authorised Bank:
Take the printed challan to an authorised bank. Authorised banks include those empanelled by the Goods and Services Tax Network (GSTN) for accepting GST payments.
4. Submit the Challan to the Bank
Submit the printed challan and the payment amount in cash, cheque, or demand draft at the bank counter. The bank will provide a stamped acknowledgement as proof of payment.
5. Verify GST Payment Status
After making the offline payment, you can check the GST payment status by visiting the GST portal.
Go to the “Services” tab > select “Payments” > and click on “Track Payment Status.”
Enter the Challan Identification Number (CIN) from the stamped acknowledgement to verify the payment status.
How to Check GST Challan History?
To check and retrieve your GST challan history on the GST portal, follow these simple steps:
- Navigate to the GST homepage and Log in to the GST portal using your credentials (username and password).
- Click on “Services” from the menu.
- Choose “Payment” from the dropdown.
- Select “Challan History” and access a detailed record of transactions, simplifying the tracking and management of your GST payments.
What is the Time Restriction to Complete the GST Payment?
When making a GST payment, it’s important to consider the time limit from the date of challan generation. The following guidelines apply:
- Offline Payments: You have 15 days from the date of challan generation to complete the payment.
- Online Payments: Payment should be made immediately upon challan generation.
Key Points for Online GST Payment:
-
Net Banking:
- After selecting the bank and generating the challan, a Common Portal Identification Number (CPIN) is issued.
- If the challan is generated without logging in, you must complete the payment immediately.
- If the challan is generated after logging in, you have up to 15 days to make the payment.
-
Offline Mode:
- A CPIN is generated with the challan and saved automatically.
- For payments made over-the-counter at a bank, you have up to 15 days to complete the payment.
GST Payment Due Dates for Different Taxpayers
The due date for GST payment is crucial for maintaining compliance and avoiding late fees or penalties. Generally, the GST payment due date is tied to the filing of the GSTR-3B return. Here’s an overview of the key due dates:
Type of Taxpayer |
GST Payment Due Dates |
| Regular Taxpayer | 20th Day of the Next Month |
| Composition Scheme | 18th Day of the Month Following the Quarter |
| Non-Resident Taxpayer | 13th Day of the Next Month |
| Input Service Distributor | 13th Day of the Next Month |
| TDS Deductor | 10th Day of the Next Month |
| TCS Collector | 10th Day of the Next Month |
Interest on Late Payment of GST
Late payment of GST attracts interest charges as per the provisions of the GST law. Here’s a detailed look at how it works:
1. Interest Rate for Late Payment
- 18% Per Annum: This interest rate is applicable if there is a delay in paying the GST liability, including taxes, interest, or any other amount payable under the GST law.
- 24% Per Annum: This higher rate applies in cases of undue or excess claim of input tax credit (ITC) or reduction in the tax liability.
2. How Is Interest Calculated?
- The interest on late GST payments is calculated using the following formula:
- Interest = Tax Amount × (Interest Rate / 100) × (Number of Days / 365)
- For example, if there is a pending GST liability of ₹10,000 and the delay is for 20 days, the interest calculation would be:
- 10,000 × (18 / 100) × (20 / 365) = ₹98.63
3. Applicability of Interest
- Delayed Payment of Tax: Any delay in paying GST within the due date results in an interest charge.
- Wrong Utilization of ITC: If the input tax credit is utilized or availed wrongly, interest will be levied on the excess credit claimed or utilized.
How to Pay GST Payments Online at a Later Date?
Paying GST payments online later is a convenient option for taxpayers. The process varies depending on the mode of payment chosen.
Here are the steps for the different payment modes:
1. Through Net Banking
- Log in to the GST portal and navigate to Services > Payments > Challan History.
- Click on the relevant CPIN, select the bank, and complete the payment process.
- The electronic cash ledger will be updated immediately upon successful payment.
2. Through OTC Mode
- Manually fill in the remaining details on the challan and affix the authorised signature.
- Submit the filled-out challan copy and payment instruments to the chosen bank.
- The electronic cash ledger will be updated within a day or two.
3. Through RTGS/NEFT
- Fill in the remaining challan details, including RTGS/NEFT particulars.
- Submit the filled-out challan copy and remittance mandate to the remitting bank.
- After processing, you’ll receive a UTR and CIN. The GST portal will be updated subsequently.
What Are the Important GST Payment Forms?
Form Name |
Description |
Explanation |
| GST PMT-01 | Electronic tax liability register | Payment of taxes, interests, penalties, fees, or any other dues by taxpayers to the government will be debited to this register. |
| GST PMT-02 | Electronic credit ledger | ITC as self-assessed in monthly returns shall be credited to the ledger. |
| GST PMT-03 | Refund to be recredited | If a refund is rejected, the amount debited from the electronic credit ledger or electronic cash ledger, as applicable, will be recredited upon the order of the authorised officer. |
| GST PMT-04 | Discrepancy in electronic credit ledger | Form for notifying any discrepancies detected in the electronic credit ledger to an officer. |
| GST PMT-05 | Electronic cash ledger | All the deposits/payments made by a taxpayer in cash are credited to this ledger. |
| GST PMT-06 | Form for making GST payments | This form is for making actual GST payments, including CGST, SGST, IGST, and cess. Taxpayers can use various modes of payment, such as Internet banking, debit/credit card, NEFT/RTGS, or over-the-counter payment at authorised banks. |
| GST PMT-07 | Application for filing payment-related grievances | “The application is for taxpayers who have had the intended payment debited from their account, but the bank has not conveyed the Common Identification Number (CIN) to the Common Portal. Alternatively, the CIN may have been generated but not reported by the respective bank within 24 hours of the debit.” |
Conclusion
In conclusion, timely GST payments are crucial for business compliance and financial health. Using digital platforms simplifies the process, enhances transparency, and boosts efficiency. Staying informed and leveraging resources helps businesses manage GST effectively and support a strong economy.
Related Read: GST Exemption: List of Goods and Services Exempt Under GST
FAQs
1. Is GST paid every month?
Yes, GST is paid monthly for most businesses.
2. Can I make GST payments after 8 PM?
Yes, you can make GST payments after 8 PM using online methods such as Net Banking, UPI, and credit/debit cards, as the GST payment facility is available 24/7. However, it’s important to note that:
- If you complete your transaction between 8 AM and 8 PM, it will be accounted for on the same day.
- If the transaction is made after 8 PM, it will be processed the next day.
3. What is the 1 GST payment rule?
Registered buyers with a monthly value of taxable supplies (excluding exempt or zero-rated supplies) exceeding ₹50 lakh must pay at least 1% of the tax liability in cash. GST on inter-state purchases under the reverse charge mechanism.
4. Who has to pay 1% GST in cash?
Businesses with a monthly turnover of more than ₹50 lakh must pay 1% of their GST liability in cash.
5. Is it mandatory to make GST payments through the online portal?
GST payments can be made via online or offline methods. For both modes, a challan must be generated compulsorily on the GST Portal. It’s obligatory to pay taxes online if the tax liability exceeds ₹10,000.
6. Is there a penalty for late GST payments?
Yes, there are penalties for late payments. The fines for CGST and SGST amount to ₹25 each per day, adding up to a total of ₹50 per day starting from the day after the deadline until you file your return.
7. Can I set up reminders for GST payment due dates?
Yes, you can set up reminders on the GST portal or through authorised GST software.
8. Can GST payments be made in installments?
Yes, GST payments can be made in installments.
9. Are there any tax benefits or incentives for prompt GST payments?
There are no specific tax benefits, but timely payments avoid interest and penalties.
10. Can I make GST payment through credit card?
Yes, you can make GST payments using a credit card. The GST portal allows taxpayers to pay their GST liabilities through various methods, including credit cards.
Related Read: What Is a GST Clearance Certificate? How to Apply & Download It?


