

Available in🇮🇳 India
A token is the unique identifier Razorpay creates for a customer’s UPI Autopay mandate. It holds the mandate terms (the maximum debit amount, the frequency and the expiry), and you use its token_id to execute every subsequent debit. In these docs, “mandate” refers to the authorisation the customer approves in their UPI app, and “token” is the object you work with in Razorpay APIs. One mandate maps to one token.
You can initiate mandate registration with the UPI Intent flow (recommended), the UPI Collect flow, or a Registration Link.
The following state diagram depicts the mandate registration flow and token lifecycle:
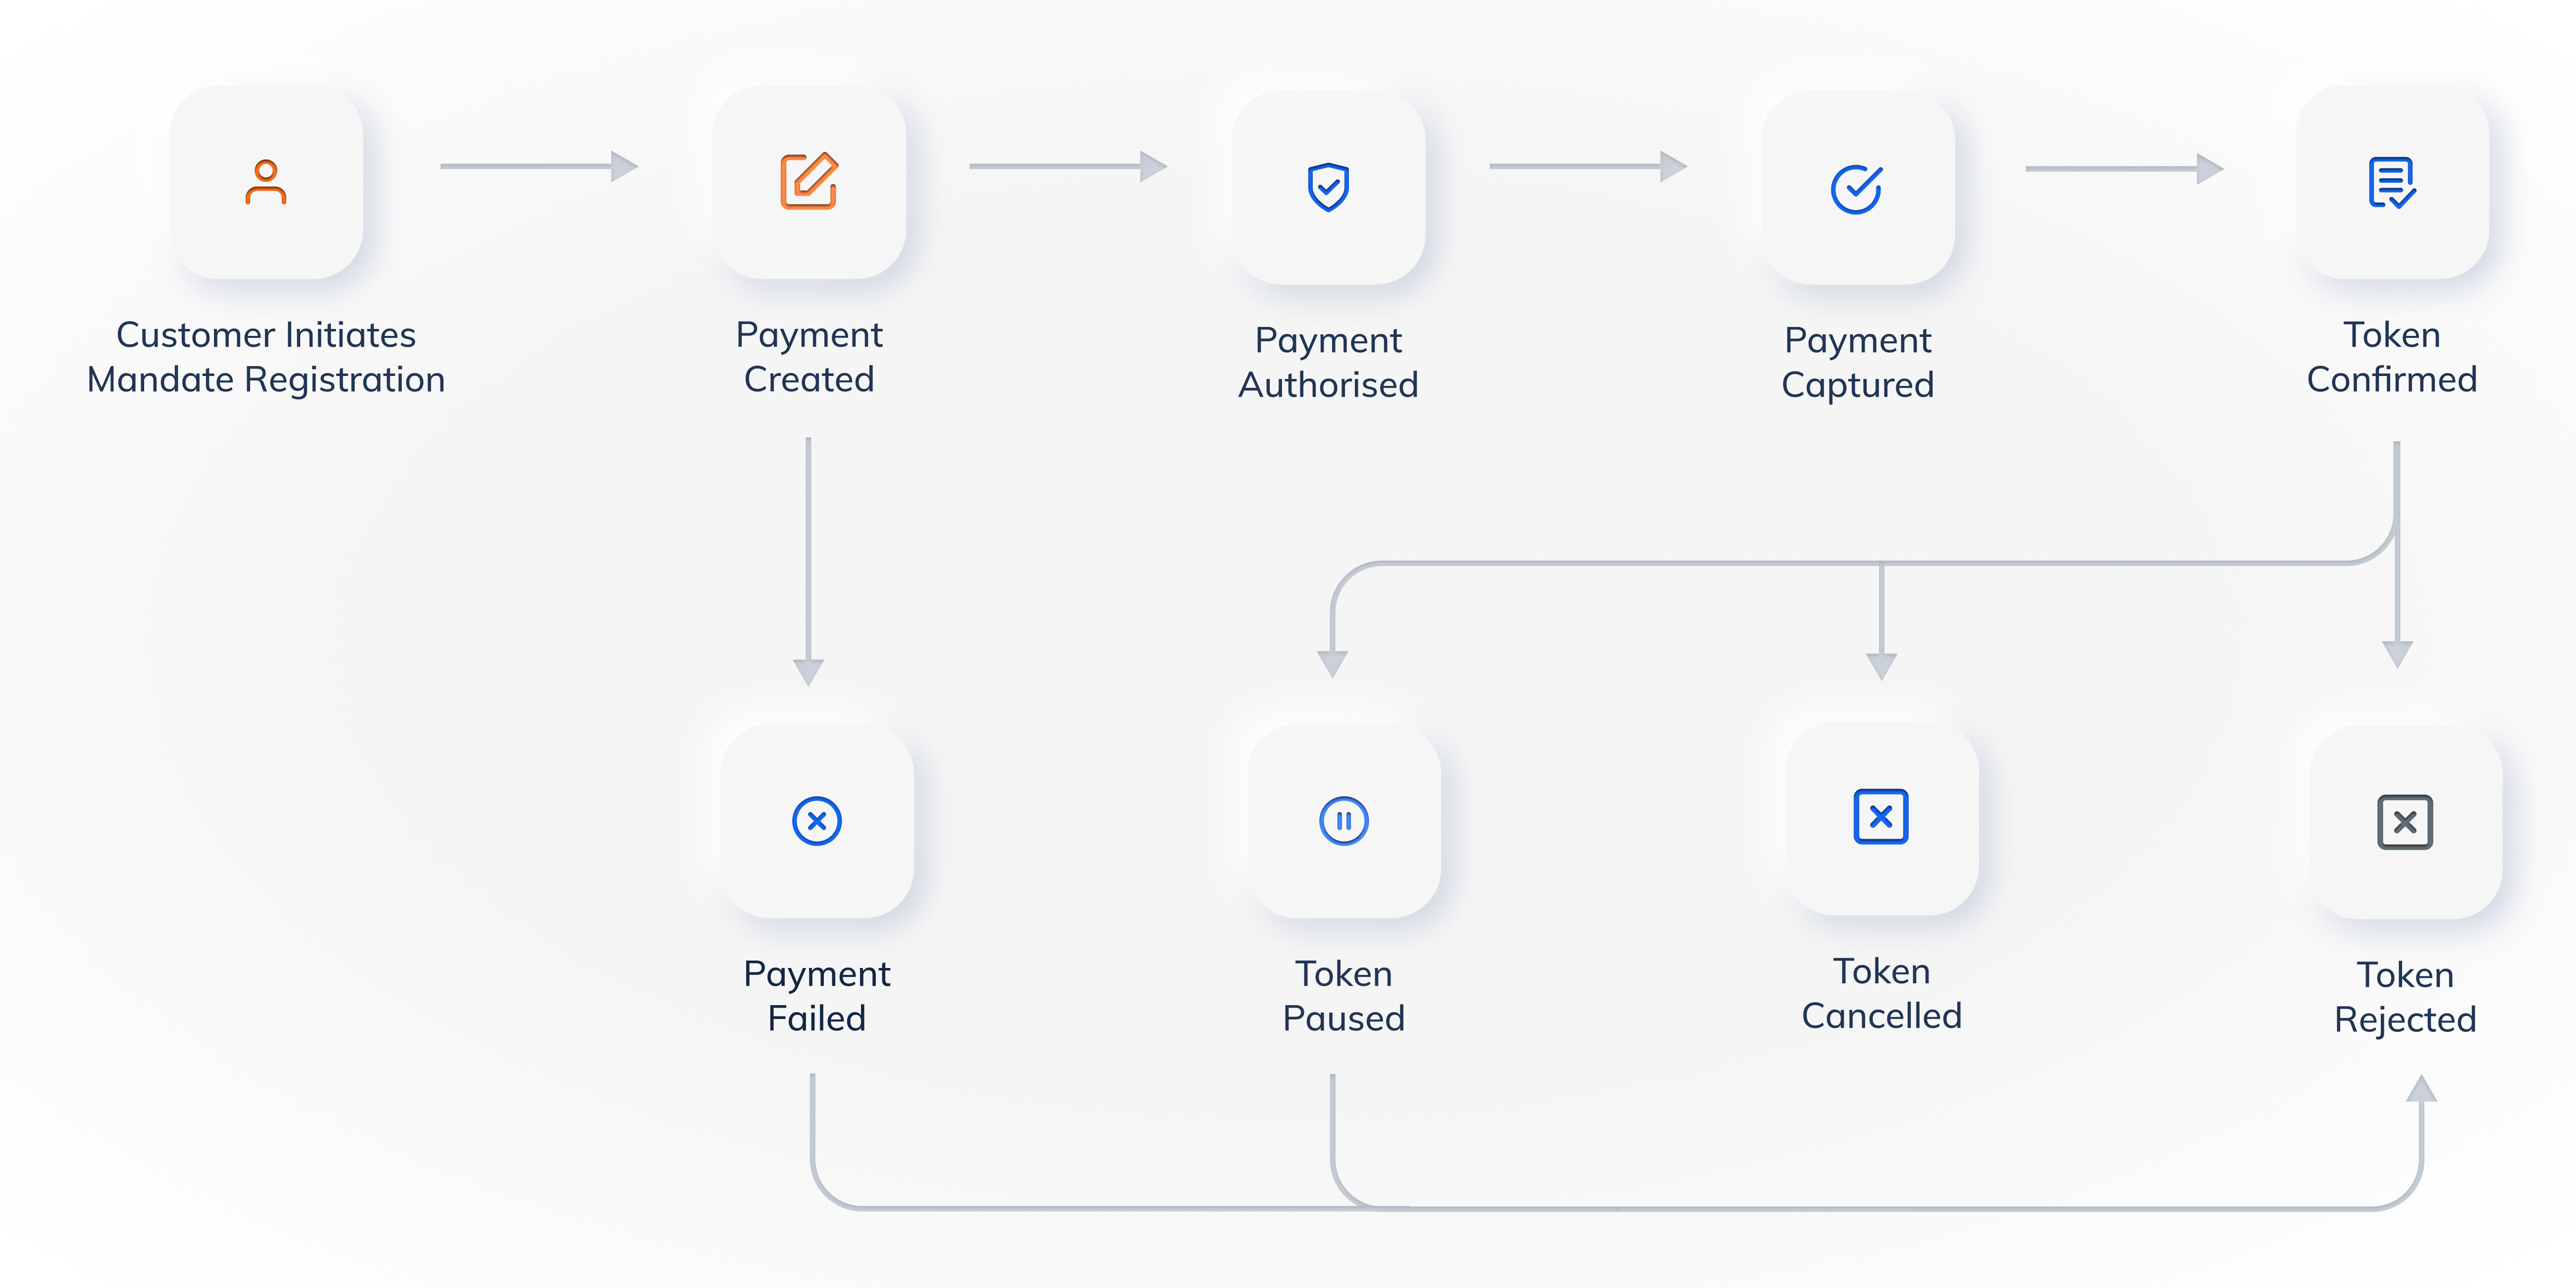 A token changes state as the customer and your business act on it:
- If the authorisation payment fails, the token moves to the
rejectedstate. - Once a token is
confirmed, it never moves torejected. It moves only topausedorcancelled. - When the customer resumes a
pausedtoken, it moves back toconfirmed. - When you cancel a token, it stays in the
cancellation_initiatedstate until the downstream partner confirms the cancellation. It then moves tocancelled.
1.1 UPI Intent
Intent is the recommended flow for UPI Autopay. The steps below run in order.What Intent Is
In the intent flow, the customer chooses from the list of UPI apps installed on their device, and is redirected to complete authentication. Once authentication is complete, customers come back to your application to see the confirmed order status. You do not collect a UPI ID from the customer. Settingupi.flow to intent on the authorisation payment needs no additional parameters.
Understanding an Intent URL
All the mandate details you send in Razorpay’s Orders API are used to generate an intent URL for the transaction. The intent URL contains all the details necessary to present the Autopay mandate setup intent in the best possible manner, to ensure the best possible customer trust and conversion. An intent URL is a deep link on theupi:// scheme. UPI apps register themselves with the device as able to handle that scheme, so opening the link passes it to a UPI app instead of a browser. The format is set by NPCI’s UPI linking specification. One-time payments use upi://pay. Autopay mandates use upi://mandate, which adds the fields a standing instruction needs.
The URL carries every term of the Autopay mandate in its query string. The UPI app reads those values and renders the approval screen from them, without fetching anything else. Below is a Razorpay Autopay intent URL, wrapped across lines for readability.
Intent URL
max_amount close to what you will actually charge and set a frequency that matches what the customer signed up for.
NPCI referencesNPCI does not host the UPI linking specification publicly. The UPI circulars page carries the addenda that change these fields, and the UPI AutoPay brand guidelines cover how app choice has to be presented to the customer.
What Razorpay Gives You
You do not build the intent URL. Create the authorisation payment withupi.flow set to intent, and Razorpay returns a formed link in the response, carrying the Autopay mandate terms from your order. Use that link to redirect the customer to their UPI app: open it as a deeplink on mobile, or render it as a QR code on desktop.
The Customer Journey
The steps below are the customer’s view of the flow on a mobile device. Walk through them yourself before you go live.- The customer chooses UPI on your payment screen. You show them the UPI apps that support the intent flow. On S2S you own the screen, so you build the app picker yourself.
- They tap their preferred app. Build the list from the apps actually installed on the device. Apps the customer does not have, or has not linked an account to, cannot complete the payment.
- The UPI app opens with the mandate pre-populated. Your business name, the maximum amount per debit, the frequency and the expiry date are all on screen, read straight out of the intent link. The customer has nothing to fill in. This is also the screen where they decide whether to trust you, so a
max_amountclose to what you will actually charge, and a frequency that matches what you sold them, matter more here than anywhere else in the integration. - They enter their UPI PIN. This is the single moment of authentication in the entire mandate lifetime. Every debit after this is silent, up to the AFA limit.
- The app hands them back to your app or site. They land back where they started, and you show them the outcome.
- You get the real result on webhooks, not from the redirect. The customer returning does not mean the mandate is registered. Wait for
payment.capturedandtoken.confirmedon success, orpayment.failedandtoken.rejectedon failure. Treat the redirect as a UI cue and the webhook as the truth.
How Intent Works
The same journey from your side, as API calls.- Create the authorisation payment. Call
POST /v1/payments/create/upiwithupi.flowset tointent. No VPA and no extra parameters, unlike collect. - Take the
linkfrom the response. It comes back alongsiderazorpay_payment_id, and it is returned only on the intent flow. Use it as returned. You can prefix it with the app name to target a specific UPI app, but do not change the mandate parameters inside it. - Get the customer into their UPI app. On mobile, open the
linkas a deeplink. On desktop, render it as a QR code. See By Platform below. - Pass the chosen app back to Razorpay. On Custom Checkout and S2S, put the app the customer picked in the
notesobject, for example"note_key_1": "phonepe". Razorpay uses it for routing and it is the first thing anyone looks at when debugging a registration failure. - Wait for the webhooks.
payment.capturedandtoken.confirmedon success,payment.failedandtoken.rejectedon failure. Thetoken_idyou get here is what every future debit runs against, so store it against the customer.
1.1.1 Create a Customer
Razorpay links recurring tokens to customers using a unique identifier generated through the Customer API. Creating a customer is mandatory to set up a registration. You may have your own way to identify customers at your end, so passingemail and contact is optional, but we recommend passing at least one of them to Razorpay. You can also use the customer for various Razorpay offerings. Know more about Customers.
The following endpoint creates a customer.
POST /customers
Request Parameters
Request Parameters
name mandatory
: string The customer’s name. For example, Gaurav Kumar.email optional
: string The customer’s email address. For example, gaurav.kumar@example.com.contact optional
: string The customer’s phone number. For example, 9876543210.notes optional
: object Key-value pair that is used to store additional information about the entity. Maximum 15 key-value pairs, 256 characters (maximum) each. For example, "note_key": "Beam me up Scotty".1.1.2 Create an Order
Use the Orders API to create a unique Razorpayorder_id that is associated with the mandate registration. The following endpoint creates an order.
POST /orders
Sample Code
Sample Code
Handy TipsThe
token.max_amount value must respect the limits defined by NPCI for your merchant category. Refer to the limits by MCC table for the maximum mandate amount and the AFA-free limit for your MCC.Handy TipsUPI Autopay supports only
INR. Recurring payments on cards support other currencies.Request Parameters
Request Parameters
amount mandatory
: integer Amount, in paise.currency mandatory
: string The 3-letter ISO currency code for the payment. Currently, we only support INR.method mandatory
: string Payment method for the mandate registration. Here, the value should be upi.receipt optional
: string Unique identifier for the order entered by you. For example, Receipt No. 1. This parameter should be mapped to the order_id sent by Razorpay.description optional
: string A description of the mandate that will be displayed to the customer in their UPI app. This helps the customer understand what they are subscribing to. Keep it under 50 characters and avoid special characters. For example, Monthly Pro subscription.notesoptional
: object Key-value pair that can be used to store additional information about the entity. Maximum 15 key-value pairs, 256 characters (maximum) each. For example, "note_key": "Beam me up Scotty".For S2S and custom checkout integrations, the customer selects the UPI app on your checkout page. We highly recommend passing the name of the app selected by the customer in this parameter. For example, "note_key_1": "phonepe". This helps Razorpay debug any issue in the mandate registration journey. If you have other notes, use the next available key, such as note_key_2.token
: Details related to the mandate such as max amount, frequency and expiry information.max_amount mandatory
: integer The maximum amount that can be debited in a single charge.The minimum value is 100 (₹1). For the maximum value for your MCC, refer to the limits by MCC table.Best PracticesSet the
max_amount as close to the actual debit amount as possible. For example, if the expected debit amount is ₹99-₹299, setting the max_amount to ₹5,000 may cause the customer to drop off due to trust issues. A realistic max_amount builds customer trust while allowing flexibility for variable debits.Frequency also plays a crucial role in building customer trust. For example, if you are selling a monthly subscription but request an as_presented mandate, the customer may find it risky to set up the mandate. If your business has a flexible billing model, as_presented frequency fits your use case better, because NPCI has strict checks to ensure one successful debit per billing cycle.If you are a TPV (third-party validation) merchant, also prompt the customer to choose only their registered bank account at app selection. See By Platform.expire_at optional
: integer The Unix timestamp that indicates when the mandate must expire. Defaults to 10 years.frequency mandatory
: string The frequency at which you can charge your customer. Possible values:weeklymonthlyquarterlyyearlyas_presented
1.1.3 Create an Authorisation Payment
Once an order is created, your next step is to create a payment to initiate the mandate registration on the customer’s UPI app. The UPI payment flow you use determines how the customer approves the mandate:- UPI Intent (recommended): The customer is redirected to their preferred UPI app (or scans a QR code on desktop) to approve the mandate. This is the default flow.
- UPI Collect (deprecated): A collect request is sent to the customer’s VPA (UPI ID). This flow is being deprecated for new UPI Autopay registrations effective 28 February 2026. For iOS users, you may continue to use the Collect flow as a fallback.
upi.
POST /payments/create/upi
Sample Code
Sample Code
UPI IntentUPI Collect (deprecated)Before creating the collect payment, validate the customer’s UPI ID using the Once the UPI ID is validated, create the authorisation payment with
/payments/validate/vpa endpoint.upi.flow set to collect.Request Parameters
Request Parameters
amount mandatory
: integer The amount associated with the payment in smallest unit of the supported currency. For example, 2000 means ₹20. Must match the amount in order created previously.currency mandatory
: string The 3-letter ISO currency code for the payment. Currently, we support only INR.order_id mandatory
: string The unique identifier of the order created in the previous step.customer_id mandatory
: string Unique identifier of the customer, obtained from the response of Step 1.1.1: Create a Customer.recurring mandatory
: string Determines if the payment is recurring or one-time. Possible values:1: Recurring payment is enabled.preferred: Use this when you want to support recurring payments and one-time payment in the same flow.
method mandatory
: string The payment method selected by the customer. Here, the value must be upi.upi
: object Details of the UPI payment flow.flow mandatory
: string Specify the type of the UPI payment flow. Possible values are:
intent(default, recommended)collect: Deprecated effective 28 February 2026. For iOS users, you may continue to use the Collect flow as a fallback.
notes optional
: json object Key-value pairs that can hold additional information about the payment.UPI Intent flowNo additional parameters are required for the UPI Intent flow.UPI Collect flow (deprecated)Pass these parameters in addition to the parameters above.vpa mandatory
: string VPA of the customer where the collect request will be sent. Applicable only to the UPI Collect flow.expiry_time optional
: integer Period of time (in minutes) after which the collect request will expire. The default value is 5. Applicable only to the UPI Collect flow.email mandatory
: string The customer’s email address. For example, gaurav.kumar@example.com.contact mandatory
: string The customer’s contact number. For example, 9123456780.ip mandatory
: string Client’s browser IP address. For example, 117.217.74.98.referer mandatory
: string Value of referer header passed by the client’s browser. For example, https://example.com/user_agent mandatory
: string Value of user_agent header passed by the client’s browser. For example, Mozilla/5.0 (Windows NT 6.1) AppleWebKit/537.36 (KHTML, like Gecko) Chrome/79.0.3945.130 Safari/537.36
save optional
: boolean Applicable only to the UPI Collect flow. Specifies if the VPA should be stored as a token. Possible values:true: Saves the VPA details.false(default): Does not save the VPA details.
Response Parameters
Response Parameters
If the payment request is valid, the response contains the following fields. Refer to the UPI Intent Flow document or the UPI Collect Flow document for more details.
razorpay_payment_id
: string Unique reference for the payment created. For example, pay_EAm09NKReXi2e0.link
: string Returned only for the UPI Intent flow. The UPI intent link to redirect the customer to their UPI app for mandate approval. Use this as a deeplink on mobile or convert it to a QR code for desktop.payment.captured or payment.failed webhook. If the payment is successful, the token.confirmed webhook is generated and you can get the token_id from it. If the payment fails, the payment.failed webhook arrives along with the token.rejected webhook and the token_id.
You can also poll for the payment status using the Fetch Payment API, but we recommend waiting for the webhook notification first and using polling as a fallback. You can also get the token_id using the Fetch Token APIs.
1.1.4 By Platform
What you do with thelink depends on where the customer is.
- mWeb and Mobile App
- Desktop Web
Use the
link returned in the response as a deeplink to redirect the customer to their preferred UPI app to complete the mandate registration.On S2S and Custom Checkout you own the app picker, so build it to show the UPI apps actually installed on the device. The Smart Intent protocol lets you do this. Also pass the app the customer chose in the notes object, for example "note_key_1": "phonepe", which Razorpay uses for routing and for debugging registration failures.1.1.5 QR Codes
Advantages
- The QR code allows you to easily manage Subscriptions and Recurring Payments and increase the success rate by simplifying the checkout process for customers.
- Customers do not have to remember the VPA. They can make the payment by scanning the QR Code using any PSP app.
Customer Journey
Below is the customer journey with a QR Code.- The QR Code is shown on your desktop checkout for UPI Autopay.

- Customers scan the QR Code using any PSP app and approve the mandate.
link returned on the authorisation payment and render it as a QR image on your desktop checkout. It is the same intent link in another form, so the customer sees the same pre-filled mandate once they scan it.
1.2 UPI Collect
Collect is the fallback flow, for iOS and for cases where intent cannot run. It is being deprecated for new UPI Autopay registrations from 28 February 2026. The steps below run in order, and the first two are identical to the intent flow.What Collect Is
In the collect flow, the customer manually enters their VPA (UPI ID). Once it is entered and validated, a push notification is sent to the customer to approve the mandate on their UPI app, and an SMS is sent as well. On seeing it, the customer opens their UPI app to authenticate. After successful authentication, they return to your screen to see the order confirmation. Compared to the intent flow, collect is tedious and causes higher user drop-offs, because of the multiple redirections and the manual entry of the VPA. We recommend keeping intent as your default flow and collect as a backup. There is one case where collect is not just a backup. Intent does not work on desktop, because there is no UPI app on the device to open. On desktop, intent is replaced by a QR code or by the collect flow. You set it withupi.flow as collect on the authorisation payment.
How Collect Works
- Validate the VPA. Check the UPI ID the customer entered before you create the payment. See 1.2.3 Validate the VPA.
- Create the authorisation payment. Call
POST /v1/payments/create/upiwithupi.flowset tocollectandupi.vpaset to the validated UPI ID. The response carries only arazorpay_payment_id. There is no link to open, because nothing is launched on the customer’s device. - Razorpay sends the collect request. It arrives in the customer’s UPI app as a pending mandate request, showing your business name, the maximum amount, the frequency and the expiry.
- The customer approves it. They open their UPI app, find the pending request and authorise it with their UPI PIN. If they do not act before
upi.expiry_timeelapses, the request expires and the payment fails. - You get the result on webhooks. On success,
payment.capturedandtoken.confirmed. On failure,payment.failedandtoken.rejected.
Collect also needs
email, contact, ip, referer and user_agent on the payment request. Intent does not.
1.2.1 Create a Customer
Identical to 1.1.1 Create a Customer.1.2.2 Create an Order
Identical to 1.1.2 Create an Order.1.2.3 Validate the VPA
In the collect flow the customer types their VPA by hand, so it can be wrong. Validate it with Razorpay before you create the payment. A collect request sent to a VPA that does not exist fails without reaching anyone.Always validate before you create the paymentValidate VPA is a separate call that runs before
POST /v1/payments/create/upi, not alongside it. A collect request sent to a VPA that does not resolve burns the attempt: nothing reaches a UPI app, and there is no customer action that recovers it. For the standalone endpoint reference, see VPA Validation.POST /v1/payments/validate/vpa
Show
customer_name back to the customer before they confirm. It lets them catch a VPA that is valid but belongs to someone else.
Exempted businesses onlyBecause manual VPA entry is being deprecated, this endpoint is relevant only to businesses covered by the exemptions above. See UPI Collect.
1.2.4 Create an Authorisation Payment
Once the UPI ID is validated, create the authorisation payment withupi.flow set to collect.
1.3 Using a Registration Link
Registration Links are an alternate way of initiating mandate registration. If you create a registration link, you need not create a customer or an order separately. When you create a registration link, an invoice is automatically issued to the customer. The customer can use the invoice to complete the mandate registration. Know how to create Registration Links using the Dashboard.Handy TipsYou can use webhooks to get notifications about successful payments against a registration link. Know more about Webhooks.
₹1.
1.3.1 Create a Registration Link
The following endpoint creates a registration link.POST /subscription_registration/auth_links
Sample Code
Sample Code
Request Parameters
Request Parameters
customer
: object Details of the customer to whom the registration link is sent.name mandatory
: string Customer’s name.email mandatory
: string Customer’s email address.contactmandatory
: integer Customer’s contact number.type mandatory
: string In this case, the value is link.amount mandatory
: integer The payment amount in the smallest currency sub-unit.currency mandatory
: string The 3-letter ISO currency code for the payment.description mandatory
: string A description that appears on the hosted page.subscription_registration
: Details of the mandate registration.method mandatory
: string The payment method used for mandate registration. Here, it is upi.max_amount mandatory
: integer Use to set the maximum amount (in paise) per debit request.The minimum value is 100 (₹1). For the maximum value for your MCC, refer to the limits by MCC table.expire_at optional
: integer The Unix timestamp till when you can use the token to charge the customer subsequent payments. The default value is 10 years and the maximum value allowed is 30 years.frequency mandatory
: string The frequency at which you can charge your customer. Possible values:dailyweeklyfortnightlybimonthlymonthlyquarterlyhalf_yearlyyearlyas_presented
sms_notify optional
: boolean Indicates if SMS notifications are to be sent by Razorpay. Possible values:true(default): Notifications are sent by Razorpay .false: Notifications are not sent by Razorpay.
email_notify optional
: boolean Indicates if email notifications are to be sent by Razorpay. Possible values:true(default): Notifications are sent by Razorpay .false: Notifications are not sent by Razorpay.
expire_by optional
: integer The Unix timestamp indicates the expiry of the registration link.receipt optional
: string A unique identifier entered by you for the order. For example, Receipt No. 1. You should map this parameter to the order_id sent by Razorpay.notes optional
: object This is a key-value pair that is used to store additional information about the entity. Maximum 15 key-value pairs, 256 characters (maximum) each. For example, "note_key": "Beam me up Scotty".1.3.2 Send/Resend Notifications
The following endpoint sends/resends notifications with the short URL to the customer:POST /invoices/:id/notify_by/:medium
Sample Code
Sample Code
Response
Path Parameters
Path Parameters
idmandatory
: string The unique identifier of the invoice linked to the registration link for which you want to send the notification. For example, inv_1Aa00000000001.medium mandatory
: string Determines through which medium you want to resend the notification. Possible values:smsemail
1.3.3 Cancel a Registration Link
The following endpoint cancels a registration link.POST /invoices/:id/cancel
Handy TipsYou can only cancel registration link in the
issued state.Sample Code
Sample Code
Response
Path Parameter
id mandatory
: string The unique identifier for the invoice linked to the registration link that you want to cancel. For example, inv_1Aa00000000001.
1.4 Best Practices
These apply to the mandate registration journey. For the auto-debit equivalents, see 3.4 Best Practices.Best Practices
- Use UPI Intent as your default flow. Collect is being deprecated for new registrations from 28 February 2026 and converts worse, so keep it only as an iOS and desktop fallback.
- On collect, always validate the VPA before you create the authorisation payment, and show the returned
customer_nameback to the customer. A collect request sent to a VPA that does not resolve fails without reaching anyone, and a typo that happens to be a real VPA puts the mandate on the wrong person. - Set
token.max_amountas close to the real debit amount as possible. An inflated ceiling is a common cause of customer drop-off at the approval screen. - Match
frequencyto how you actually bill. Asking foras_presentedon a fixed monthly subscription reads as risky to the customer; conversely, a flexible billing model fitsas_presentedbetter, because NPCI enforces one successful debit per billing cycle. - Pass a
descriptionunder 50 characters with no special characters. It is shown to the customer in their UPI app and is what they judge the mandate on. - On S2S and custom checkout, send the UPI app the customer picked in
notes, for example"note_key_1": "phonepe". Razorpay needs it to debug failed registrations. - Create the customer first and pass at least one of
emailorcontact, even though both are optional. - Treat the
token.confirmedwebhook as the point the mandate is live, not the API response. Poll the Fetch Payment and Fetch Token APIs only as a fallback. - If you are a TPV merchant, prompt the customer to pick their registered bank account before app selection. A mandate authorised from another account registers successfully and then fails every debit.