

Available in🇮🇳 India
Razorpay Payment Gateway supports one-time passwords (OTPs) at the Checkout itself, preventing the customers from being redirected to the ACS page of their respective issuing banks.
Advantages
Using the Native OTP feature, you can:- Increase success rates by up to 4%.
- Reduce payment failures due to low internet speeds.
- Avoid failures due to redirects to bank pages.
- Offer a consistent experience on mobile and web checkout.
Prerequisites
Before implementing the Native OTP feature, check the following prerequisites:- Log in to the Dashboard and generate the API Keys.
- Integrate with the Razorpay Android Custom SDK.
Integration Steps
1.1 Update Razorpay Android Custom SDK version.1.2 Implement
CardsFlowCallback interface in the getCardsFlow function. 1.3 Call
razorpay.getCardOtpData(CardsFlowCallback) Function. 1.4 Handle Success and Error Events.
1.5 Store Field in Server.
1.6 Verify Payment Signature.
1.1 Update Razorpay Android Custom SDK version
Update the Android Custom SDK version. This feature is available from version 3.9.3 and above.1.2 Implement CardsFlowCallback Interface in getCardsFlow Function
Implement theCardsFlowCallback interface in the getCardsFlow function in the payment activity.
The SDK fires the isNativeOtpEnabled function and determines whether the native OTP flow is enabled for the BIN.
Sample Code
1.3 Call razorpay.getCardOtpData(CardsFlowCallback) Function
If Native OTP is enabled for BIN, you should call therazorpay.getCardOtpData(CardsFlowCallback) function. The SDK then fires the otpGenerateResponse(boolean otpGenerated) function and confirms if the OTP was successfully sent to the customer. Based on this information, you can display the generated OTP UI to the customer.
After entering the OTP, the customer can either:
- Submit OTP
The customer needs to submit the OTP for authenticating the payment. The customer receives the OTP through your application frontend. For card payments, the customer receives the OTP via their preferred notification medium, SMS or email.
Handy TipsDo not perform any validation on the length of the OTP since this can vary across banks. However, the OTP should not be blank.
-
Request for OTP to be resent
There could be situations when customers have to re-enter the OTP sent to them. The bank determines the number of retries that the user is allowed. -
Cancel OTP
Cancel the payment by cancelling the OTP.
Sample Code
1.4 Handle Success and Error Events
You must handle the payment success and error events as shown in the code sample below:Handy TipsTo reuse the Razorpay Checkout web integration inside a web view on Android or iOS, pass a callback_url along with other checkout options to process the desired payment.
Use PaymentResultWithDataListener
You have the option to implement PaymentResultListener or PaymentResultWithDataListener to receive callbacks for the payment result.
PaymentResultListenerprovides only payment_id as the payment result.PaymentResultWithDataListenerprovides additional payment data such as email and contact of the customer, along with theorder_id,payment_id,signatureand more.
Java
Step 5: Store the Fields in Server
A successful payment returns the following fields to the Checkout form.Success Callback
Success Callback
- You need to store these fields in your server.
- You can confirm the authenticity of these details by verifying the signature in the next step.
razorpay_payment_id
: string Unique identifier for the payment returned by Checkout only for successful payments.razorpay_order_id
: string Unique identifier for the order returned by Checkout.razorpay_signature
: string Signature returned by the Checkout. This is used to verify the payment.Step 6: Verify Payment Signature
This is a mandatory step to confirm the authenticity of the details returned to the Checkout form for successful payments.To verify the razorpay_signature returned to you by the Checkout form:
To verify the razorpay_signature returned to you by the Checkout form:
-
Create a signature in your server using the following attributes:
order_id: Retrieve theorder_idfrom your server. Do not use therazorpay_order_idreturned by Checkout.razorpay_payment_id: Returned by Checkout.key_secret: Available in your server. Thekey_secretthat was generated from the Dashboard.
-
Use the SHA256 algorithm, the
razorpay_payment_idand theorder_idto construct a HMAC hex digest as shown below:
HMAC Hex Digest
- If the signature you generate on your server matches the
razorpay_signaturereturned to you by the Checkout form, the payment received is from an authentic source.
Generate Signature on Your Server
Generate Signature on Your Server
Given below is the sample code for payment signature verification:
Post Signature Verification
Post Signature Verification
After you have completed the integration, you can set up webhooks, make test payments, replace the test key with the live key and integrate with other APIs.
Test the Integration
After the integration is complete, a Pay button appears on your webpage/app.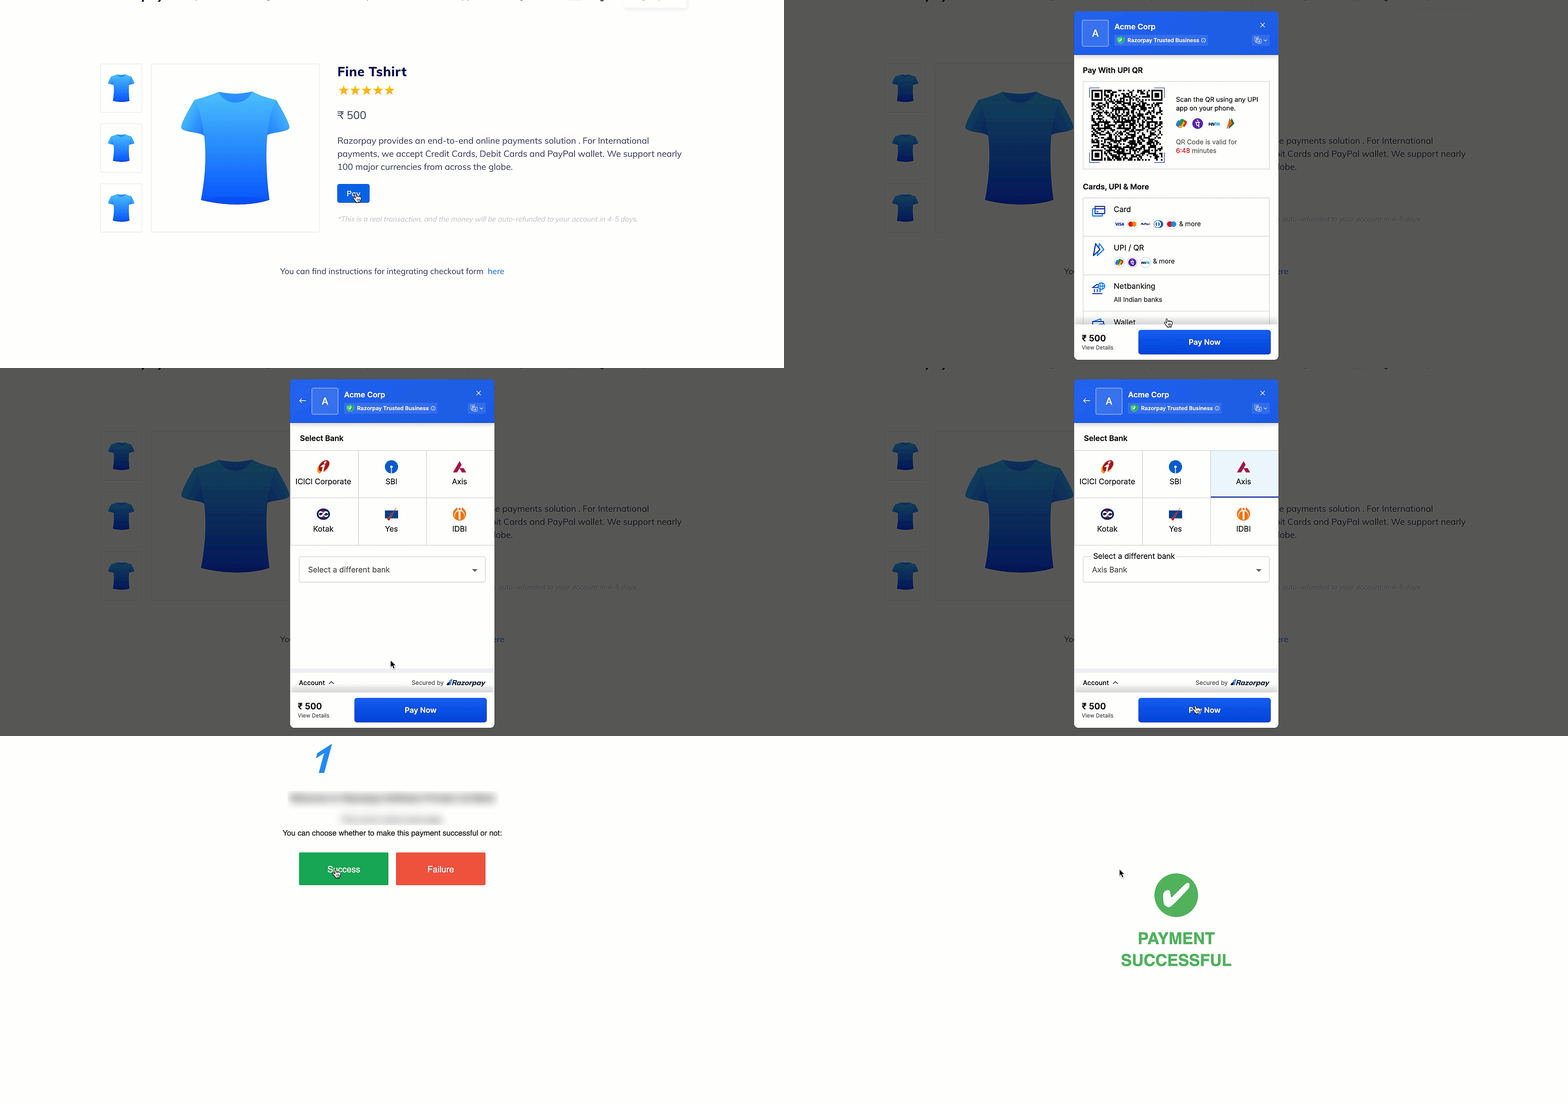 Click the button and make a test transaction to ensure the integration is working as expected. You can start accepting actual payments from your customers once the test transaction is successful.
Following are all the payment modes that the customer can use to complete the payment on the Checkout. Some of them are available by default, while others may require approval from us. Raise a request from the Dashboard to enable such payment methods.
Click the button and make a test transaction to ensure the integration is working as expected. You can start accepting actual payments from your customers once the test transaction is successful.
Following are all the payment modes that the customer can use to complete the payment on the Checkout. Some of them are available by default, while others may require approval from us. Raise a request from the Dashboard to enable such payment methods.
You can make test payments using one of the payment methods configured at the Checkout.
Netbanking
Netbanking
You can select any of the listed banks. After choosing a bank, Razorpay will redirect to a mock page where you can make the payment
success or a failure. Since this is Test Mode, we will not redirect you to the bank login portals.Check the list of supported banks.UPI
UPI
You can enter one of the following UPI IDs:
success@razorpay: To make the payment successful.failure@razorpay: To fail the payment.
Handy TipsYou can use Test Mode to test UPI payments, and Live Mode for UPI Intent and QR payments.
Cards
Cards
You can use the following test cards to test transactions for your integration in Test Mode.
Domestic Cards
Use the following test cards for Indian payments:Error Scenarios
Use these test cards to simulate payment errors. See the complete list of error test cards with detailed scenarios. Check the following lists:International Cards
Use the following test cards to test international payments. Use any valid expiration date in the future in the MM/YY format and any random CVV to create a successful payment.Check the list of supported card networks.
Wallet
Wallet
You can select any of the listed wallets. After choosing a wallet, Razorpay will redirect to a mock page where you can make the payment
success or a failure. Since this is Test Mode, we will not redirect you to the wallet login portals.Check the list of supported wallets.