

Available in🇮🇳 India
Magic Checkout replaces the Shopify checkout on your store with Razorpay’s one-page checkout. This page covers Shopify stores. For WooCommerce, Magento or your own website, see Magic Checkout.
Which Shopify setup you have
Razorpay runs two different Shopify setups. Check which one you are on before you follow any steps on this site.
Shopify One-page Checkout is being retired. Existing stores keep it until they move to Magic Checkout through the Magic Checkout Pro card on the Dashboard (Start setup, then Start upgrade), which uninstalls the public app. New stores set up Magic Checkout, as on this page. The settings pages for One-page Checkout are under COD & Magic Checkout.
When Magic Checkout is live for your buyers
Buyers see the Magic Checkout pop-up only when all of these are true:- Your Razorpay account is activated, so you have Live API keys, and your Dashboard is in Live mode when you start setup. Setup writes your Live key into the store and checks for keys in the mode the Dashboard is in; without the Live key Magic Checkout cannot run.
- Magic Checkout is switched on for your Razorpay account, either by you through the setup on this page or by Razorpay.
- The buyer is viewing your store in Indian Rupees. Magic Checkout does not load on a page shown in another currency, for example through a Shopify Markets currency selector. A display-only converter app does not affect this.
- The theme Magic Checkout was added to, the one with Magic Checkout in its name, is your published theme in Shopify. Magic Checkout lives inside one theme. Any other theme does not have it.
- On Shopify One-page Checkout(MagicX) only: Enable Magic Checkout is on under Setup & Settings → Checkout Settings. Magic Checkout on the custom app has no on/off switch.
- Shipping is set up under Setup & Settings → Shipping Setup. Home shows Shipping is required to start Magic Checkout until it is.
- Every product in the cart is in stock, published, and available to the Magic Checkout app in Shopify. Otherwise Magic Checkout opens, shows Uh-oh!, and Go to cart takes the buyer to the Shopify checkout.
What setup switches on for you
Self-serve setup turns on Magic Checkout for your account with these defaults: taxes included in prices, the email field shown at checkout, the Razorpay coupon engine, Partial COD, the Magic Checkout button on product pages (off in the cart), and your Shopify shipping rates imported into Magic Checkout. Change any of them later under Setup & Settings.Before you start
- Finish KYC on the Razorpay Dashboard and wait for activation. Live API keys exist only after activation, and setup needs them.
- Switch the Dashboard to Live mode and generate API keys under Account & Settings → Website and app settings → API keys. Without a key in the current mode, setup stops at API key not found!.
- Use an owner or admin login on the Razorpay Dashboard. Other roles do not see Setup & Settings.
- Use a Shopify login that can install apps and manage themes.
- Leave room for one more theme in your Shopify theme library. Setup makes a copy of your live theme and adds Magic Checkout to that copy.
- Connect one Shopify store to one Razorpay account. Connecting a second store to the same account replaces the first.
Set up Magic Checkout yourself
Every Razorpay account can set up Magic Checkout on Shopify itself. The Magic Checkout page on the Dashboard shows Try Magic Checkout now. Your progress is saved, so you can close the Dashboard and come back; after the app is installed the store URL is locked.Step 1: Start setup and connect your store
Step 1: Start setup and connect your store
- Log in to the Razorpay Dashboard and open Magic Checkout.
- Click Try Magic Checkout now. If you started earlier, the button reads Resume setup and shows your progress.
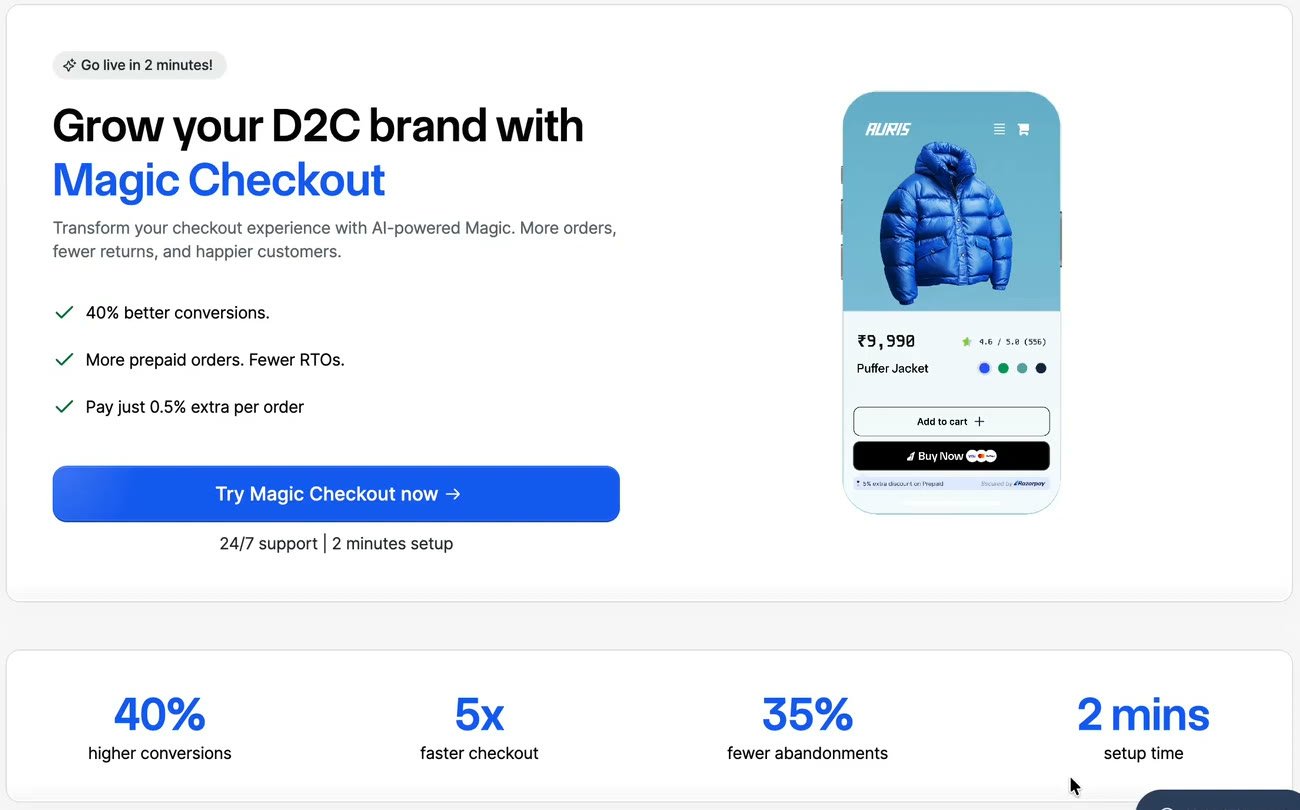
- If API key not found! opens, click Open Settings, generate your Live API keys, come back and click Try Magic Checkout now again.
- Under What’s your store URL?, type your store address in Enter Shopify URL or pick it from Shopify store URL. Wait for Valid Shopify URL.
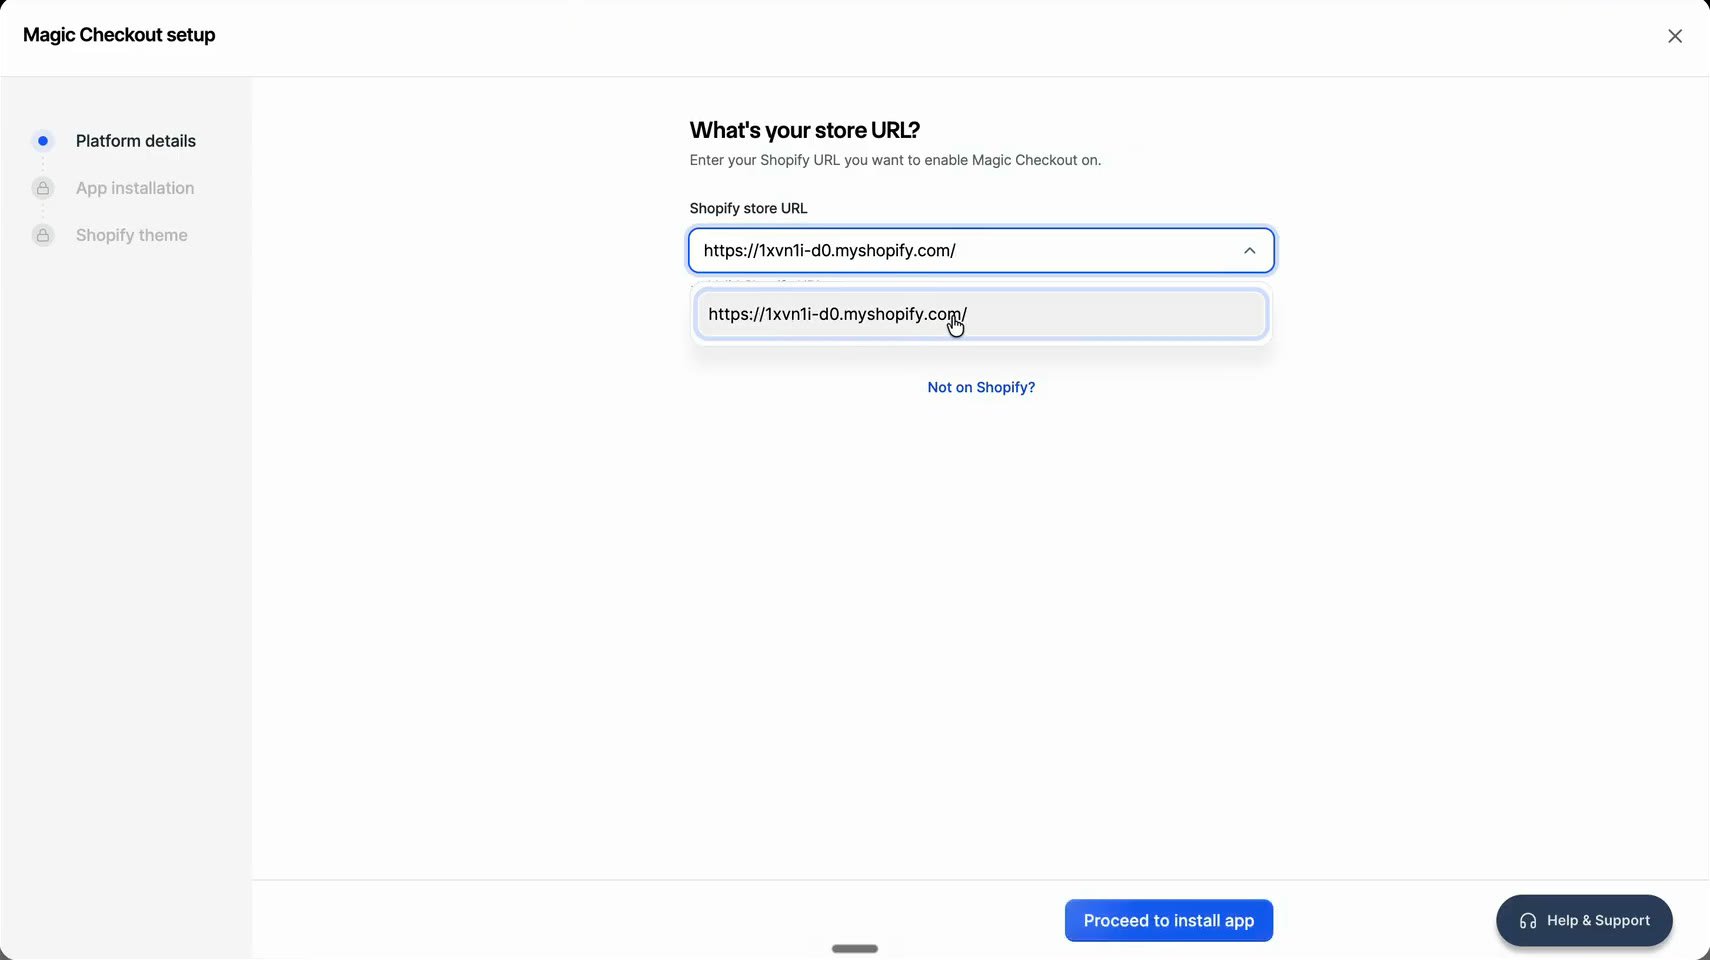
- Click Proceed to install app.
Step 2: Install the app on Shopify
Step 2: Install the app on Shopify
- On the Razorpay Magic Checkout Pro card, click Install App. Shopify opens; install the app there.
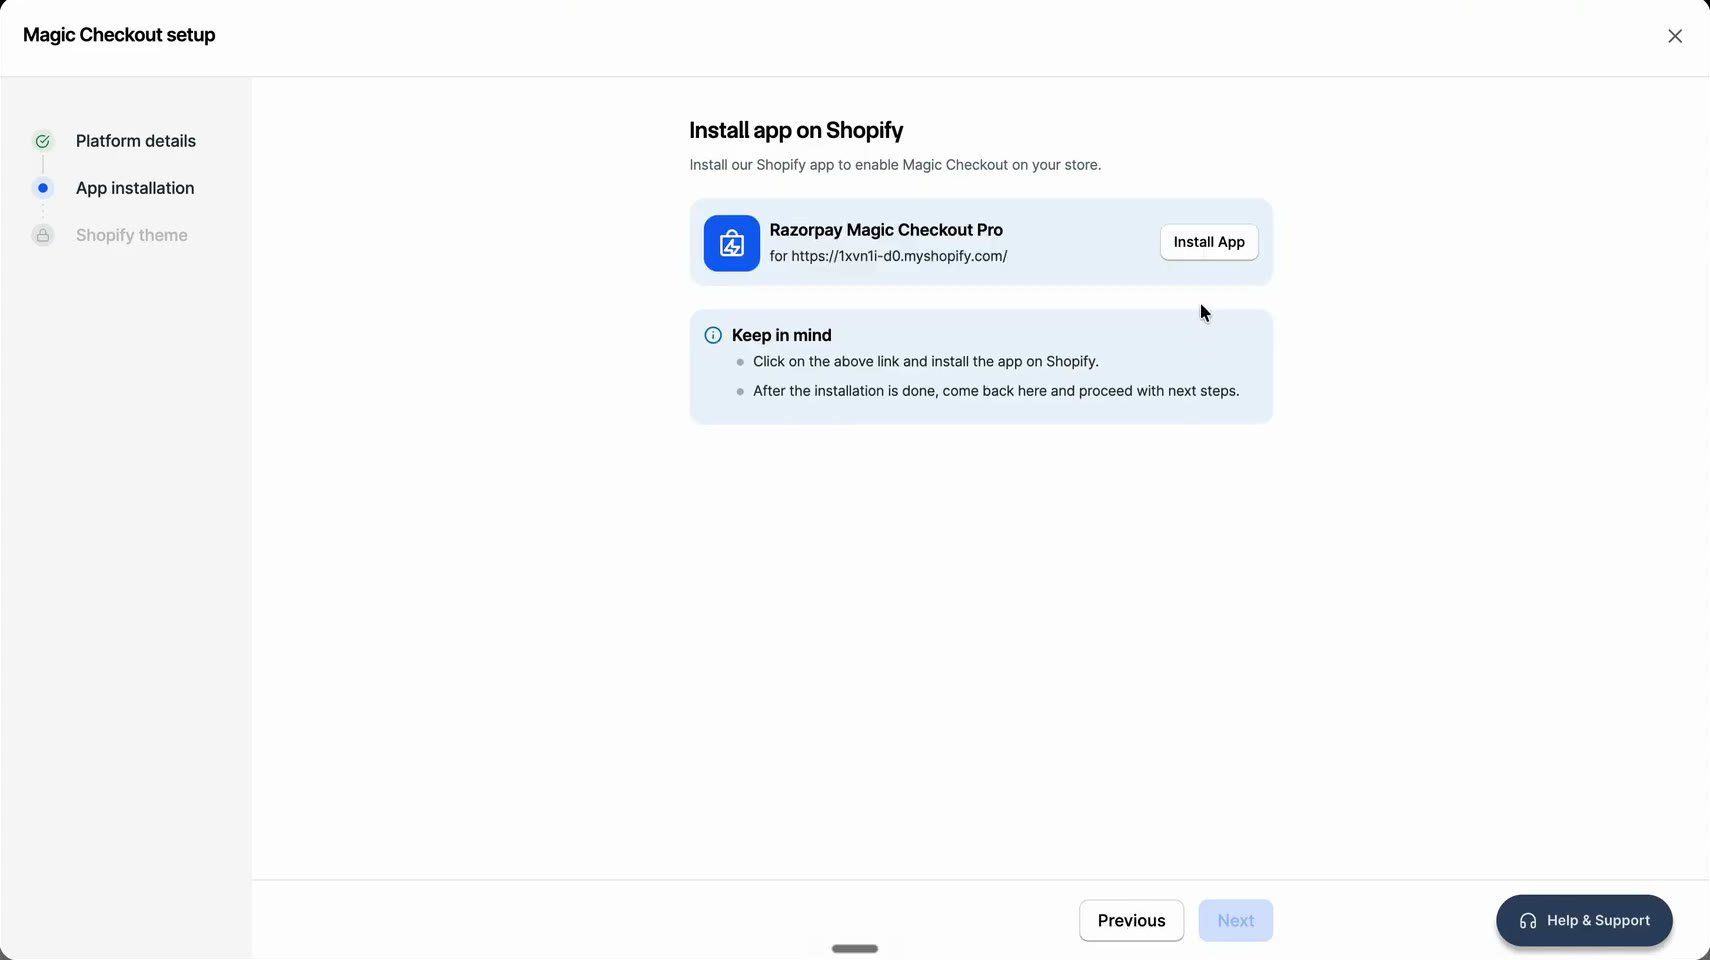
- Come back to the Razorpay tab and click Next.
- If you see Do you levy taxes on your products?, pick the answer that fits your store and click Proceed to create theme. On the shorter setup the tax setting is read from your Shopify store and the question appears only if that read fails.
Step 3: Add Magic Checkout to a copy of your theme
Step 3: Add Magic Checkout to a copy of your theme
- Under Shopify theme creation, check the theme marked Created for you. It is a copy of your live theme.
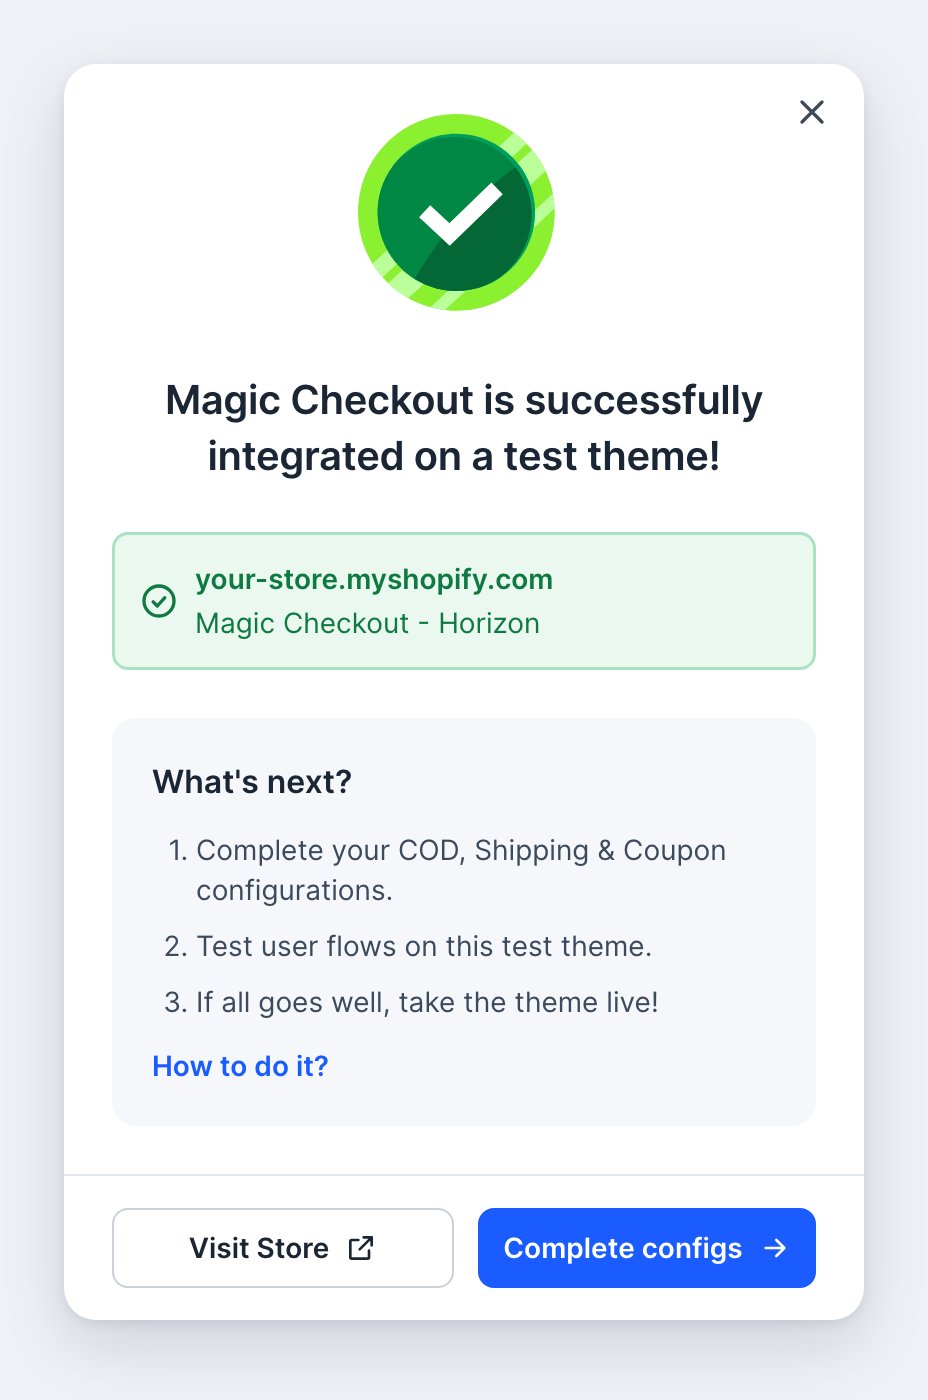
- If you see You’re out of themes!, delete an unused theme in Shopify, then click Refresh. Never delete your live theme; deleting a theme cannot be undone.
- Click Integrate Magic Checkout and wait for it to finish. The page may reload once or twice; wait a minute, then refresh.
Magic Checkout is in the copy, not in your live theme yetNothing changes for your buyers until you publish the copy in Step 5. Test it first.
Step 4: Set up shipping
Step 4: Set up shipping
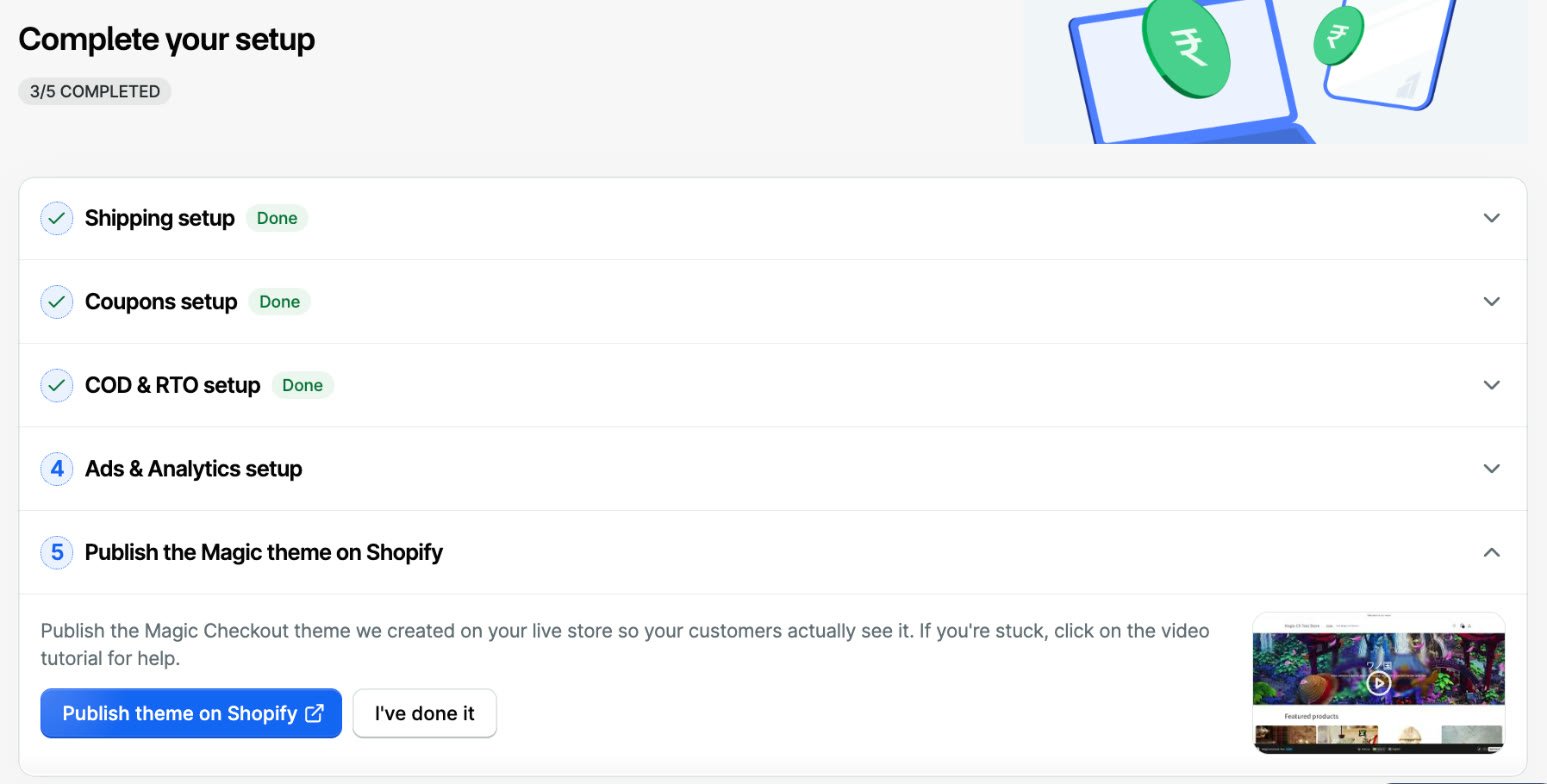
On Home, under Complete your setup, open Shipping setup and click View all shipping settings. Switch on Magic Shipping and set up your zones and methods. Home ticks this step when Magic Shipping is on. Magic Checkout does not start without shipping. See Shipping Options.
Step 5: Test, then publish the theme
Step 5: Test, then publish the theme
- In Shopify admin, go to Online Store → Themes. Find the copy under Draft themes; its name contains Magic Checkout. Click Preview, add a product to the cart, click Checkout and place a test order. The Magic Checkout pop-up should open and the order should land in Shopify as you expect. Orders placed on a preview theme do not count in Magic Checkout Analytics. Watch how to test and publish.
- Happy with the test? Publish the copy: click Publish on it and confirm. On Home, under Complete your setup, Publish theme on Shopify opens the Shopify themes page for you.
- Back on Home, click I’ve done it. The step turns complete only when the Magic theme is your live theme. If Home does not show this step, see Check that Magic Checkout is live instead.
Check that Magic Checkout is live
“Live” has two parts: Magic Checkout is on for your Razorpay account, and Magic Checkout is on the theme your buyers see. Both must be true.- On the Dashboard, open Magic Checkout. Home should greet you with Welcome to Magic checkout. If you still see Try Magic Checkout now or Resume setup, setup is not finished.
- In Shopify admin, Online Store → Themes: the published theme must be the one with Magic Checkout in its name, not a draft and not another theme.
- Open your store in a private window, add a product to the cart and click Checkout. The Magic Checkout pop-up should open, not the Shopify checkout page. Do this on the preview of the copy theme before you publish, and again on the live store after.
On Shopify One-page Checkout(MagicX)Check Enable Magic Checkout is on under Setup & Settings → Checkout Settings. Then in Shopify, open your live theme’s editor, click App embeds and check the Razorpay embed is on. Test as in step 3: Razorpay’s window should open before the Shopify checkout.
Change your Shopify theme
Magic Checkout’s code sits inside one theme, the one with Magic Checkout in its name. A new or changed theme does not have it, so buyers go back to the Shopify checkout. Your Razorpay settings are not affected.- Write to magic-checkout-support@razorpay.com with your store URL and the name of the new theme. Razorpay adds Magic Checkout to that theme itself, not to a copy.
- If the theme is not published yet, preview it, place a test order, then publish it, as in Step 5 above.
- Add back any other custom code your old theme had, or ask whoever added it.
On Shopify One-page Checkout(MagicX)This setup runs as a Shopify app embed, and Shopify does not switch app embeds on in a newly published theme. In Shopify admin, open Online Store, click Customize on the new theme, click App embeds, switch the Razorpay embed on and click Save. Or on the Dashboard, under Setup & Settings → Checkout Settings, check Enable Magic Checkout is on and click Save Settings, which opens the theme editor for you. Click Save there.
Turn Magic Checkout off
Magic Checkout on the custom app has no switch on the Dashboard. To turn it off, write to magic-checkout-support@razorpay.com with your store URL. Buyers then go to the normal Shopify checkout. Do not uninstall the Shopify app to pause Magic Checkout: uninstalling turns Magic Checkout off on your Razorpay account and you would have to set it up again. When Razorpay switches Magic Checkout off for you, the theme code stays in place. On Shopify One-page Checkout(MagicX): under Setup & Settings → Checkout Settings, switch off Enable Magic Checkout and click Save Settings.Why is this not working?
Buyers see the Shopify checkout instead of Magic Checkout.
Buyers see the Shopify checkout instead of Magic Checkout.
Check these in order and stop at the first one that fails.
- Magic Checkout is on for your account: Home greets you with Welcome to Magic checkout. On Shopify One-page Checkout(MagicX): Enable Magic Checkout is on under Setup & Settings → Checkout Settings, and the Razorpay app embed is on in your live theme’s editor.
- The published theme in Shopify is the one with Magic Checkout in its name. If you changed or published another theme, see Change your Shopify theme.
- The buyer is viewing the store in Indian Rupees. A Shopify Markets currency selector set to another currency stops Magic Checkout from loading on that page.
- The products in the cart are in stock, published and available to the Magic Checkout app. If not, Magic Checkout opens with Uh-oh! and Go to cart sends the buyer to the Shopify checkout.
- If both Razorpay apps are installed: Toggle checkout platform: under Setup & Settings → Checkout Setup is set to the checkout you want.
- If Enable International Shipping is on under Setup & Settings → Shipping Setup and the buyer confirms an address outside India, Magic Checkout sends them to the Shopify checkout on purpose. With it off, buyers cannot pick another country.
- Theme code was edited. If the file
snippets/razorpay-magic-checkout.liquidwas changed or removed from the theme, Magic Checkout does not load. Write to support with the theme name; re-adding Magic Checkout rewrites the file. - Other apps take the first click. Upsell apps such as SellEasy and Zepto handle the first click on the checkout or Buy it now button and Magic Checkout opens on the second. Carts with a Recurpay subscription go to Recurpay’s checkout, and a cart with a total of zero goes to the Shopify checkout.
- If only some products fail: open the product in Shopify admin and under Publishing make sure the Magic Checkout sales channel is selected.
I do not know whether Razorpay has turned Magic Checkout on for my account.
I do not know whether Razorpay has turned Magic Checkout on for my account.
Open Magic Checkout on the Dashboard. Try Magic Checkout now or Resume setup means Magic Checkout is not live yet: finish the setup yourself. Welcome to Magic checkout on Home means it is on and setup is done.
Setup stops at API key not found!
Setup stops at API key not found!
You have no Live API keys. Click Open Settings, generate them and start again with Try Magic Checkout now.
Setup stops at You're out of themes!
Setup stops at You're out of themes!
Your Shopify theme library is full. Delete an unused theme in Shopify, never the live one, then click Refresh.
Home says the Magic theme is not live on my store yet.
Home says the Magic theme is not live on my store yet.
The copy theme with Magic Checkout in its name is still a draft. Publish it in Shopify under Online Store → Themes, then click I’ve done it again. Your live theme is … Magic is set up on a different theme. means you published another theme: publish the Magic Checkout theme again, or follow Change your Shopify theme if you want Magic on the new one.
My store is not on Shopify.
My store is not on Shopify.
On the Magic Checkout page, click Not on Shopify?, choose your platform under Choose your platform and click Continue. WooCommerce and Magento stores then follow their own setup pages; a custom website needs a developer and the website integration.
Where do I see my orders and conversions after going live?
Where do I see my orders and conversions after going live?
Orders placed through Magic Checkout appear in Shopify as usual and under Magic Checkout → Orders on the Razorpay Dashboard. Conversion numbers are under Magic Checkout → Analytics.
What to set up next
- Shipping Options: zones, methods and rates. Required before Magic Checkout starts.
- Cash on Delivery: turn COD on and set where and when it shows.
- Coupons and Login with Razorpay.
- Google Analytics, Google Ads and Facebook Ads under Setup & Settings → Analytics and ads setup.
- Abandoned Sessions: recover buyers who dropped off.