

Available in🇮🇳 India
Abandoned Sessions shows every recognised shopper who visited your store and left without buying, across the full funnel — those who only browsed, those who added to cart, and those who reached Magic Checkout. It gives your recovery team one worklist, one set of filters and one set of actions to win these shoppers back.
Abandoned Orders is now Abandoned Sessions.The page previously called Abandoned Orders — nested under Orders — is now called Abandoned Sessions and appears as its own entry in the left navigation. The old link redirects to the new page, and the data you had before is unchanged. What is new is two additional journey types (Browsing and Cart) alongside the abandoned checkouts you already worked.
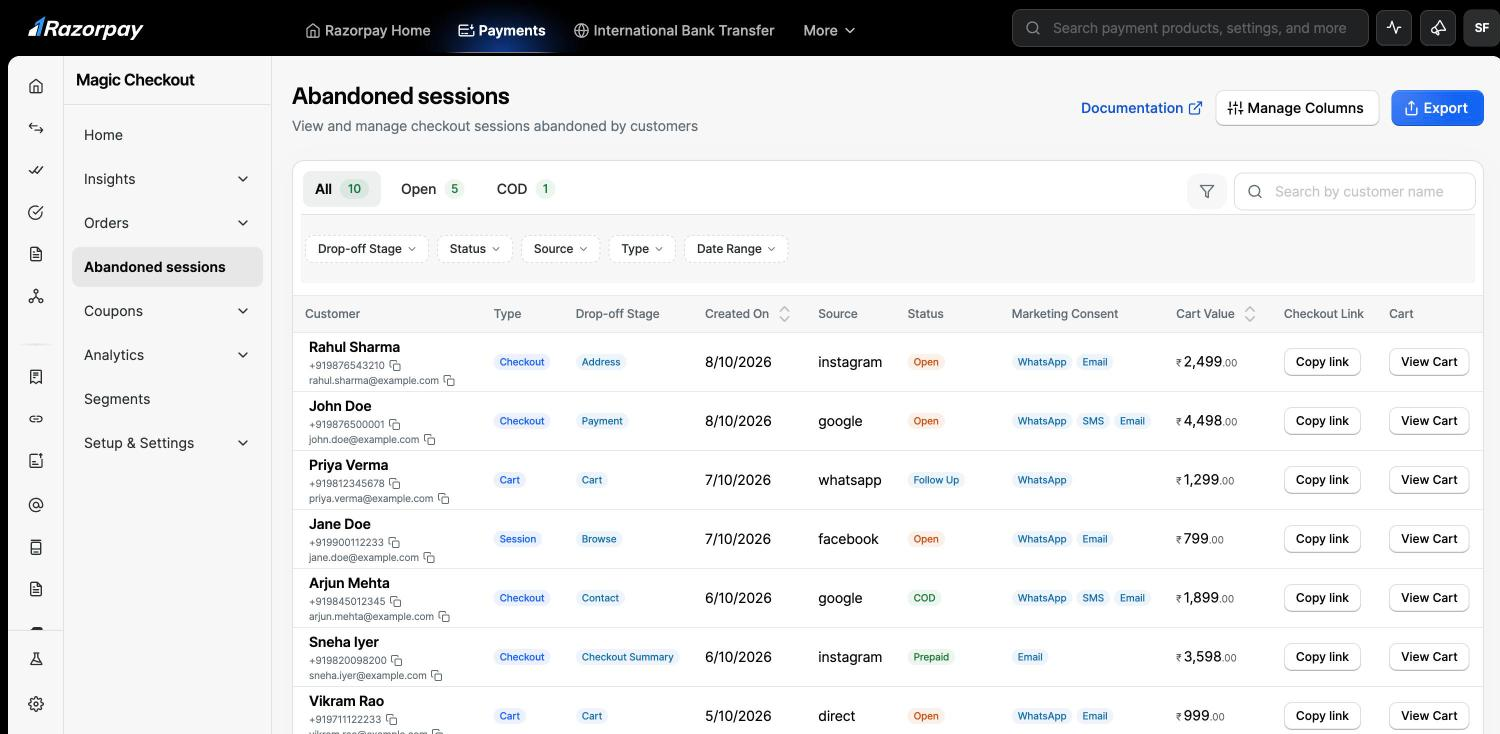
About the screenshots on this page. The dashboard is mid-rename, so some screens still read Abandoned Orders and use the older labels Session (the Browsing journey type) and Browse (the Browsing drop-off stage). These map directly to the terms used here — Session / Browse → Browsing. Only the labels are changing; the data and actions are the same.
The Three Journey Types
Abandoned Sessions covers the whole drop-off funnel. Every row is tagged with the stage at which the shopper left: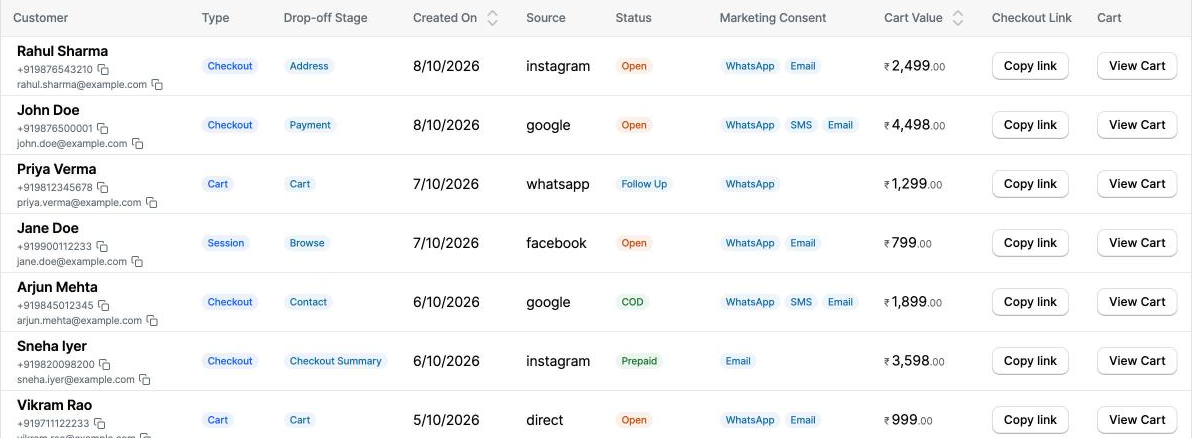
Browsing and Cart are the new journey types. They start populating from the date the feature is enabled on your store, so your Available from date depends on when your store was onboarded. Checkout journeys retain their full history.
One journey, one rowA shopper who browses, adds to the cart, and then abandons at checkout appears as a single row, not three. The row is classified by how far the shopper got: if a checkout was started it is a Checkout journey; otherwise, if a cart exists it is a Cart journey; otherwise it is a Browsing journey.
cart, address, payment and checkout_summary — so you can see exactly where a checkout drop-off happened.
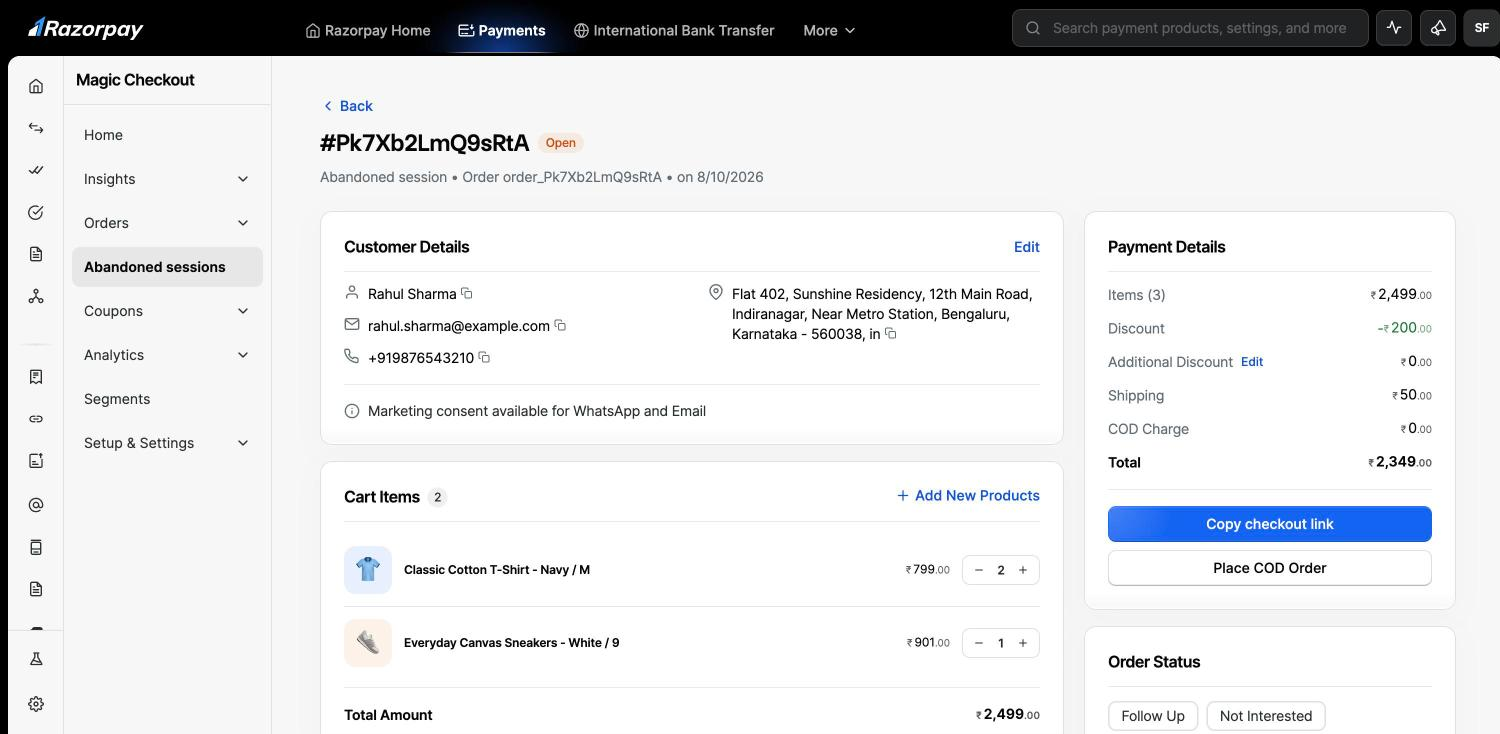
Once a cart exists on a journey (a Cart or Checkout journey, or a Browsing journey after you build a cart), the full action set applies: edit the cart, edit customer details, apply a discount, place a COD order, or generate a Magic Link.
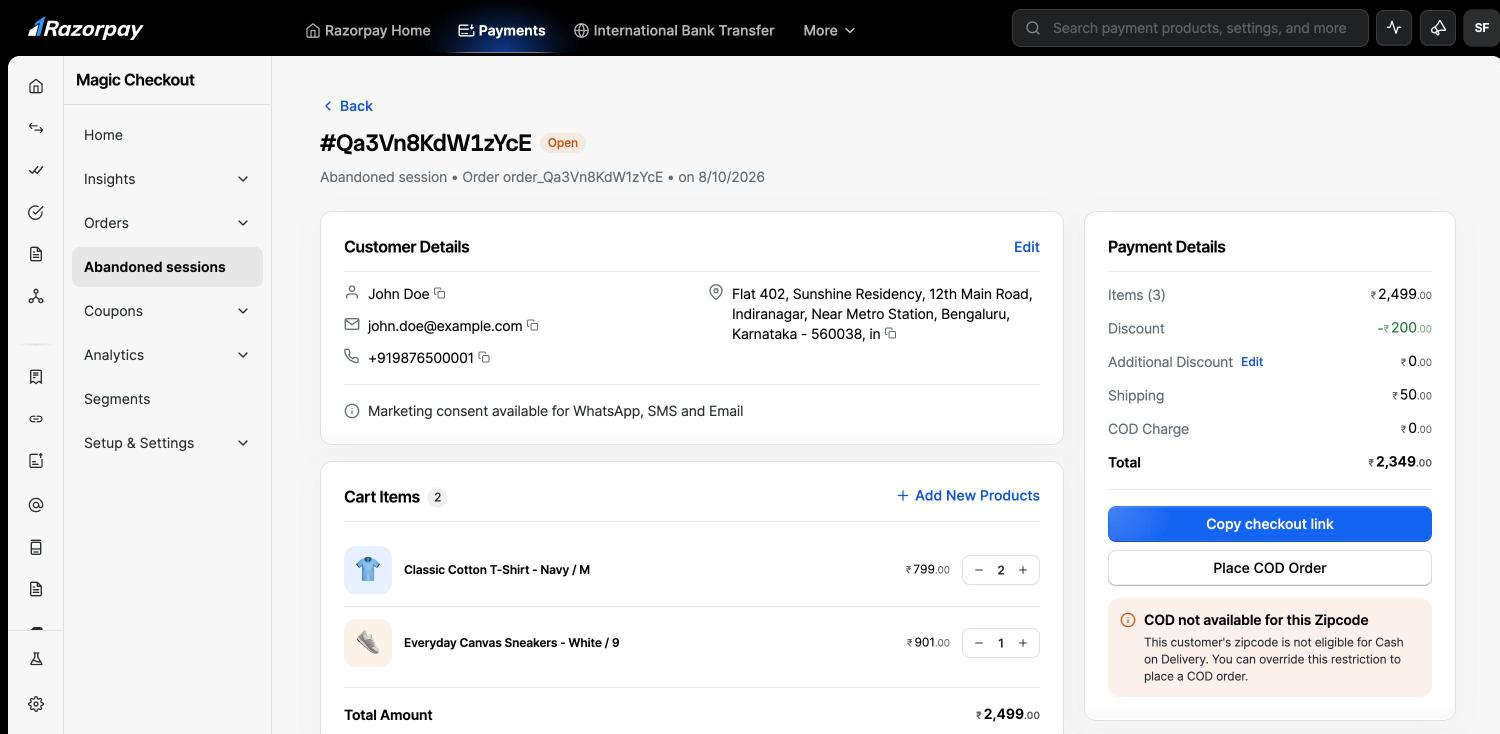
 When you place a COD order for a shopper whose pincode is not normally eligible for Cash on Delivery, the dashboard shows an inline notice under Place COD Order and lets you override the restriction to place the order anyway.
Who Appears in the List
Abandoned Sessions lists only shoppers Razorpay can recognise — a shopper who has logged in through Razorpay ID, or who has transacted through Magic Checkout before. Anonymous visitors are counted in aggregate but never listed, because a row you cannot contact is not one you can act on. Every recognised shopper is listed, whether or not they have given marketing consent. The Marketing Consent column shows each shopper’s consent state, so your team can see who you are permitted to contact before reaching out — a– means no marketing-consent state is recorded for that shopper. Check this column (and your own Shopify consent fields) before you contact anyone.
Why are my counts lower than my store analytics?Abandoned Sessions lists only shoppers we can identify — those who have logged in through Magic or bought through Magic Checkout before. Store analytics counts every visitor, including anonymous ones. Every row here is a person you can actually contact.
Build a Cart for Browsing Sessions
A Browsing session has no cart, because the shopper never added anything. To recover it, build a cart on the shopper’s behalf:- Open the Browsing session and click Build cart.
-
Search your catalogue and add products. Products the shopper viewed during their session are surfaced first, where available.
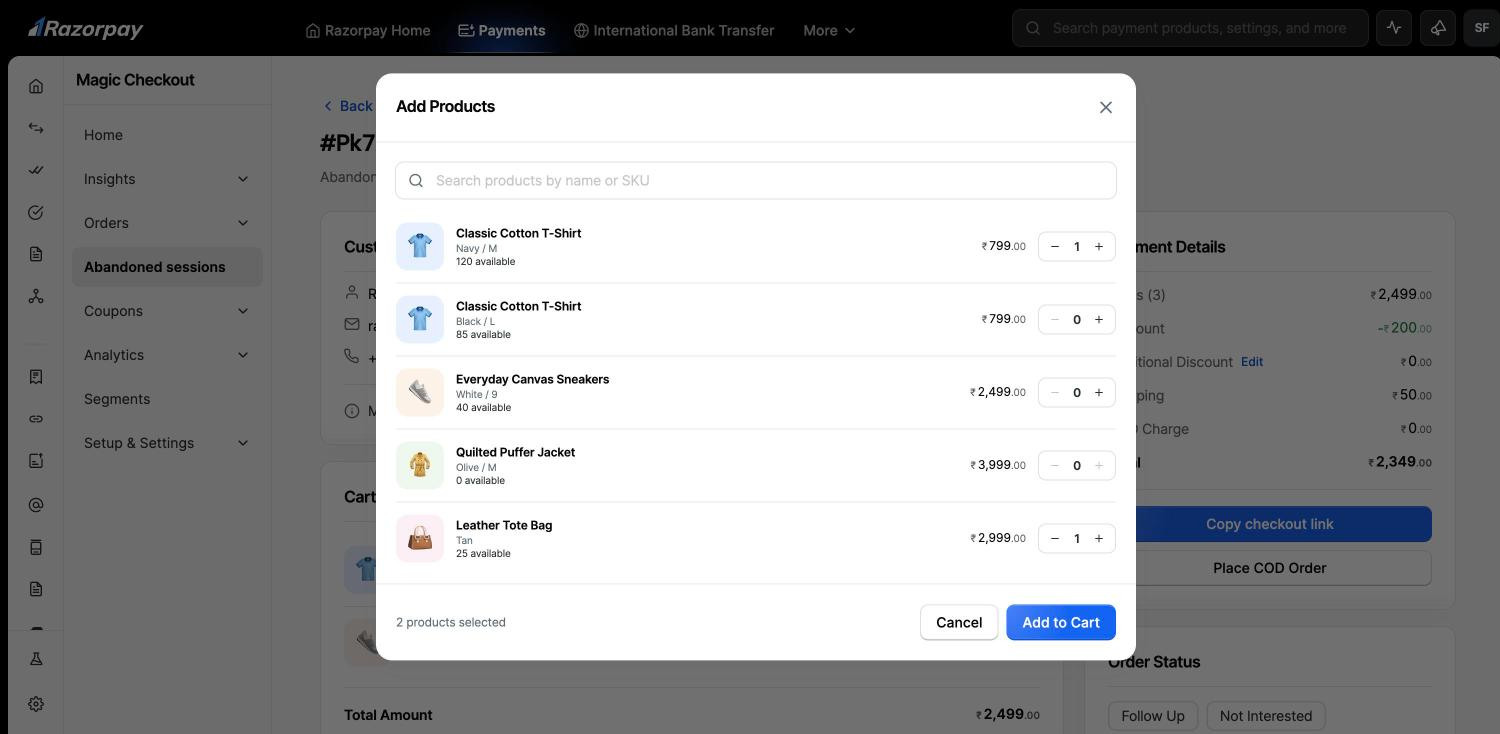
- Once the cart exists, the full action set applies — edit the cart, apply a discount, place a COD order, or generate a Magic Link.
Handy TipsPrices and inventory shown while building a cart are live Shopify values at build time, not the values the shopper saw earlier. If a viewed product has since been repriced or gone out of stock, the current Shopify value applies.
Filters and Drop-off Stage
The list supports filtering and searching across all three journey types: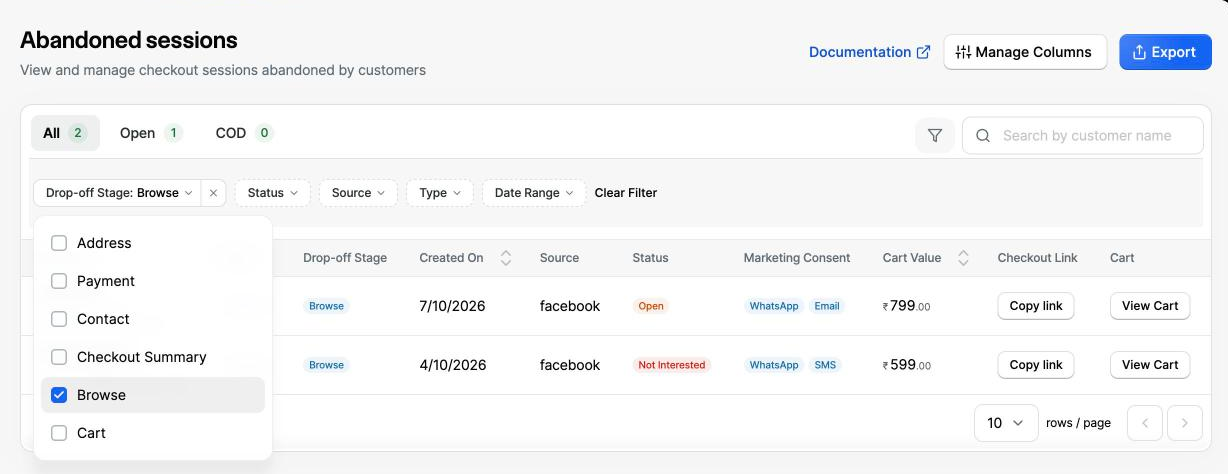
- Journey type — a multi-select filter for Browsing, Cart and Checkout. All three are selected by default.
- Drop-off stage — the journey-level stage (Browsing / Cart / Checkout). For Checkout journeys, the sub-stages (
cart,address,payment,checkout_summary) are also available. - Status, Source (UTM) and Date range — as before.
- Search — across customer name, email and phone.
Shopify Tags and Automations
Every recognised abandoner is written to your Shopify customer list with a tag, and every order you place from Abandoned Sessions carries a tag. This turns Shopify — and every tool wired to it — into a retargeting surface with nothing to integrate.Tags
Marketing consent captured through Magic is synced to the customer’s Shopify marketing consent fields and is never downgraded. If the customer already exists in Shopify, only tags and consent are updated — no other customer data is changed.
Automations You Can Build Today
Using these tags, you can build recovery flows in Shopify Flow, Shopify Email, Klaviyo and similar tools:- Browsing win-back email — Trigger on the
magic-session-abandonertag with email consent subscribed. Wait 2 hours, then send a “still thinking about it?” email featuring the collection they browsed. Low intent — one message, no discount. - Cart reminder with a nudge — Segment on
magic-cart-abandonerwith no order in the last day. Send a reminder at 1 hour, then an offer at 24 hours if there is still no order. Medium intent — the second message earns the discount. - Checkout abandoner SMS — Segment on
magic-checkout-abandonerwith SMS consent subscribed. Send an SMS with the store link within 30 minutes. Highest intent — speed beats incentive. - Stop double-contact after recovery — Trigger on order created with the
magic-agent-placedtag. Add amagic-recoveredcustomer tag (one you create in this flow, not a tag Razorpay applies) and excludemagic-recoveredfrom flows 1–3, so an agent recovery and an automated nudge don’t both land on the same shopper. - Recovered-revenue report — In Shopify, filter Orders by the
magic-agent-placedtag and export. This is the revenue your recovery team produced, in your own numbers. - Retargeting audiences — Use
magic-cart-abandonerormagic-checkout-abandoneras high-intent retargeting audiences, andmagic-session-abandoneras a low-cost prospecting or lookalike seed.
Rules to Follow
- Consent first. Tags identify; consent permits. Always check marketing consent before a flow sends — a flow that ignores consent is a compliance risk.
- Don’t over-contact Browsing abandoners. One message. They showed the least intent.
- Tags accumulate. A shopper can carry more than one abandoner tag. Flows should key on the highest-intent tag present.
- Tag names are stable. These tags are a public interface and will not be renamed, so you can safely build long-lived segments and flows on them.
Export to CSV
You can export the filtered list to CSV, as before. The export now includes a journey-type column so you can distinguish Browsing, Cart and Checkout rows offline. The file also carries a note about the date from which Browsing and Cart data is available for your store.Reach WhatsApp and CRM Partners Automatically
The same journeys you see in Abandoned Sessions can be pushed to your retargeting partners as events, using Magic Webhooks:Retargeting webhooks are coming soon.Only
checkout.abandoned is live today. The new retargeting events for the Browsing and Cart journeys — cart.abandoned and cart.session_abandoned — are coming soon; this page will be updated once they are released. Until then, the setup guide below covers the existing abandoned-checkout webhook only.Availability
- Platform: Shopify stores only. On other platforms, abandoned checkouts continue to work as before; Browsing and Cart journeys are not available.
- Data: Browsing and Cart data is available from the day the feature is enabled on your store. Checkout history is unchanged.