

GST registration process is conducted online and must be completed on the official GST Portal. Any business that supplies services with an annual turnover exceeding Rs. 20 lakh (or Rs. 10 lakh if the business is located in the States of Manipur, Mizoram, Nagaland, and Tripura) is required to undergo GST registration.
Similarly, any business that supplies goods exceeding Rs. 40 lakh (or Rs. 20 lakh if the business is located in the States of Arunachal Pradesh, Manipur, Meghalaya, Mizoram, Nagaland, Puducherry, Sikkim, Telangana, Tripura, and Uttarakhand) must also undergo GST registration.
Read More: GST Registration Rules and Benefits
Table of Contents
Latest Updates on GST Registration Process Online
As per CGST notification no. 13/2024 notified from CBIC dated 10th July 2024
1. Biometric-based Aadhaar Authentication for GST registration, earlier implemented on a pilot basis in Gujarat and Puducherry, has now been extended to the whole of India.
As per CGST notification no. 12/2024 notified from CBIC dated 10th July 2024
2. In cases where applicants do not opt for Aadhaar Authentication, they must submit a photograph of the individual applicant or such individuals in relation to the applicant and get the original documents verified at one of the designated facilitation centres.
A Step-by-Step Guide to the GST Registration Process
New GST Registration procedure is easy and free. A taxpayer seeking a normal registration can visit the GST portal and fill the registration Form GST REG-01.
Registering for Goods and Services Tax (GST) online is a straightforward process that involves a few key steps.
Here’s a comprehensive, step-by-step guide to help you navigate through the GST registration process seamlessly.
STEP 1: Access the GST Portal
Go to the official GST Portal
STEP 2: Click on “Register Now”
Click on “Registration” under the “Services” tab and then click on “New registration”.
 The application form is divided into 2 parts – Part A and Part B.
Part A
STEP 3: Select Taxpayer
Select the ‘Taxpayer’ as the type of taxpayer from the ‘I am a’ drop-down list.
STEP 4: Select State/UT and District
From the State/UT and District drop-down list, select the state and district for which registration is required.
STEP 5: Enter Business Name
In the Legal Name of the Business field, enter the legal name of the business/ entity as mentioned in the PAN database.
STEP 6: Enter PAN Number
In the Permanent Account Number (PAN) field, enter PAN of the business or PAN of the Proprietor.
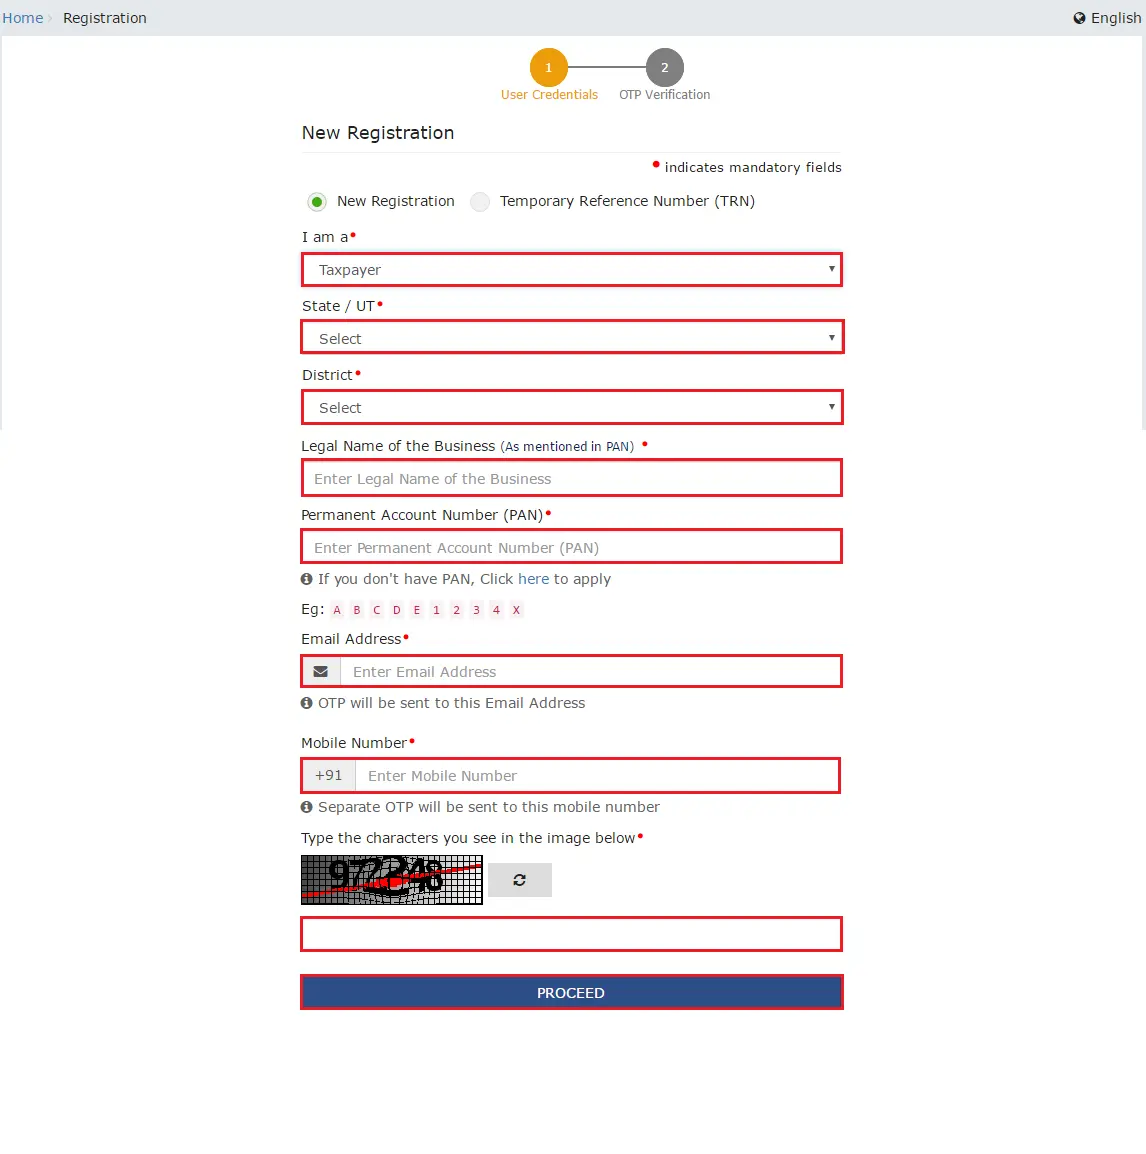
STEP 7: Enter Email Address
In the email address field, enter the email address of the primary authorised signatory.
STEP 8: Enter Mobile Number
In the mobile number field, enter the valid mobile number of the primary authorised signatory.
STEP 9: Enter Captcha
Enter the captcha and click the ‘Proceed’ button.
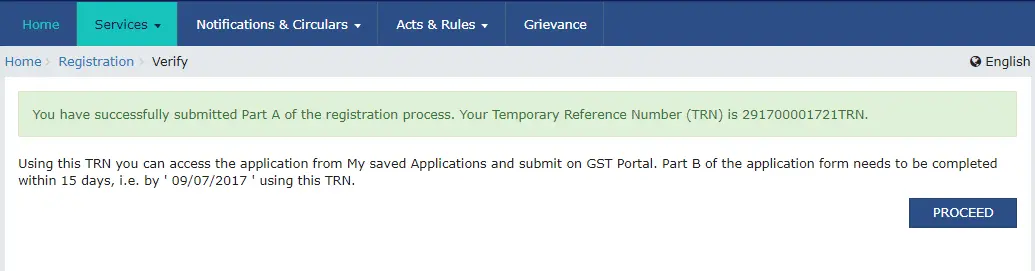
STEP 10: Temporary Reference Number (TRN)
After completing the process, move to Part B. After verification, you will receive a Temporary Reference Number (TRN). The TRN will be sent to the registered email address and mobile number.
Part B
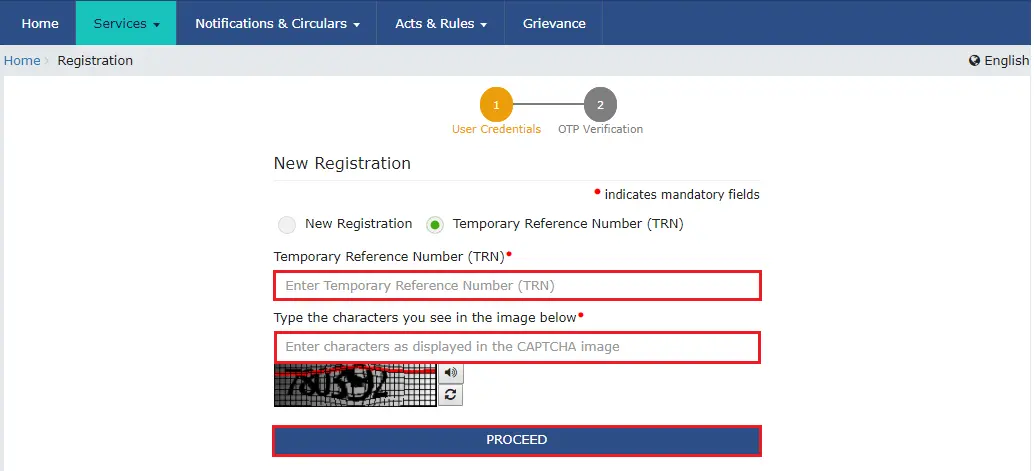
STEP 11: Log in Using TRN
Click on ‘Services’ > ‘Registration’ > ‘New Registration’ option and select the Temporary Reference Number (TRN) button to log in using the TRN.
STEP 12: Enter TRN Generated Captcha
In the TRN field, enter the TRN generated and the captcha text shown on the screen. Then, click on “Proceed”.
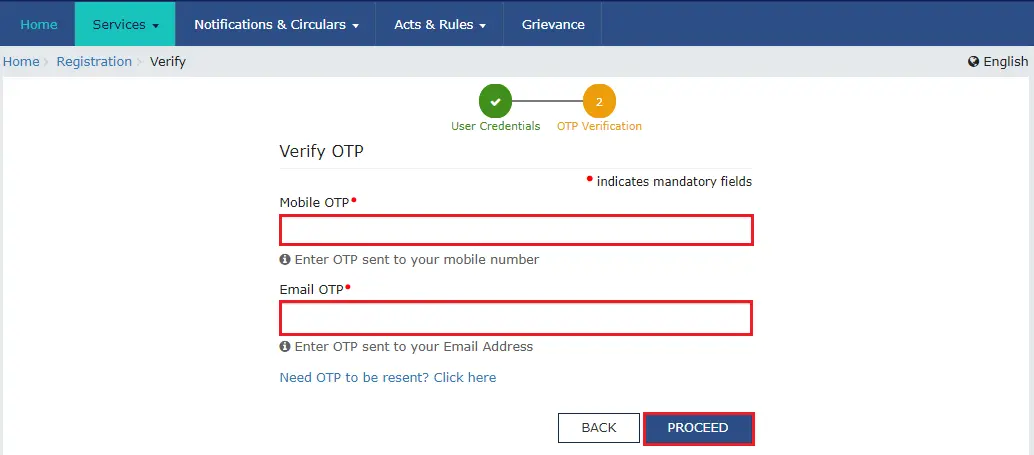
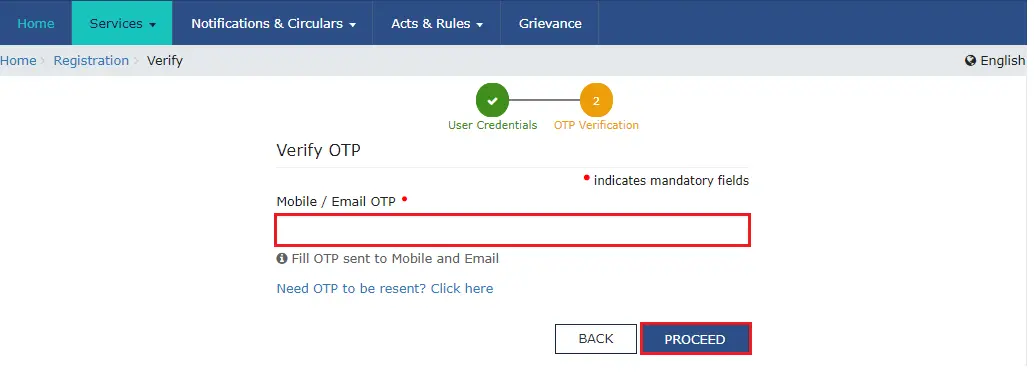
STEP 13: Enter OTP
Enter OTP sent on mobile or email in the verify OTP page. And, click on the ‘Proceed’ button.
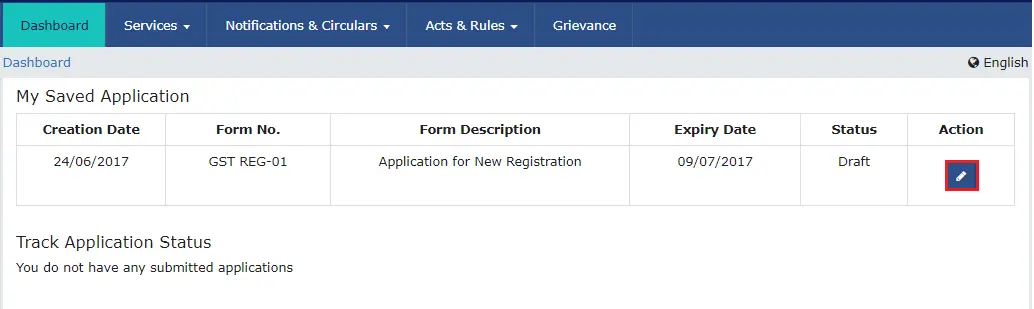
STEP 14: My Saved Application
The My Saved Application page is displayed. Under the Action column, click the Edit icon.
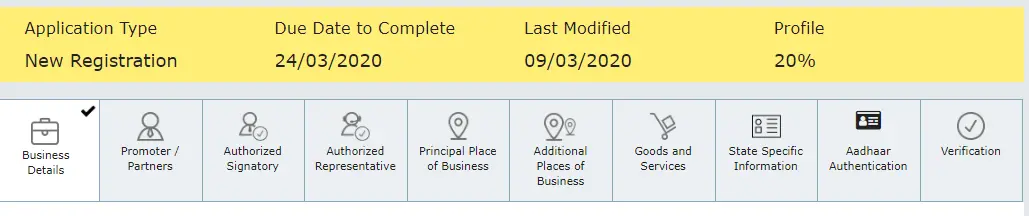
STEP 15: Enter Business Details
On the top of the page, registration application form with 10 tabs open. Click on each tab to enter the details like business details, promoter/partner details, authorised signatory, principal & additional place of business, goods & services detail, state information, aadhaar authentication and verification.
STEP 16: Click On Save and Continue
Now click on ‘Save and continue’. Once the application is submitted, sign it digitally using DSC and click on ‘Proceed’
STEP 17: Receive an ARN
After submission, you will receive an Application Reference Number (ARN) via email or SMS to confirm your registration.

Related Read: GST Registration Limits: Threshold limit for GST Registration for 2025
GST Registration Via Authentication of Aadhaar
Here’s a step-by-step guide for GST registration via authentication of Aadhaar
STEP 1: Access the GST Portal
Open your web browser and navigate to GST Portal
STEP 2: Initiate Registration Process
Click on the “REGISTER NOW” link on the GST portal homepage, or alternatively, navigate to Services > Registration > New Registration.
STEP 3: Choose Aadhaar Authentication Option
During the registration process, opt for Aadhaar authentication by selecting the Aadhaar Authentication Tab.
STEP 4: Indicate Preference
You’ll be prompted to indicate whether you wish to authenticate your Aadhaar or not. Choose either YES or NO based on your preference.
STEP 5: Authentication Link Generation
If you opt for YES, an authentication link will be sent to the to the registered mobile numbers and email addresses of the Promoters/Partners and Authorized Signatories.
STEP 6: Declaration and Aadhaar Entry
Upon clicking the authentication link, a declaration will appear on the screen. Enter your Aadhaar number and click on “validate”.
STEP 7: OTP Verification
After entering the Aadhaar number, an OTP will be sent to the email and registered mobile number. Enter the OTP in the provided box on the validation screen.
STEP 8: Confirmation
After OTP verification, a confirmation message will appear indicating successful authentication.
STEP 9: Ensure Updated Details:
It’s essential to ensure that your registered mobile numbers and email addresses are updated in Aadhaar for successful authentication.
STEP 10: Verification Process
If you choose NO for Aadhaar Authentication, the GST registration application will be forwarded to the jurisdictional tax authority. They will conduct further steps, including documentary and/or physical site verification, before approving the registration.
STEP 11: Approval Timeframe
If no action is taken by the Tax Authority within 21 days, the GST registration application will be considered approved.
Conclusion
A new GST registration process is crucial for businesses. With a clear understanding of the steps and the procedure involved, compliance becomes seamless. Stay informed, follow the guidelines, and ensure a smooth registration to enjoy the benefits of a transparent and legally compliant business operation.
FAQs
1. Is it mandatory to register for GST online, or can I register offline?
Although registration can be completed through both online and offline channels, the online method is typically favored due to its convenience and effectiveness. Nonetheless, offline registration alternatives exist for individuals who may lack internet access or encounter technical difficulties.
2. How much does GST registration cost?
There is no payable fee upon registering for GST
3. What are the 3 types of GST registration?
The three types of GST registration are:
- Regular taxpayer registration: This type of registration is for businesses whose turnover exceeds the threshold limit set by the GST Council.
- Composition scheme registration: This is for small businesses with a turnover below the threshold limit who opt for the composition scheme, which offers simplified compliance and a lower tax rate.
- GST registration as a casual taxpayer: This is for businesses or individuals who occasionally undertake transactions liable for GST but do not have a regular place of business in the taxable territory.
4. Can I register for GST online if my business operates in multiple states?
Yes, you can register for GST online even if your business operates in multiple states. The online registration process allows you to specify the states in which your business operates and complete the registration accordingly.
5. How long does it take to complete the GST registration process online?
Generally, The entire process of GST registration, including the issuance of the GST number, typically spans from 7 to 10 business days. The duration can vary depending on factors such as the completeness of information provided, verification processes, and workload at the GST authorities.
6. Do I need a digital signature for GST registration online?
Yes, According to GST regulations, all documentation submitted to the government, such as GST registration applications or files uploaded to the GST common portal, must bear digital signatures.
7. Can I track the status of my GST registration application online?
Yes, you can track the status of your GST registration application online using the Application Reference Number (ARN) provided upon submission. The GST portal allows you to check the status in real-time.


