

Available in🇮🇳 India🇲🇾 Malaysia🇸🇬 Singapore
Follow these steps to integrate your Flutter application with the Razorpay Payment Gateway:
1.1 Install Razorpay Flutter Plugin.
1.2 Add Dependencies.
1.3 Import Package.
1.4 Create Razorpay instance.
1.5 Attach Event Listeners.
1.6 Create an Order in Server.
1.7 Add Checkout Options.
1.8 Open Checkout.
1.9 Store Fields in Your Server.
1.10 Verify Payment Signature.
1.11 Verify Payment Status.
Handy TipsAfter you complete the integration:
- Set up webhooks
- Make test payments
- Replace Test API keys with Live API keys
- Integrate with other APIs
Refer to the post-integration steps.
1.1 Install Razorpay Flutter Plugin
Download the plugin from Pub.dev.1.2 Add Dependencies
Add the below code todependencies in your app’s pubspec.yaml:
Add Dependencies
Add Proguard Rules (Android Only)
If you are using Proguard for your builds, you need to add the following lines to the Proguard files:Add Proguard Rules
Get Packages
Runflutter packages get in the root directory of your app.
Handy Tips
- For Android, ensure that the minimum API level for your app is 19 or higher.
- For iOS, ensure that the minimum deployment target for your app is iOS 10.0 or higher. Also, do not forget to enable bitcode for your project.
1.3 Import Package
Use the below code to import therazorpay_flutter_customui.dart file to your project:
Import Package
1.4 Create Razorpay instance
For Android, use the below code to create a Razorpay instance:Instantiate
Initialise and Instantiate
1.5 Attach Event Listeners
The plugin uses event-based communication and emits events when payments fail or succeed.- The event names are exposed via the constants
EVENT_PAYMENT_SUCCESSandEVENT_PAYMENT_ERRORfrom theRazorpayclass. - Use the
on(String event, Function handler)method on the Razorpay instance to attach event listeners.
Attach Event Listeners
Handlers
1.6 Create an Order in Server
Order is an important step in the payment process.- An order should be created for every payment.
- You can create an order using the Orders API. It is a server-side API call. Know how to authenticate Orders API.
- The
order_idreceived in the response should be passed to the checkout. This ties the order with the payment and secures the request from being tampered.
API Sample Code
Use this endpoint to create an order using the Orders API.POST /orders
Request Parameters
Request Parameters
amount mandatory
: integer Payment amount in the smallest currency subunit. For example, if the amount is ₹500, enter 50000.currency mandatory
: string The currency in which the payment should be made by the customer. Length must be of 3 characters.receipt optional
: string Your receipt id for this order should be passed here. Maximum length is 40 characters.notes optional
: json object Key-value pair that can be used to store additional information about the entity. Maximum 15 key-value pairs, 256 characters (maximum) each. For example, "note_key": "Beam me up Scotty”.partial_payment optional
: boolean Indicates whether the customer can make a partial payment. Possible values:true: The customer can make partial payments.false(default): The customer cannot make partial payments.
first_payment_min_amount optional
: integer Minimum amount that must be paid by the customer as the first partial payment. For example, if an amount of ₹7000 is to be received from the customer in two installments of #1 - ₹5000, #2 - ₹2000 then you can set this value as 500000. This parameter should be passed only if partial_payment is true.Know more about Orders API.Response Parameters
Response Parameters
Descriptions for the response parameters are present in the Orders Entity parameters table.
Error Response Parameters
Error Response Parameters
The error response parameters are available in the API Reference Guide.
1.7 Add Checkout Options
Pass the Checkout options. Ensure that you pass theorder_id that you received in the response of the previous step.
Checkout Options
key mandatory
: string API Key ID generated from the Razorpay Dashboard.
amount mandatory
: integer The amount to be paid by the customer in currency subunits. For example, if the amount is ₹100, enter 10000.
currency mandatory
: string The currency in which the payment should be made by the customer.
description optional
: string Description of the product shown in the Checkout form. It must start with an alphanumeric character.
image optional
: string Link to an image (usually your business logo) shown in the Checkout form. Can also be a base64 string, if loading the image from a network is not desirable.
order_id mandatory
: string Order ID generated via the Orders API.
notes optional
: object Set of key-value pairs that can be used to store additional information about the payment. It can hold a maximum of 15 key-value pairs, each 256 characters long (maximum).
method mandatory
: string The payment method used by the customer on Checkout. Possible values:
card(default)fpx(default)wallet(default)
card mandatory if method=card
: object The details of the card that should be entered while making the payment.
number
: integer Unformatted card number.
name
: string The name of the cardholder.
expiry_month
: integer Expiry month for card in MM format.
expiry_year
: integer Expiry year for card in YY format.
cvv
: integer CVV printed on the back of the card.
bank mandatory if method=fpx
: string Bank code. List of available banks enabled for your account can be fetched via methods.
wallet mandatory if method=wallet
: string Wallet code for the wallet used for the payment. Possible values:
touchngo(default)grabpay(default)
callback_url optional
: string Customers will be redirected to this URL on successful payment. Ensure that the domain of the Callback URL is whitelisted. This parameter is mandatory for FPX payments.
redirect optional
: boolean Determines whether to post a response to the event handler post payment completion or redirect to Callback URL. callback_url and redirect parameters are mandatory for FPX payments. Possible values:
true: Customer is redirected to the specified callback URL in case of payment failure. For FPX payments, theredirectparameter should always be sent astrue.false(default): Customer is not redirected to the specified callback URL.
1.8 Open Checkout
Use the below code to open the Razorpay checkout:Open Razorpay Checkout
1.9 Store Fields in Your Server
A successful payment returns the following fields to the Checkout form.Success Callback
Success Callback
- You need to store these fields in your server.
- You can confirm the authenticity of these details by verifying the signature in the next step.
razorpay_payment_id
: string Unique identifier for the payment returned by Checkout only for successful payments.razorpay_order_id
: string Unique identifier for the order returned by Checkout.razorpay_signature
: string Signature returned by the Checkout. This is used to verify the payment.1.10 Verify Payment Signature
This is a mandatory step to confirm the authenticity of the details returned to the Checkout form for successful payments.To verify the razorpay_signature returned to you by the Checkout form:
To verify the razorpay_signature returned to you by the Checkout form:
-
Create a signature in your server using the following attributes:
order_id: Retrieve theorder_idfrom your server. Do not use therazorpay_order_idreturned by Checkout.razorpay_payment_id: Returned by Checkout.key_secret: Available in your server. Thekey_secretthat was generated from the Dashboard.
-
Use the SHA256 algorithm, the
razorpay_payment_idand theorder_idto construct a HMAC hex digest as shown below:
HMAC Hex Digest
- If the signature you generate on your server matches the
razorpay_signaturereturned to you by the Checkout form, the payment received is from an authentic source.
Generate Signature on Your Server
Generate Signature on Your Server
Given below is the sample code for payment signature verification:
Post Signature Verification
Post Signature Verification
After you have completed the integration, you can set up webhooks, make test payments, replace the test key with the live key and integrate with other APIs.
M1 MacBook Changes
If you use M1 MacBook, you need to make the following changes in your podfile.Handy TipsAdd the following code inside
post_install do |installer|.podfile
1.8 Verify Payment Status
Handy TipsOn the Razorpay Dashboard, ensure that the payment status is
captured. Refer to the payment capture settings page to know how to capture payments automatically.You can track the payment status in three ways:
You can track the payment status in three ways:
- Verify Status from Dashboard
- Subscribe to Webhook Events
- Poll APIs
To verify the payment status from the Razorpay Dashboard: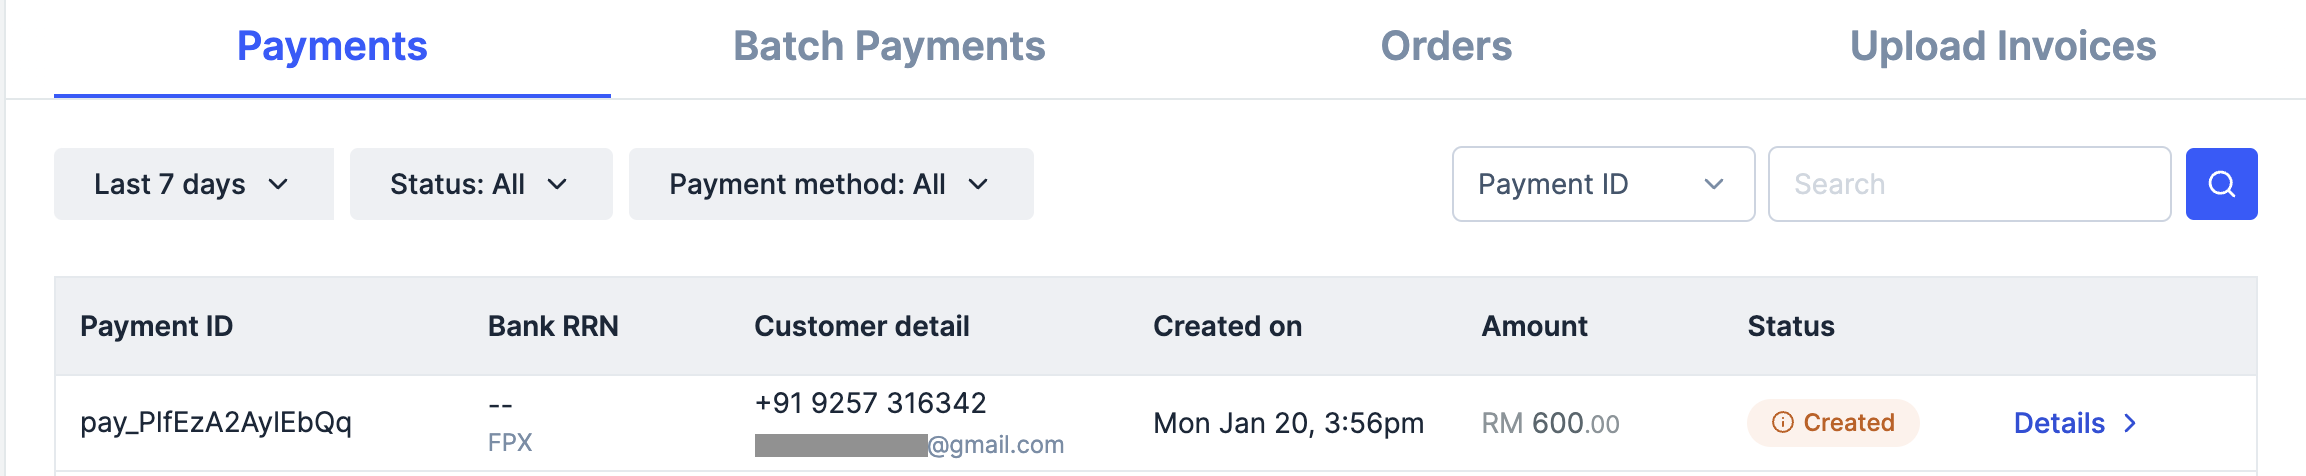
- Log in to the Razorpay Dashboard and navigate to Transactions → Payments.
- Check if a Payment Id has been generated and note the status. In case of a successful payment, the status is marked as Captured.