> ## Documentation Index
> Fetch the complete documentation index at: https://razorpay-881012b3.mintlify.site/llms.txt
> Use this file to discover all available pages before exploring further.
# Add Submerchants from Dashboard
> Invite submerchants using email IDs from the Razorpay Partner Dashboard.
Available in
🇮🇳 India
You can invite submerchants for different apps from the Partner Dashboard.
**Feature Request**
This is an on-demand feature. Please raise a request with your Razorpay point-of-contact to get it activated on your Razorpay account.
You can send an invite link to an individual account or multiple accounts.
## Add One Sub-Merchant
To invite a new sub-merchant using email ID:
1. Log in to the Dashboard.
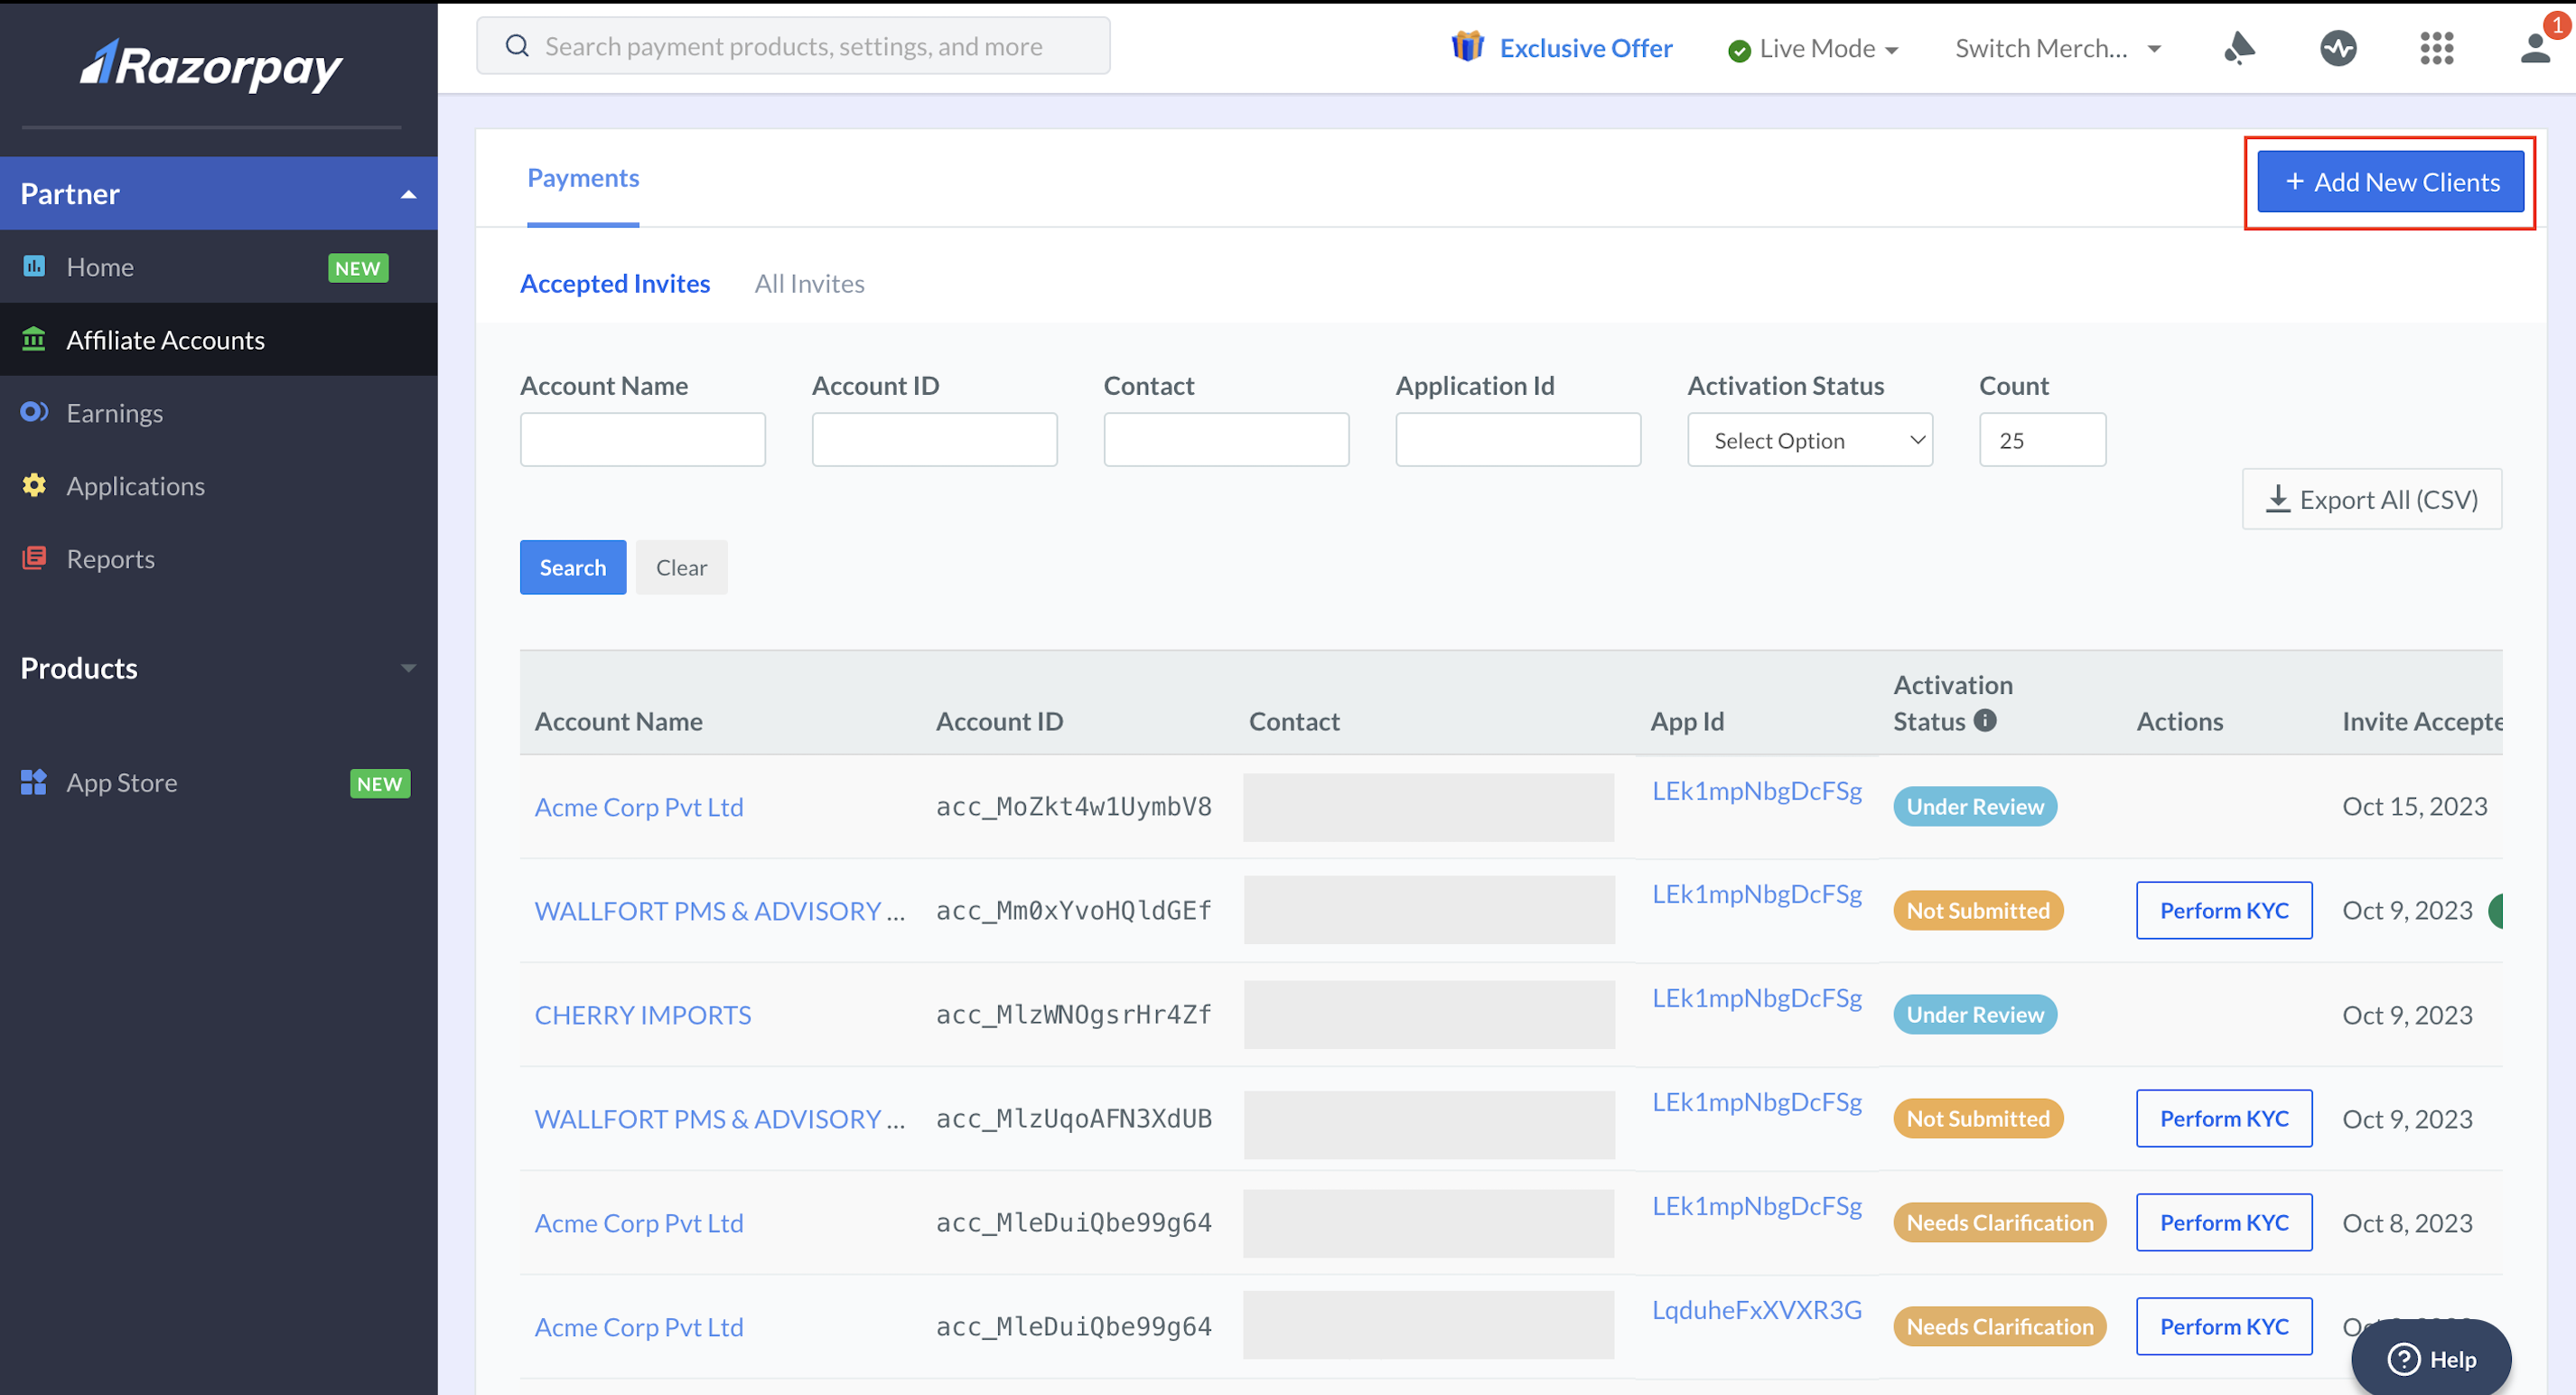
2. Click **Partner** and navigate to **Affiliate Accounts**.
3. Select the **Payments** or **RazorpayX** tab depending on the product you want to refer a client to.
4. Click **+ Add New Clients**.
 5. Select the app for which you want to add a client.
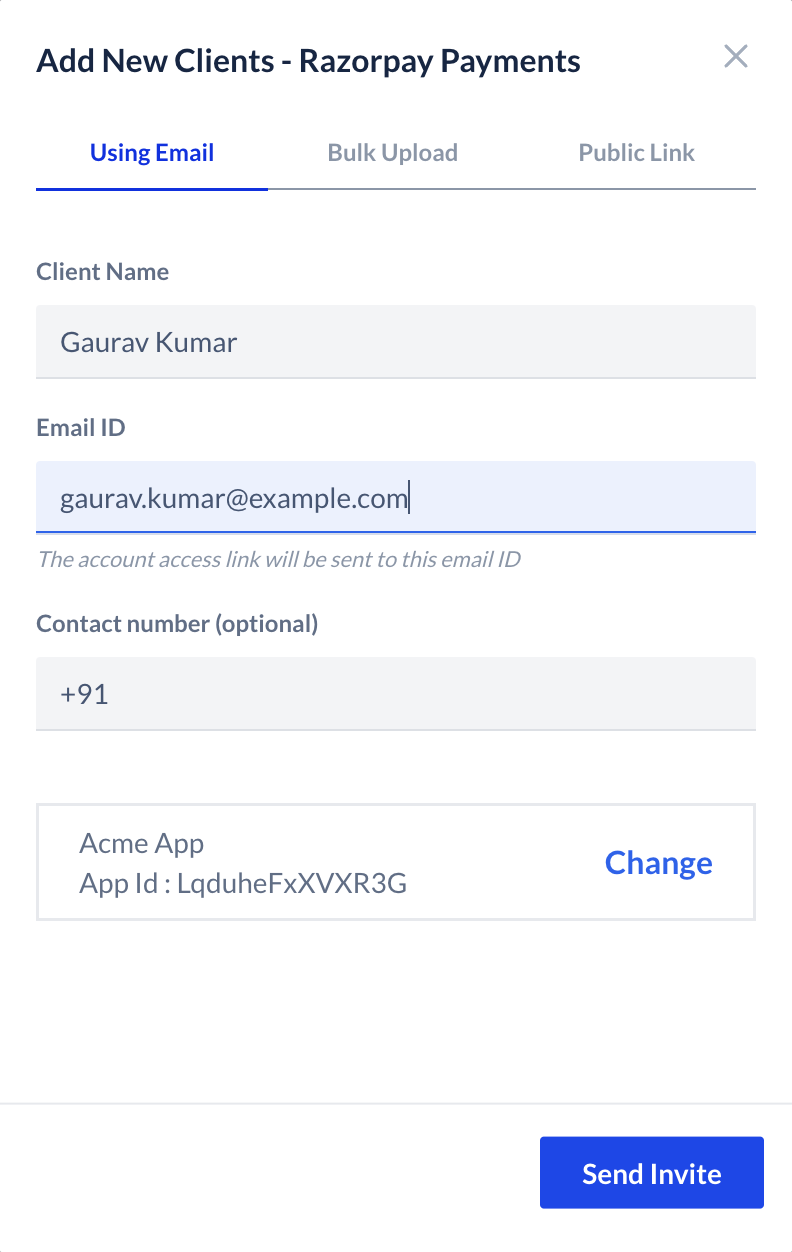
6. Under the **Using Email** tab, enter your contact's details. Click **Send Invite**.
5. Select the app for which you want to add a client.
6. Under the **Using Email** tab, enter your contact's details. Click **Send Invite**.
 ## Bulk Upload Sub-Merchants
You can send invites to multiple users using the **Bulk Upload** option. Upload an XLSX or CSV file with the Dashboard's required data.
This sends a single sign up invitation link to multiple affiliate accounts in bulk. This enables your sub-merchants to sign up and register on Razorpay.
### Bulk Upload Template
To view and understand the file format requirements, download the [sample template](https://razorpay.com/docs/build/browser/assets/images/sample_invite_submerchant_batch.xlsx). The account creation template contains the following headers.
`account_name` *optional*
: Name of the sub-merchant's account.
`email` *mandatory*
: The Email address of the sub-merchant.
**Watch Out!**
* Do not modify field names/headers (`account_name` and `email`) in a batch as it might result in an upload failure.
* There should be **only 1** sheet in the file.
* The size of the file can be up to 50 MB. You can add up to 5,000 rows in a particular file. The links will be processed in the same sequence as listed in the file.
To add multiple accounts using the bulk upload template:
1. Log in to the Dashboard.
2. Click **Partner** and navigate to **Affiliate Accounts**.
3. Select the **Payments** or **RazorpayX** tab depending on the product you want to refer a client to.
4. Click **+ Add New Clients**.
5. Select the app for which you want to add a client.
6. Shift to the **Bulk Upload** tab.
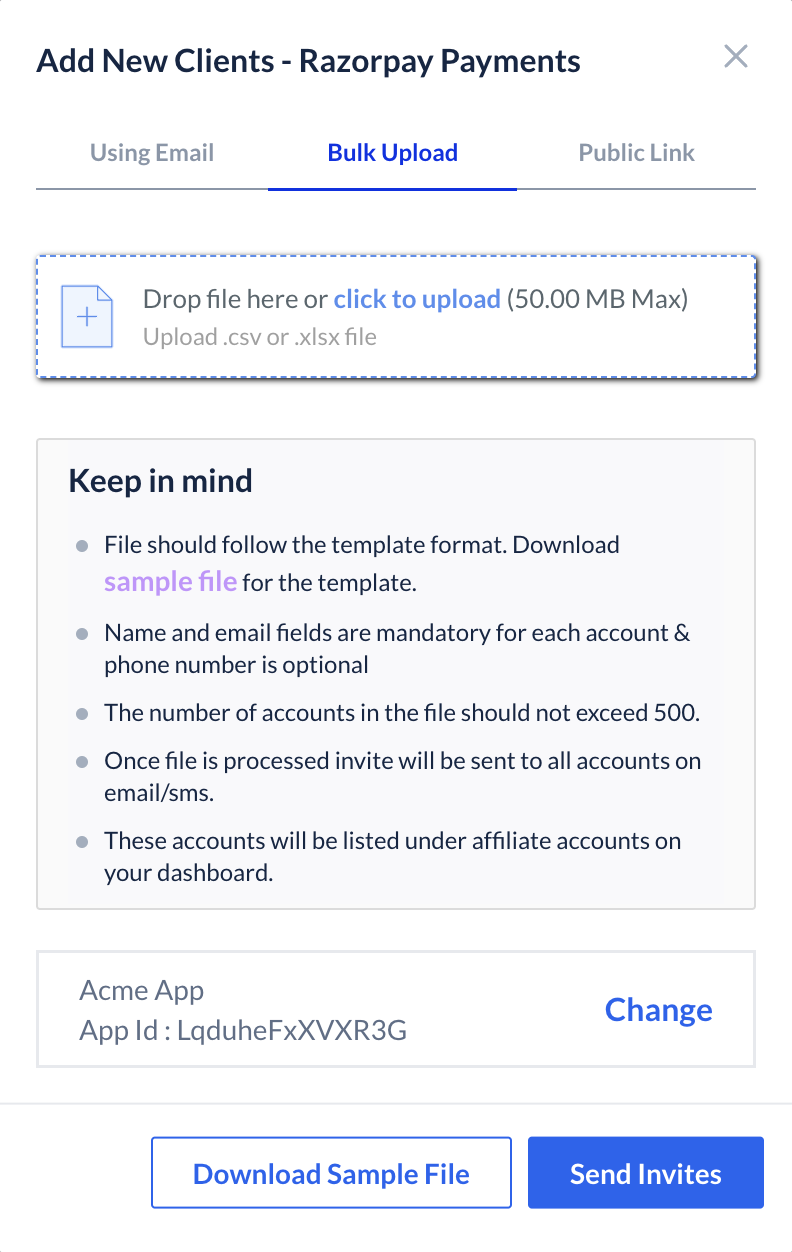
7. Upload the file. You can drag and drop or **click to upload**.
## Bulk Upload Sub-Merchants
You can send invites to multiple users using the **Bulk Upload** option. Upload an XLSX or CSV file with the Dashboard's required data.
This sends a single sign up invitation link to multiple affiliate accounts in bulk. This enables your sub-merchants to sign up and register on Razorpay.
### Bulk Upload Template
To view and understand the file format requirements, download the [sample template](https://razorpay.com/docs/build/browser/assets/images/sample_invite_submerchant_batch.xlsx). The account creation template contains the following headers.
`account_name` *optional*
: Name of the sub-merchant's account.
`email` *mandatory*
: The Email address of the sub-merchant.
**Watch Out!**
* Do not modify field names/headers (`account_name` and `email`) in a batch as it might result in an upload failure.
* There should be **only 1** sheet in the file.
* The size of the file can be up to 50 MB. You can add up to 5,000 rows in a particular file. The links will be processed in the same sequence as listed in the file.
To add multiple accounts using the bulk upload template:
1. Log in to the Dashboard.
2. Click **Partner** and navigate to **Affiliate Accounts**.
3. Select the **Payments** or **RazorpayX** tab depending on the product you want to refer a client to.
4. Click **+ Add New Clients**.
5. Select the app for which you want to add a client.
6. Shift to the **Bulk Upload** tab.
7. Upload the file. You can drag and drop or **click to upload**.
 8. The file is validated for any associated errors and uploaded to the Razorpay server. Click **Next**.
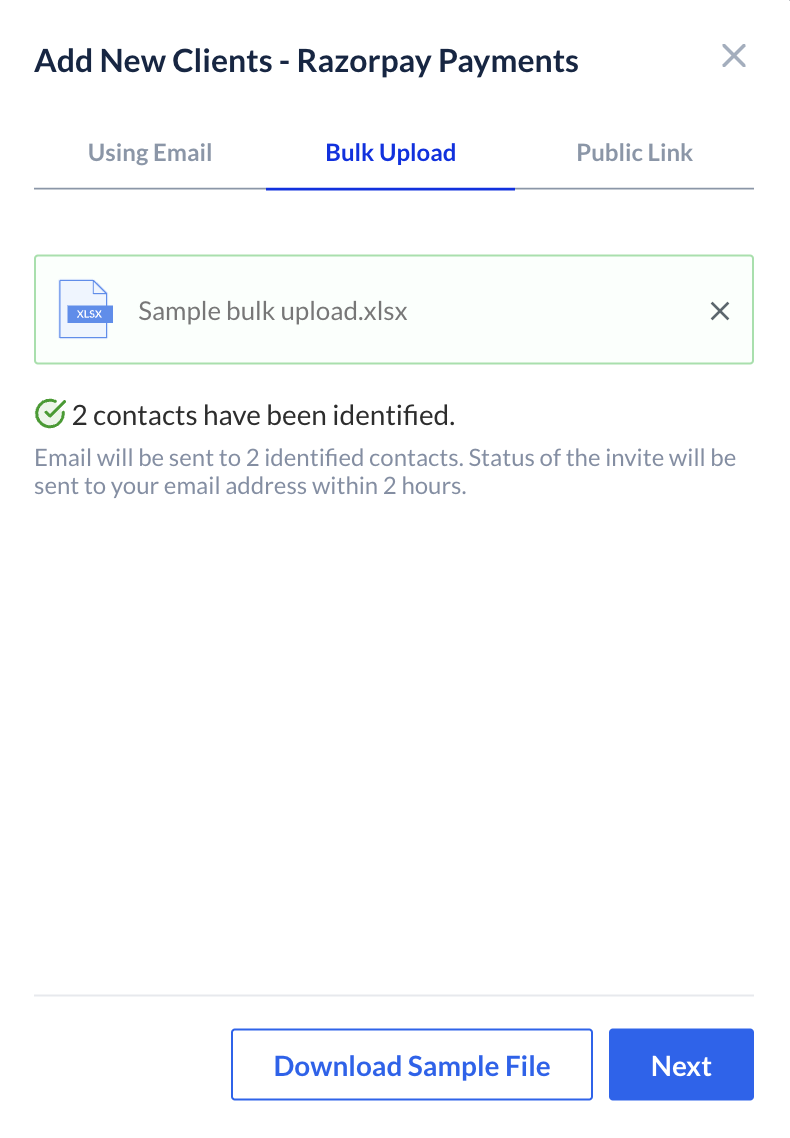 Once the file is successfully processed, you will receive the account creation status via email. The email attachment will include both success and/or failure details for each account, including the error code and exact reason for the failure.
## Add Sub-Merchants Using a Referral Link
Share a referral link with potential sub-merchants via social media or instant messengers. You can also copy the referral link and send it via email.
To add sub-merchants using a referral link:
1. Log in to the Dashboard.
2. In the **Partner** section, navigate to **Affiliate Accounts**.
3. Select the **Payments** or **RazorpayX** tab depending on the product you want to refer a client to.
4. Click **+ Add New Clients**.
5. Select the app for which you want to add a client.
6. Switch to the **Public Link** tab.
Once the file is successfully processed, you will receive the account creation status via email. The email attachment will include both success and/or failure details for each account, including the error code and exact reason for the failure.
## Add Sub-Merchants Using a Referral Link
Share a referral link with potential sub-merchants via social media or instant messengers. You can also copy the referral link and send it via email.
To add sub-merchants using a referral link:
1. Log in to the Dashboard.
2. In the **Partner** section, navigate to **Affiliate Accounts**.
3. Select the **Payments** or **RazorpayX** tab depending on the product you want to refer a client to.
4. Click **+ Add New Clients**.
5. Select the app for which you want to add a client.
6. Switch to the **Public Link** tab.
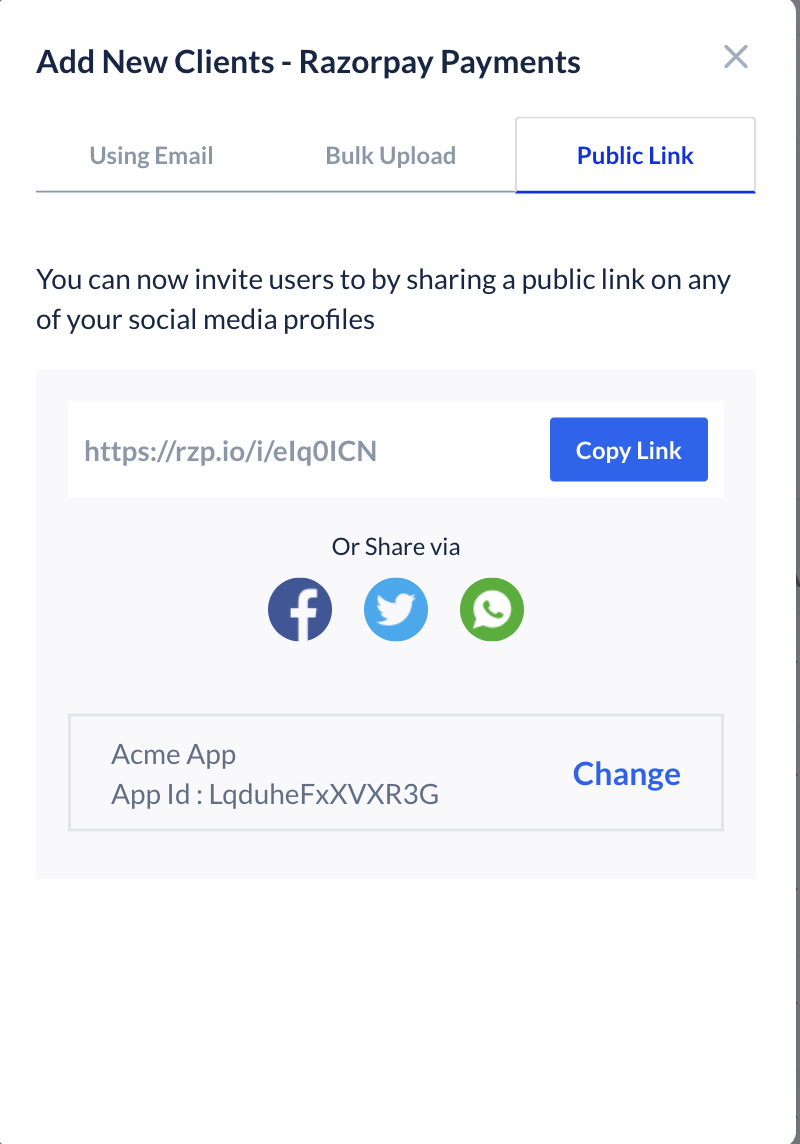 7. You can share the link using:
1. Copy button: This copies the referral link. You can copy-paste this link and send it via email or instant messaging apps such as WhatsApp.
2. Facebook: Click the Facebook icon to share the referral link as a post on your Facebook account.
3. Twitter: Click the Twitter icon to send a tweet with the referral link.
4. WhatsApp: Click the WhatsApp icon to send a message with the referral link.
Businesses can click on this referral link and sign up as an affiliate account. As a Service Partner, you will get 0.1% commission for every transaction done by the affiliate accounts who sign up using this link.
## Actions After Inviting
The actions after inviting differs based on the product referred.
* [Payments](#payments)
* [RazorpayX](#razorpayx)
### Payments
Your contact will receive an invite via email and SMS to create a Razorpay account. To get started, the contacts invited for `Payment` products, must proceed to create a Razorpay account and complete account activation and [KYC Verification](/docs/payments/set-up#2-submit-kyc-details).
The newly added Payments sub-merchants will appear on your list on the Partner Dashboard with a default **Activation Status** as **Not Submitted**.
Sub-merchants invited for `Payments` can be seen under **Payments**.
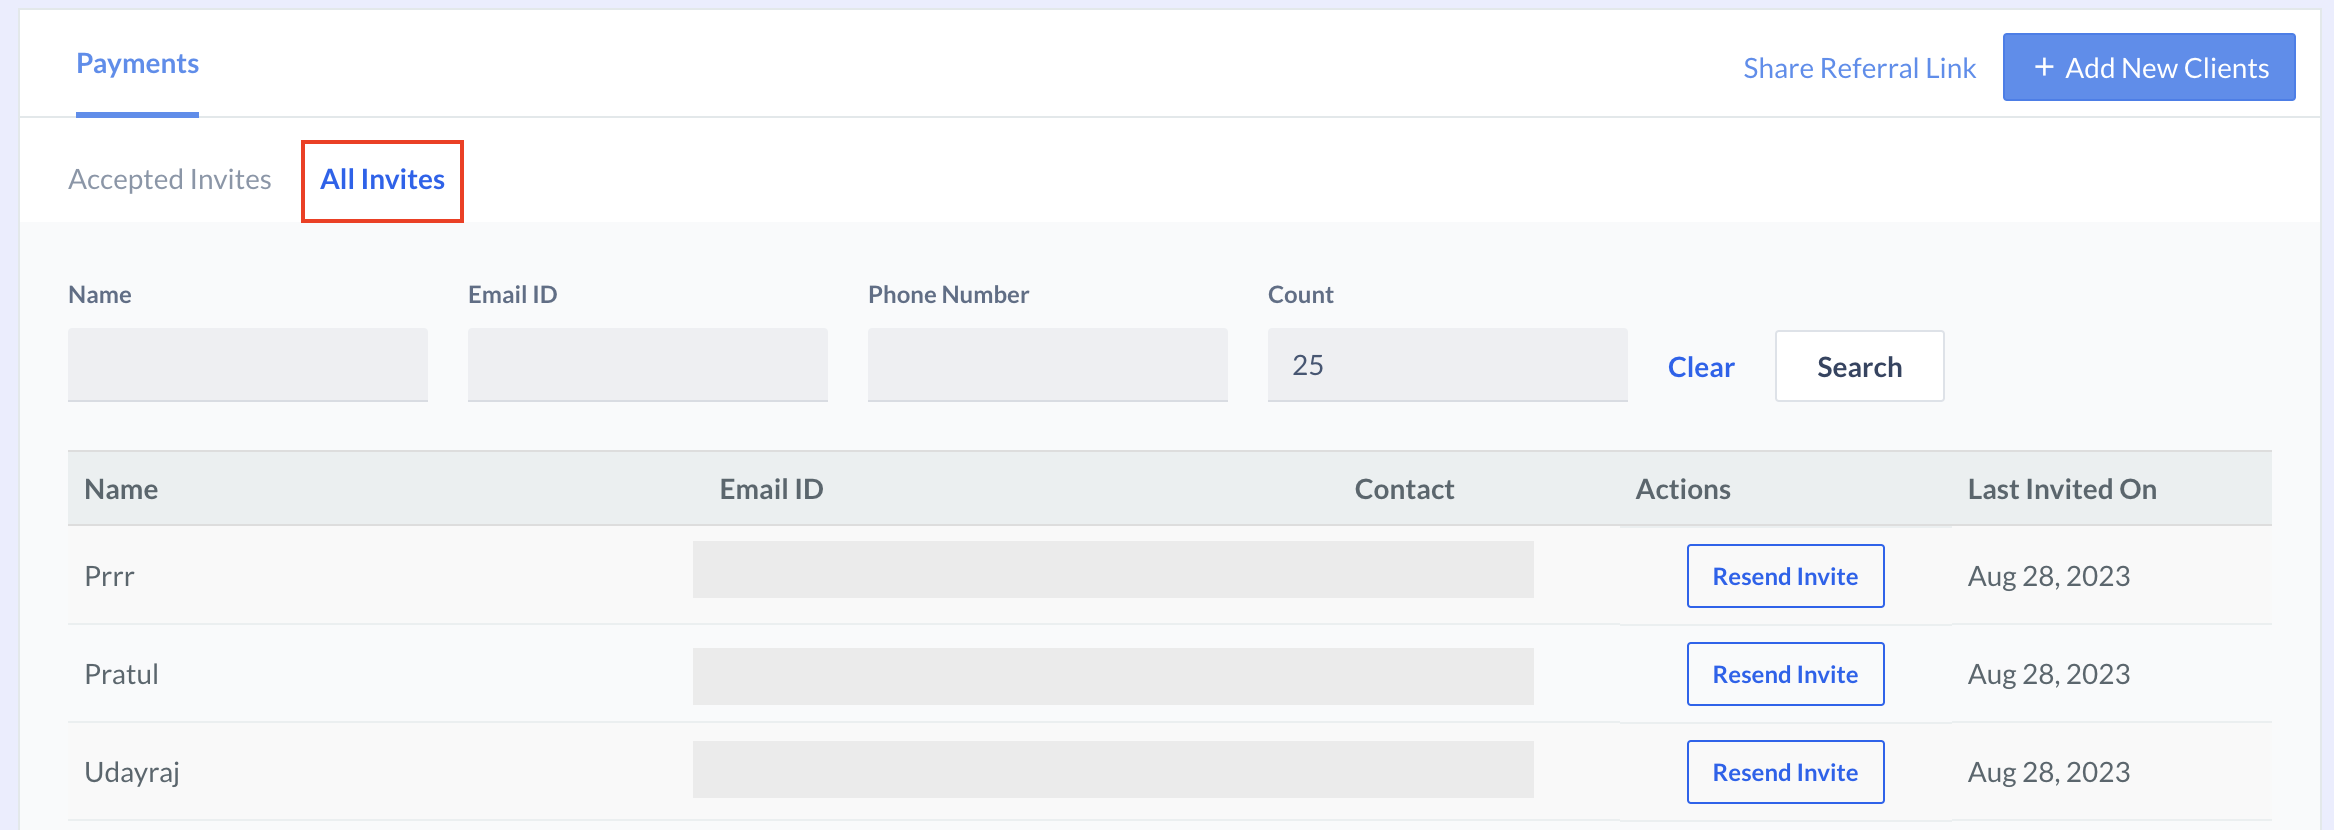
* You can check all the invites sent in the **All Invites** tab. Here you can resend invites to your contacts.
7. You can share the link using:
1. Copy button: This copies the referral link. You can copy-paste this link and send it via email or instant messaging apps such as WhatsApp.
2. Facebook: Click the Facebook icon to share the referral link as a post on your Facebook account.
3. Twitter: Click the Twitter icon to send a tweet with the referral link.
4. WhatsApp: Click the WhatsApp icon to send a message with the referral link.
Businesses can click on this referral link and sign up as an affiliate account. As a Service Partner, you will get 0.1% commission for every transaction done by the affiliate accounts who sign up using this link.
## Actions After Inviting
The actions after inviting differs based on the product referred.
* [Payments](#payments)
* [RazorpayX](#razorpayx)
### Payments
Your contact will receive an invite via email and SMS to create a Razorpay account. To get started, the contacts invited for `Payment` products, must proceed to create a Razorpay account and complete account activation and [KYC Verification](/docs/payments/set-up#2-submit-kyc-details).
The newly added Payments sub-merchants will appear on your list on the Partner Dashboard with a default **Activation Status** as **Not Submitted**.
Sub-merchants invited for `Payments` can be seen under **Payments**.
* You can check all the invites sent in the **All Invites** tab. Here you can resend invites to your contacts.
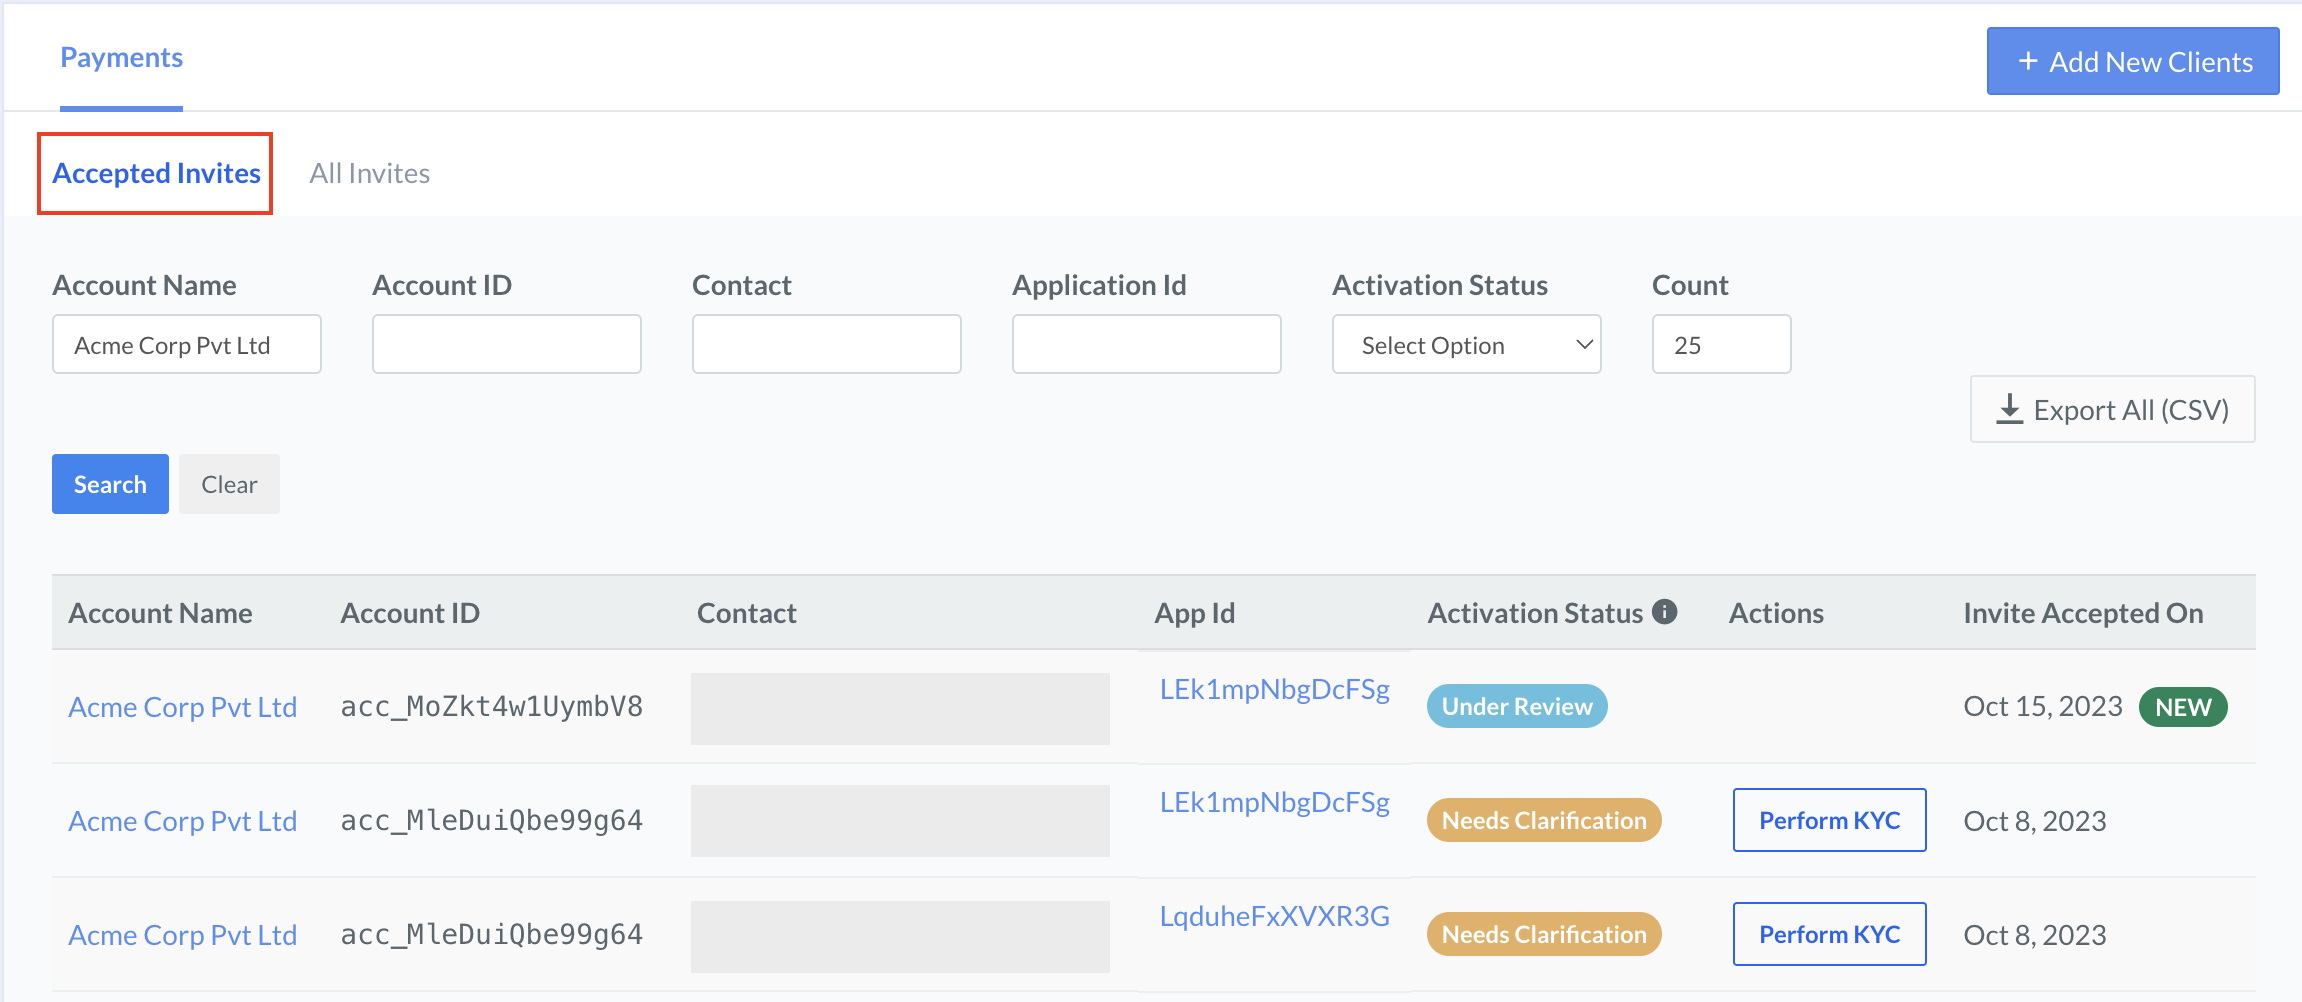
 * To see the contacts that have accepted your invite, switch to the **Accepted Invites** tab. Here you can check the activation status and request for KYC.
 You can use the `Switch` option to access the sub-merchant's account. Once you are on the sub-merchant's Dashboard, you can perform all the actions that the sub-merchant can perform. Know more about [switching to sub-merchant Dashboard](/docs/partners/technology-partners/onboard-businesses/add-on-features/switch-dashboard).
### RazorpayX
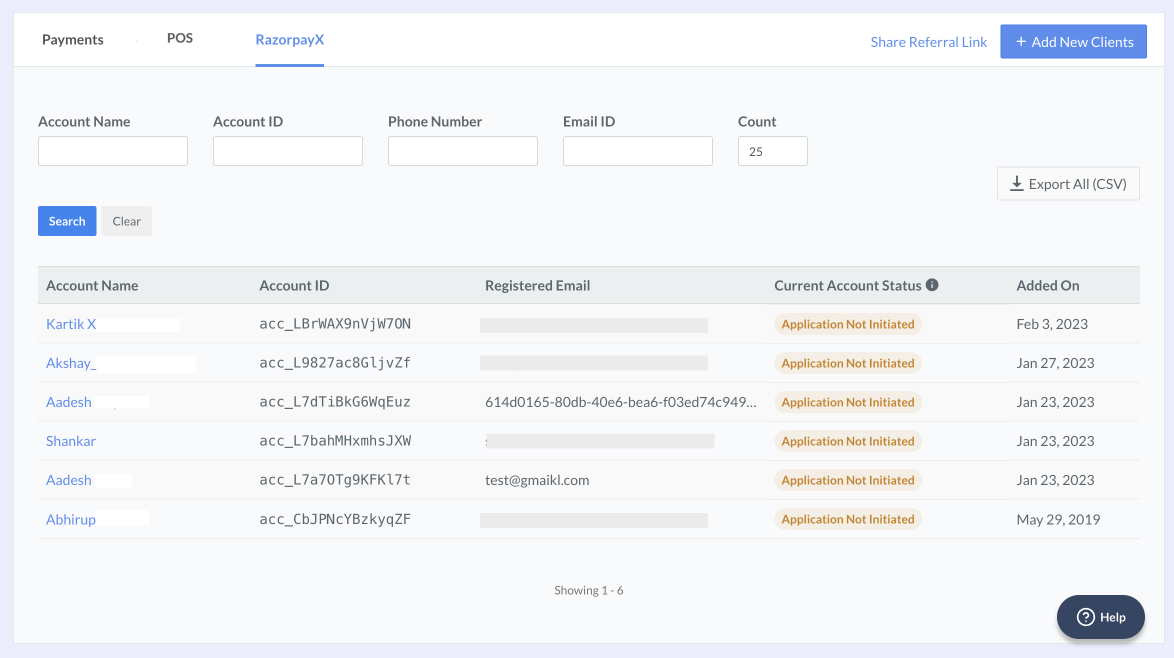
A RazorpayX affiliate will be displayed with a default CA status as **Application not initiated**. Sub-merchants referred for `RazorpayX powered Current Account` must log in to their [RazorpayX Dashboard](https://x.razorpay.com/auth) and initiate Current Account application.
Sub-merchants invited for `Current Account` can be seen under **RazorpayX**:
You can use the `Switch` option to access the sub-merchant's account. Once you are on the sub-merchant's Dashboard, you can perform all the actions that the sub-merchant can perform. Know more about [switching to sub-merchant Dashboard](/docs/partners/technology-partners/onboard-businesses/add-on-features/switch-dashboard).
### RazorpayX
A RazorpayX affiliate will be displayed with a default CA status as **Application not initiated**. Sub-merchants referred for `RazorpayX powered Current Account` must log in to their [RazorpayX Dashboard](https://x.razorpay.com/auth) and initiate Current Account application.
Sub-merchants invited for `Current Account` can be seen under **RazorpayX**:
 ### Related Information
* [About Embedded Payments](/docs/partners/technology-partners)
* [Perform Sub-merchant KYC](/docs/partners/technology-partners/onboard-businesses/add-on-features/perform-submerchant-kyc)
* [Switch to Sub-merchant Dashboard](/docs/partners/technology-partners/onboard-businesses/add-on-features/switch-dashboard)
### Related Information
* [About Embedded Payments](/docs/partners/technology-partners)
* [Perform Sub-merchant KYC](/docs/partners/technology-partners/onboard-businesses/add-on-features/perform-submerchant-kyc)
* [Switch to Sub-merchant Dashboard](/docs/partners/technology-partners/onboard-businesses/add-on-features/switch-dashboard)